Cut-down Chassis - All Andy’s & MIP Build

General discussion, builds/restorations, etc...

Moderators: scr8p, klavy69

User avatar
aeiou
Approved Member
Posts: 1071
Joined: Fri Apr 13, 2007 4:04 pm
Location: Atlanta, GA
Been thanked: 1 time

Cut-down Chassis - All Andy’s & MIP Build

Post by aeiou »

This build will use all Andy’s & MIP parts on a cut-down chassis, with a couple of custom parts thrown in for good measure. I’m using taller Andy’s molded shock towers as I plan to setup the shocks with additional travel. For shocks, I’m using 1.02” in the front and 1.32” in the rear.

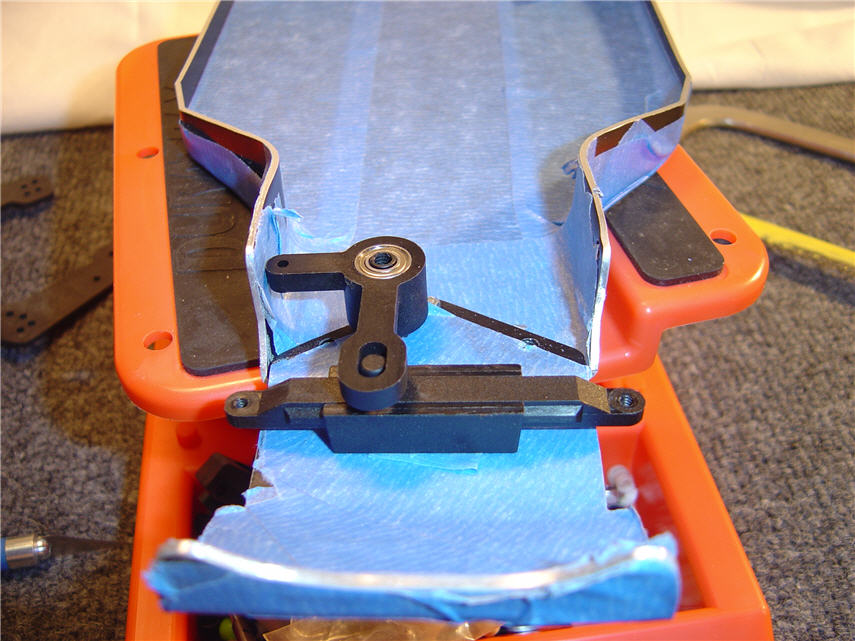
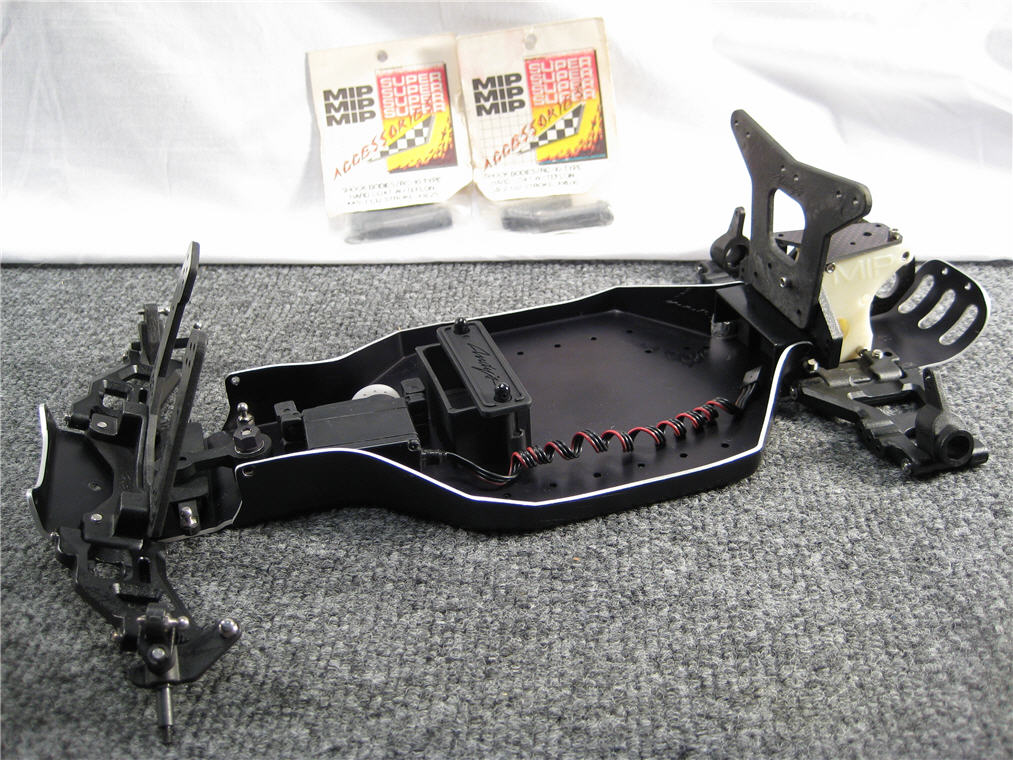
Installing the Andy’s rack steering kit has been an interesting and fun part of this build so far. I ended up putting it in a different position than on the right side like you generally see on Andy’s chassis. Even though it may require drilling additional holes to move the servo mounts, I just like the way it works and looks on the left side (it functions just fine in either location). I included a photo of it during chassis prep with it in the standard position.

Here’s where I could use some input:

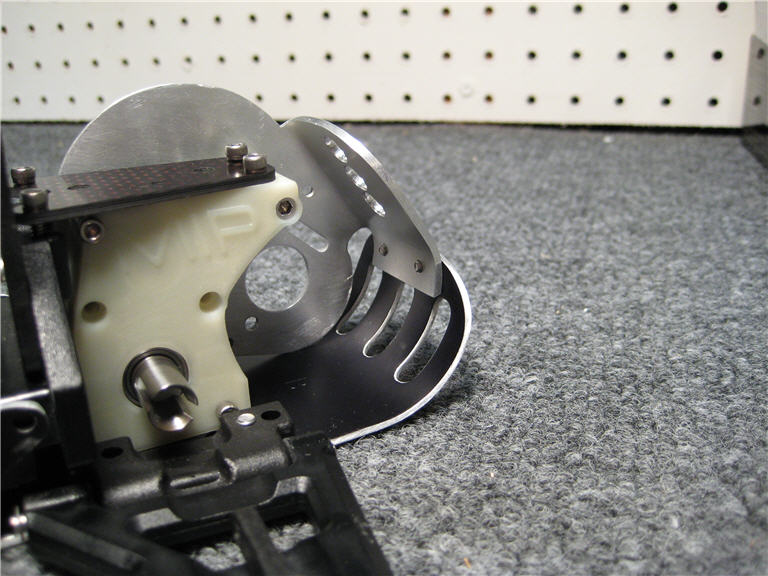
1. I’m set on using the MIP change box tranny conversion (which will be died black), but I’m not sure about the custom motor plate that’s on it now. I’d rather have used the aluminum mount, but I don’t like how it looks at the different angle created by this tranny. I’m a bit stuck at this point as to what to do here. Any ideas on what type/style of motor plate would work best?

2. The previous owner of the chassis left some marks in the anodizing from his initial attempt at cutting it down (which were disguised with Sharpie for the eBay listing :roll: – but that’s a story for the eBay talk forum…), so I’ve decided I’m going to strip and refinish the chassis in a light blue. But when it’s all done, I still want the sanded/polished edges. I’m thinking anodizing at this point, but I’m open to options. What’s the best finish process to achieve the desired outcome – paint, powder coat, anodizing, etc.?

Any and all comments welcome. Many thanks in advance! :)

Image
Image

It looks tighter in the photo than it really is. It is cozy, but it works great and everything lines up nice. I used button head screws to mount the thicker Andy’s shock tower so there would be a little more clearance for the dust shield. I liked the kit mounted in this position much better than in the standard location.

Image

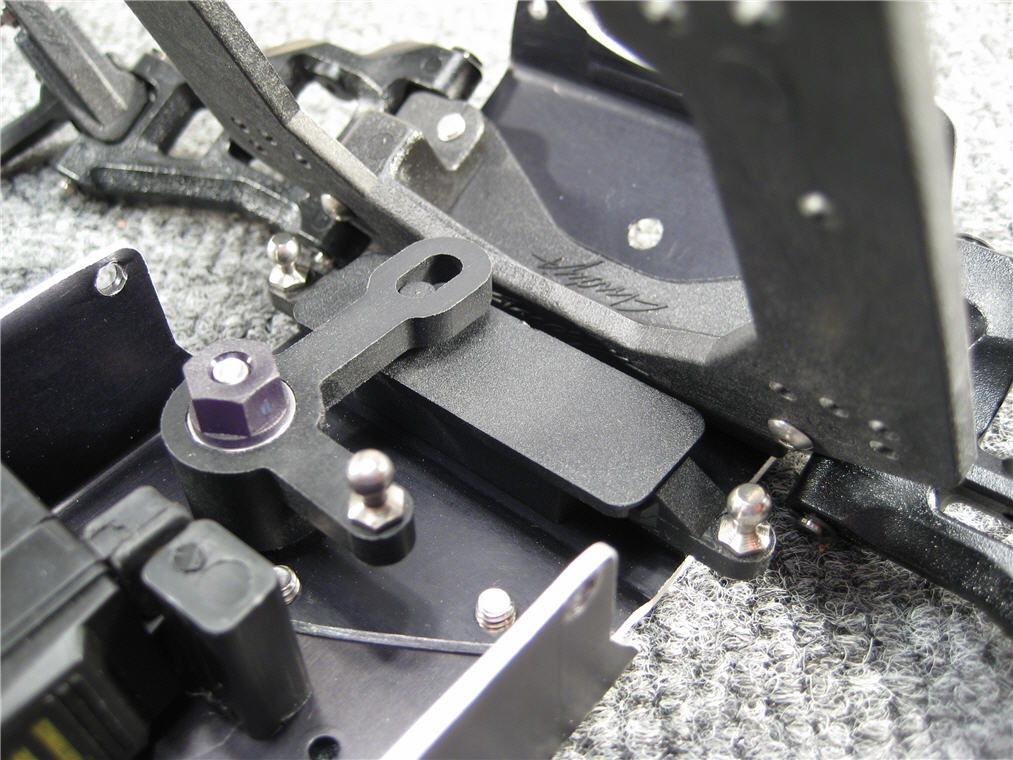
During the early chassis trimming, sanding and mock-up, I tried the steering kit in the right hand position. Yep, you have to get that servo-side arm almost right up against the side of chassis to get everything even close to lining up even. To get the rack centered, you have to angle the control arm to the right.

Image

User avatar
scr8p
Administrator
Posts: 16527
Joined: Tue Feb 07, 2006 9:46 pm
Location: Northampton, PA
Has thanked: 28 times
Been thanked: 957 times

Re: Cut-down Chassis - All Andy’s & MIP Build (Help needed!)

Post by scr8p »

well, it'd definately be easier to remove anodizing from the edges. paint wouldn't be too bad. if it was done base/clear, the edges could be sanded before the clear was applied, but the edges would lose some of it's brightness, if you know what i mean. removing powder coat would probably suck.

User avatar
mikedealer
Approved Member
Posts: 1778
Joined: Fri May 18, 2007 12:25 am

Re: Cut-down Chassis - All Andy’s & MIP Build (Help needed!)

Post by mikedealer »

if the chassis is gonna be blue, i say go for a blue litesink heatsink.. i think it would give it the hopped up look.

as for the chassis.... i say go for re-anodizing... gonna be a bitch... but paint and powder looks "cheesy" sometimes... anodizing definetly gives it the ultimate finished look. just sand the edges with a dremel after reanodizing..

wyldbill
Approved Member
Posts: 553
Joined: Tue Apr 24, 2007 11:03 pm
Location: birdsboro,pa
Been thanked: 2 times

Re: Cut-down Chassis - All Andy’s & MIP Build (Help needed!)

Post by wyldbill »

I’m not sure about the custom motor plate that’s on it now
that motor plate looks like one of Tim DiPenti's C.C.S (Custom Chassis Systems), he is a member on dirtoval.com and he builds custom b3 and b4 oval chassis. he sells chassis and 2.25,b3, and b4 motor plates on ebay every now and then.

User avatar
JPAE07
Approved Member
Posts: 517
Joined: Sat Nov 17, 2007 8:17 pm
Location: Placentia, CA
Has thanked: 1 time

Re: Cut-down Chassis - All Andy’s & MIP Build (Help needed!)

Post by JPAE07 »

Very nice build so far. Are you planning on running it or shelfing it?
Either way I would probably still go with anodizing.

badhoopty
Approved Member
Posts: 3753
Joined: Tue Feb 07, 2006 2:12 pm
Has thanked: 15 times
Been thanked: 35 times

Re: Cut-down Chassis - All Andy’s & MIP Build (Help needed!)

Post by badhoopty »

:shock:

i shoulda read the words first, cause i spent forever trying to figure out why there was a funky reflection in the tub.

a battery and some stickers would cover that right up... :P

badhoopty
Approved Member
Posts: 3753
Joined: Tue Feb 07, 2006 2:12 pm
Has thanked: 15 times
Been thanked: 35 times

Re: Cut-down Chassis - All Andy’s & MIP Build (Help needed!)

Post by badhoopty »

i dunno about sanding the edges with a dremel, i'd just use some 400 grit. if it were me i wouldnt sand the edges after getting it anodized.

i agree that light blue in anything but anodizing will look super cheesy. think of a smurf... anodizing still shows the grain of the aluminum underneath, which is cool. i'd get the litespeed piece first and match that.

User avatar
aeiou
Approved Member
Posts: 1071
Joined: Fri Apr 13, 2007 4:04 pm
Location: Atlanta, GA
Been thanked: 1 time

Re: Cut-down Chassis - All Andy’s & MIP Build (Help needed!)

Post by aeiou »

I really appreciate the input, guys.

Yep, I did get that motor plate from Tim DiPenti on eBay. It's a nice piece, but it's just not working for me on this build.

It looks like anodizing is the clear winner on the finish. After the Litespeed recommendation, I may change my color choice. I’ve always liked the blue they used on those pieces. The light blue I originally chose may end up looking a bit smurf-ish now that I think about it.

I have one of those heat sinks NIP, but it would have the same angle issue as the stock plate. I just don’t think I could bring myself to drill holes in the Litespeed piece, so I’ll probably go with a stock mount and drill it to adjust the angle. That way, I’d be sure the anodizing would match, too.

Thanks again!

User avatar
scr8p
Administrator
Posts: 16527
Joined: Tue Feb 07, 2006 9:46 pm
Location: Northampton, PA
Has thanked: 28 times
Been thanked: 957 times

Re: Cut-down Chassis - All Andy’s & MIP Build (Help needed!)

Post by scr8p »

aeiou wrote:I have one of those heat sinks NIP, but it would have the same angle issue as the stock plate. I just don’t think I could bring myself to drill holes in the Litespeed piece, so I’ll probably go with a stock mount and drill it to adjust the angle. That way, I’d be sure the anodizing would match, too.
you shouldn't have to to drill any holes in the motor plate. it's supposed to be angled like that. the only ones you'd need to drill would be the 2 new ones where the rear kickup screws to the stock motor plate. if you use a litesink, you wouldn't have to drill any.

personally, i think a litesink on a tub chassis looks retarted. or any motor plate that doesn't attach to the tub, for that matter. just my opinion, though......................... :wink:

User avatar
aeiou
Approved Member
Posts: 1071
Joined: Fri Apr 13, 2007 4:04 pm
Location: Atlanta, GA
Been thanked: 1 time

Re: Cut-down Chassis - All Andy’s & MIP Build (Help needed!)

Post by aeiou »

Thanks, scr8p.

Ya, I meant drilling for the transmission mounting screws. Because I just don't like the look of the motor plate at that "improved" :wink: angle, I'd end up drilling the two offset holes for the transmission mount in order to swing the motor plate back to its stock position. :)

User avatar
scr8p
Administrator
Posts: 16527
Joined: Tue Feb 07, 2006 9:46 pm
Location: Northampton, PA
Has thanked: 28 times
Been thanked: 957 times

Re: Cut-down Chassis - All Andy’s & MIP Build (Help needed!)

Post by scr8p »

you could go the b3/t3 motor plate direction to be a little different. :wink:

User avatar
m_vice
Approved Member
Posts: 1313
Joined: Fri Feb 23, 2007 12:46 pm
Location: Dallas, TX
Been thanked: 1 time

Re: Cut-down Chassis - All Andy’s & MIP Build (Help needed!)

Post by m_vice »

aeiou wrote: personally, i think a litesink on a tub chassis looks retarted. or any motor plate that doesn't attach to the tub, for that matter. just my opinion, though......................... :wink:
I am with you on this one. It look unfinished. thats why i fabricated this alum plate to finish the GPM blue motor plate.

SOME MORE PICS... i made one with Kidex material.
Attachments
BlackRC10-motor-plate-05.jpg
BlackRC10-motor-plate-05.jpg (33.32 KiB) Viewed 2531 times
BlackRC10-motor-plate-05.jpg
BlackRC10-motor-plate-05.jpg (33.32 KiB) Viewed 2531 times
BlackRC10-motor-plate-06.jpg
BlackRC10-motor-plate-06.jpg (30.85 KiB) Viewed 2532 times
BlackRC10-motor-plate-06.jpg
BlackRC10-motor-plate-06.jpg (30.85 KiB) Viewed 2532 times
BlackRC10-motor-plate-08.jpg
BlackRC10-motor-plate-08.jpg (6.36 KiB) Viewed 2530 times
BlackRC10-motor-plate-08.jpg
BlackRC10-motor-plate-08.jpg (6.36 KiB) Viewed 2530 times
BlackRC10-motor-plate.jpg
BlackRC10-motor-plate.jpg (39.46 KiB) Viewed 2647 times
BlackRC10-motor-plate.jpg
BlackRC10-motor-plate.jpg (39.46 KiB) Viewed 2647 times

User avatar
RichieRich
Approved Member
Posts: 2352
Joined: Wed Jun 14, 2006 11:42 pm
Location: Los Angeles, CA
Has thanked: 34 times
Been thanked: 19 times

Re: Cut-down Chassis - All Andy’s & MIP Build (Help needed!)

Post by RichieRich »

I wish the GPM motor plate was still available. :(
Image

User avatar
aeiou
Approved Member
Posts: 1071
Joined: Fri Apr 13, 2007 4:04 pm
Location: Atlanta, GA
Been thanked: 1 time

Re: Cut-down Chassis - All Andy’s & MIP Build

Post by aeiou »

Well, the mockup on the motor plate for the change box transmission is done. I ended up going with the original MIP-recommended setup with the motor plate shifted. Now that I have it all together, it actually looks a lot better than I thought it would. I did dress up the motor plate a bit and trimmed off the excess material below the new chassis mount holes. I drilled and tapped those, rather than using the nut and bolt method included in the kit.

I have something a little different in mind for the nose brace tubes. 8) Once that’s done, I’ll tear it down, do a little final sanding and polishing and get it off to be anodized.

But now that I look at these photos, I'm not so sure about the new color. The black and brushed aluminum combo looks rather nice. Hmm….

Image
Image

Weave
Approved Member
Posts: 39
Joined: Thu Dec 21, 2006 12:16 pm
Location: Atchison, KS

Re: Cut-down Chassis - All Andy’s & MIP Build

Post by Weave »

Sorry if I'm asking the obvious, but what is the preferred method to cut down a tub chassis? I know many will say dremel, but that seems like a crude way to go about it. I'm looking to avoid the random out of control dremel scratches in the tub and have a clean, uniform sanded upper edge.

The "brushed" aluminum motor plate looks good - and so does the black and aluminum motif

Post Reply

Create an account or sign in to join the discussion

You need to be a member in order to post a reply

Create an account

Not a member? register to join our community
Members can start their own topics & subscribe to topics
It’s free and only takes a minute

Register

Sign in

  • Similar Topics
    Replies
    Views
    Last post

Return to “RC10 Buggy Forum”

Who is online

Users browsing this forum: No User AvatarBing [Bot], No User AvatarFacebook [Bot] and 41 guests