Optima Mid Runner Budget Build to LWB conversion
-
XLR8

- Approved Member
- Posts: 2916
- Joined: Sun Feb 19, 2017 3:46 am
- Location: north/central Alabama
- Has thanked: 1123 times
- Been thanked: 829 times
Re: Optima Mid Runner Budget Build to LWB conversion
I haven't been able to find a place for this decal. Does anyone know where this is supposed to go?
- Attachments
-
- mystery decal.JPG (11.38 KiB) Viewed 1451 times
- mystery decal.JPG (11.38 KiB) Viewed 1451 times
Doug
-
XLR8
- Approved Member
- Posts: 2916
- Joined: Sun Feb 19, 2017 3:46 am
- Location: north/central Alabama
- Has thanked: 1123 times
- Been thanked: 829 times
Re: Optima Mid Runner Budget Build to LWB conversion
I still need to wire a switch to the ESC but otherwise the car is finished. The electronics are basically the same as before except I’ve replaced the XP SC450-BL ESC (45 amp) with an SC900-BL (90 amp).
In addition to the extended wheelbase and rear hub carriers from the re-release, I’ve replaced the front ball dif with a spool with one-way bearings. I have this arrangement on my CAT and I really like how it performs. We’ll see if this car reacts similarly to this change.
In addition to the extended wheelbase and rear hub carriers from the re-release, I’ve replaced the front ball dif with a spool with one-way bearings. I have this arrangement on my CAT and I really like how it performs. We’ll see if this car reacts similarly to this change.
Doug
-
XLR8
- Approved Member
- Posts: 2916
- Joined: Sun Feb 19, 2017 3:46 am
- Location: north/central Alabama
- Has thanked: 1123 times
- Been thanked: 829 times
Re: Optima Mid Runner Build revisited
The plan this time is to build another runner car and I've just uploaded some part designs for printing -- for the first time. To date, every part I've gotten from printing services has been someone else's design so I'm new to the process. We'll see how this goes but so far, so good.
The first item on the order is a ball of Mid parts...
... and a stack of Mid belt sprockets that are designed to work with earlier chain drive diff cases. I had a set of the early diffs in a box so I want to try to use them for my Mid runner.
It has taken me only two attempts to fully satisfy the printer's design requirements. After the first attempt, Yurii contacted me about walls that were a bit too thin so I've had to correct and re-submit. I've just received confirmation that designs have been accepted, the parts are being printed and will go out on August 12th.
These parts are designed to run but if I have durability issues, my plan is to repair them and swap them with parts from a shelf car.
I'm fairly confident that Kyosho is working on a re-release for the Mid but who knows when it will become available and I'm tired of waiting. Many of the suspension parts from the re-re Optima will fit the Mid; the parts I'm having printed are unique to the Mid. The shaft sets for Mid transmissions are still readily available NOS from ebay and are surprisingly cheap.
I love this hobby. Stay tuned for updates...
The first item on the order is a ball of Mid parts...
- Mid Sprockets.JPG (22.13 KiB) Viewed 1183 times
- Mid Sprockets.JPG (22.13 KiB) Viewed 1183 times
These parts are designed to run but if I have durability issues, my plan is to repair them and swap them with parts from a shelf car.
I'm fairly confident that Kyosho is working on a re-release for the Mid but who knows when it will become available and I'm tired of waiting. Many of the suspension parts from the re-re Optima will fit the Mid; the parts I'm having printed are unique to the Mid. The shaft sets for Mid transmissions are still readily available NOS from ebay and are surprisingly cheap.
I love this hobby.
Doug
-
XLR8
- Approved Member
- Posts: 2916
- Joined: Sun Feb 19, 2017 3:46 am
- Location: north/central Alabama
- Has thanked: 1123 times
- Been thanked: 829 times
Re: Optima Mid Runner Budget Build to LWB conversion
The parts arrive a couple weeks ago and I've spent some time over the weekend getting them separated, inspected, cleaned and the holes tapped.
Here are some photos taken during the trial fit.
Everything aligned and fit together very well, I didn't need to fight to get any of the screws to line up. The gear mesh is just about perfect - I was worried about that.
However, I did find that the bearings fit a little too tight. Not knowing which way to go with the design (i.e. will the material expand during the printing process and by how much, etc.) , I modeled the bearing bores to exactly match the bearing OD. I think perhaps that grainy surface texture has effectively added material and this explains the tight bearing fit.
Anyway, I was planning to make a special reamer to resize the bores but I found that a few minutes spent with a sharp xacto knife was enough smooth the surface and allow the bearings to snugly press-fit into place.
Like the bearing bores, the screw holes were a little undersize as well. Before running an M3 tap through them, I probably should have drilled them first but I just went ahead forced the tap through. I had no problems getting the holes tapped - this material is extremely dense and tough.
Here are some photos taken during the trial fit.
However, I did find that the bearings fit a little too tight. Not knowing which way to go with the design (i.e. will the material expand during the printing process and by how much, etc.) , I modeled the bearing bores to exactly match the bearing OD. I think perhaps that grainy surface texture has effectively added material and this explains the tight bearing fit.
Anyway, I was planning to make a special reamer to resize the bores but I found that a few minutes spent with a sharp xacto knife was enough smooth the surface and allow the bearings to snugly press-fit into place.
Like the bearing bores, the screw holes were a little undersize as well. Before running an M3 tap through them, I probably should have drilled them first but I just went ahead forced the tap through. I had no problems getting the holes tapped - this material is extremely dense and tough.
Doug
-
Dadio
- Approved Member
- Posts: 3867
- Joined: Sun Apr 24, 2016 2:21 pm
- Location: Guildford UK
- Has thanked: 2272 times
- Been thanked: 1992 times
Re: Optima Mid Runner Budget Build to LWB conversion
Great achievement ! Generally with 3d printed parts holes tend to shrink a little , with home FDM printers I tend to increase the diameter by 0.2.- 0.3 mm so where I'd drill a 2.5mm for tapping an M3 thread with printing I'd make a 2.7mm hole for an M3 thread , if I'm making a hole for an m3 to freely slide through I'd go to 3.5mm of course for sintered powder printing like Pro shops then the tolerances may be different but the concept is the same "holes close up a bit" , people tend to expect to re-drill holes on printed parts , it's nice when you don't need to but you mostly do 
If a jobs not worth doing then its certainly not worth doing well.
A problem shared is a problem halved but an advantage shared is no advantage at all.
A problem shared is a problem halved but an advantage shared is no advantage at all.
-
MarkyDents

- Approved Member
- Posts: 1019
- Joined: Sun Jan 10, 2021 11:52 am
- Location: Staten Island, N.Y.
- Has thanked: 1332 times
- Been thanked: 509 times
Re: Optima Mid Runner Budget Build to LWB conversion
This makes me feel lazy 
Really is very impressive, I like the material they are printed in…. Looks very factory prototype like
Really is very impressive, I like the material they are printed in…. Looks very factory prototype like
Who do you race for ?
Me……. I race for me.
That’s impossible, I was told you need a sponsor to race.
Hey Cru ! Go balls out
Me……. I race for me.
That’s impossible, I was told you need a sponsor to race.
Hey Cru ! Go balls out
-
XLR8
- Approved Member
- Posts: 2916
- Joined: Sun Feb 19, 2017 3:46 am
- Location: north/central Alabama
- Has thanked: 1123 times
- Been thanked: 829 times
Re: Optima Mid Runner Budget Build to LWB conversion
MarkyDents wrote: ↑Sun Aug 29, 2021 5:11 pm This makes me feel lazy
Really is very impressive, I like the material they are printed in…. Looks very factory prototype like
Thank you!
The gray/green color is only on the surface, beneath the surface the material is black.
Anyway, I agree about the material looking very unique and prototypical however I've found that it stains very easily and I believe after only a few minutes run time, it will begin to look really bad.
So, I've gone ahead and painted everything flat black to seal the surface and unify the color.
I guess one could apply a clear coat and preserve the color while sealing the surface but I didn't think of that until after I'd already painted the parts black.
Doug
-
XLR8
- Approved Member
- Posts: 2916
- Joined: Sun Feb 19, 2017 3:46 am
- Location: north/central Alabama
- Has thanked: 1123 times
- Been thanked: 829 times
Re: Optima Mid Runner Budget Build to LWB conversion
Thank you Dadio.Dadio wrote: ↑Sun Aug 29, 2021 5:09 pm Great achievement ! Generally with 3d printed parts holes tend to shrink a little , with home FDM printers I tend to increase the diameter by 0.2.- 0.3 mm so where I'd drill a 2.5mm for tapping an M3 thread with printing I'd make a 2.7mm hole for an M3 thread , if I'm making a hole for an m3 to freely slide through I'd go to 3.5mm of course for sintered powder printing like Pro shops then the tolerances may be different but the concept is the same "holes close up a bit" , people tend to expect to re-drill holes on printed parts , it's nice when you don't need to but you mostly do
This is exactly the kind of feedback and advice I was looking for. For the next set of parts, I will adjust the hole sizes accordingly.
As I mentioned previously, this was my first time having parts of my own design printed and I am very happy with the results.
This definitely won't be the last time I will use a printing service. It was relatively hassle free, the price was reasonable and it was very fast. I think was less than 15 days from upload to having parts arrive at my door step. I'm hooked.
Doug
-
Dadio
- Approved Member
- Posts: 3867
- Joined: Sun Apr 24, 2016 2:21 pm
- Location: Guildford UK
- Has thanked: 2272 times
- Been thanked: 1992 times
Re: Optima Mid Runner Budget Build to LWB conversion
The prints from Pro shops can be porous and stain easily , some shops offer a colouring service or yes painting them or sealing them in clear coat works just as well .
If a jobs not worth doing then its certainly not worth doing well.
A problem shared is a problem halved but an advantage shared is no advantage at all.
A problem shared is a problem halved but an advantage shared is no advantage at all.
-
XLR8
- Approved Member
- Posts: 2916
- Joined: Sun Feb 19, 2017 3:46 am
- Location: north/central Alabama
- Has thanked: 1123 times
- Been thanked: 829 times
Re: Optima Mid Runner Budget Build to LWB conversion
A couple new prints on order:
Bumpers, knuckles and battery mounts with flat tops so they accept a lipo.
And a gang of 8 belt covers that fit above the motor. The original part rarely comes up for sale and they are super expensive when they do. These 8 will cost me 13 bucks.
And that's really it for the Mid. Once these arrive, I'll have enough parts to finish the current runner build and re-assemble an SE that's been sitting in a box for a while.
Next up is an interior for the Bronco. I have designed it for sheet styrene but I think I'll go back and re-design the dash, door and interior panels for 3d print.
I have completed the main tub from styrene and it was easy to cut and assemble. I have the dash parts cut from styrene but many of the parts are so tiny that it has been nearly impossible for me to assemble. Combining build techniques and materials is one way to achieve the highest level of detail and ease of assembly and at the lowest cost. If I'd had the tub printed, it would have been super expensive. Styrene is cheap.
I'm going to carve the seats from blocks of PVC - I think they'll look great after painting.
Bumpers, knuckles and battery mounts with flat tops so they accept a lipo.
Next up is an interior for the Bronco. I have designed it for sheet styrene but I think I'll go back and re-design the dash, door and interior panels for 3d print.
I have completed the main tub from styrene and it was easy to cut and assemble. I have the dash parts cut from styrene but many of the parts are so tiny that it has been nearly impossible for me to assemble. Combining build techniques and materials is one way to achieve the highest level of detail and ease of assembly and at the lowest cost. If I'd had the tub printed, it would have been super expensive. Styrene is cheap.
I'm going to carve the seats from blocks of PVC - I think they'll look great after painting.
Doug
-
XLR8
- Approved Member
- Posts: 2916
- Joined: Sun Feb 19, 2017 3:46 am
- Location: north/central Alabama
- Has thanked: 1123 times
- Been thanked: 829 times
Re: Optima Mid Runner Budget Build to LWB conversion
The last batch of printed parts have arrived and, as before, everything looks very good.
The only fitment problem came with the belt cover. Apparently, I’ve made the grooves that receive the lexan cover too narrow so the two parts wouldn’t come together. I was able to open the gap with some sandpaper.
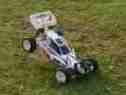
Some final photos before adding the ESC and Rx, body and wing.
With that, this project has reached its end as I really don’t have plans to build or modify another Mid.
In addition to this car, I have two SE’s (one of them will be wearing a new TBG Turbo Optima Mid body shell and wing with MCI decals) and that LWB TOMS tribute car I built a few years ago. That’s enough for me.
If Kyosho is planning to re-release the Mid, one obstacle they will need to overcome are the belt covers. I don’t believe that in today’s RC world, adding thread lock to “seal” the lexan covers to the chassis plate is going to be acceptable. They’ll need to develop a smarter and more effective method for keeping dirt out of the drive train.
The only fitment problem came with the belt cover. Apparently, I’ve made the grooves that receive the lexan cover too narrow so the two parts wouldn’t come together. I was able to open the gap with some sandpaper.
With that, this project has reached its end as I really don’t have plans to build or modify another Mid.
In addition to this car, I have two SE’s (one of them will be wearing a new TBG Turbo Optima Mid body shell and wing with MCI decals) and that LWB TOMS tribute car I built a few years ago. That’s enough for me.
If Kyosho is planning to re-release the Mid, one obstacle they will need to overcome are the belt covers. I don’t believe that in today’s RC world, adding thread lock to “seal” the lexan covers to the chassis plate is going to be acceptable. They’ll need to develop a smarter and more effective method for keeping dirt out of the drive train.
Doug
-
radioactivity

- Super Member
- Posts: 800
- Joined: Wed Jan 24, 2018 11:46 am
- Location: Dripping Springs Tx
- Has thanked: 337 times
- Been thanked: 499 times
Re: Optima Mid Runner Budget Build to LWB conversion
Hi Doug
For a moment there I thought you shifted gears without using the clutch

At first it looked as though you replaced all the printed parts with OEM.
On closer inspection, I see that you dyed your printed parts black.
So I guess I'm sayin' it looks real good!
I'd be interested on a parts durability update maybe.
BTW what type of printing did you choose?
And is that small belt cover at the top of the trans one of those hose clamp mods or something else? It looks white and I've not seen a white colored clamp.
Chuck
For a moment there I thought you shifted gears without using the clutch
At first it looked as though you replaced all the printed parts with OEM.
On closer inspection, I see that you dyed your printed parts black.
So I guess I'm sayin' it looks real good!
I'd be interested on a parts durability update maybe.
BTW what type of printing did you choose?
And is that small belt cover at the top of the trans one of those hose clamp mods or something else? It looks white and I've not seen a white colored clamp.
Chuck
Hydrodip how to https://www.rc10talk.com/viewtopic.php?f=62&t=42727
When all you have is a hammer everything looks like a nail
When all you have is a hammer everything looks like a nail
-
Bottom Feeder

- Approved Member
- Posts: 320
- Joined: Wed Nov 06, 2013 11:30 am
- Location: Virginia
- Has thanked: 10 times
- Been thanked: 23 times
Re: Optima Mid Runner Budget Build to LWB conversion
Really beautiful work. I'm impressed by how dedicated and talented some of you guys are to preserving these things. I like to build, tinker and hack these things while some of you (many of you actually) are modelers and real artists. Kudos!
-
XLR8
- Approved Member
- Posts: 2916
- Joined: Sun Feb 19, 2017 3:46 am
- Location: north/central Alabama
- Has thanked: 1123 times
- Been thanked: 829 times
Re: Optima Mid Runner Budget Build to LWB conversion
Thank you for the kind words.Bottom Feeder wrote: ↑Tue Sep 21, 2021 1:49 pm Really beautiful work. I'm impressed by how dedicated and talented some of you guys are to preserving these things. I like to build, tinker and hack these things while some of you (many of you actually) are modelers and real artists. Kudos!
I think what’s important is that this is YOUR hobby so approach it in a way that makes you happy.
For my part, I really enjoy running my vintage RC vehicles and having fun but as my appreciation for them continues to grow, I’ve decided to avoid at all costs permanently modifying vintage parts. I hope these things will be around long after I’m gone so I want to pass them forward and allow future generations to appreciate them in their original form – or as close to original as possible. I take the same approach with my old motorcycle collection; no permanent modifications.
Again, that’s just my approach to the hobby and not a recommendation for others.
“… (many of you actually) are modelers and real artists.”
I agree, the level of skill and artistry expressed by other members here is nothing short of amazing. My work pales in comparison. Many of the builds posted elsewhere on this message board should be on display at the Guggenheim.
Doug
-
XLR8
- Approved Member
- Posts: 2916
- Joined: Sun Feb 19, 2017 3:46 am
- Location: north/central Alabama
- Has thanked: 1123 times
- Been thanked: 829 times
Re: Optima Mid Runner Budget Build to LWB conversion
radioactivity wrote: ↑Tue Sep 21, 2021 12:05 pm Hi Doug
For a moment there I thought you shifted gears without using the clutch
At first it looked as though you replaced all the printed parts with OEM.
On closer inspection, I see that you dyed your printed parts black.
So I guess I'm sayin' it looks real good!
I'd be interested on a parts durability update maybe.
BTW what type of printing did you choose?
And is that small belt cover at the top of the trans one of those hose clamp mods or something else? It looks white and I've not seen a white colored clamp.
Chuck
Thank you Chuck.
Actually, I’ve simply painted the parts flat black. Without fully understanding the thermal properties for the printing material, I didn’t want to risk overheating the parts in dye only to watch them dissolve. The material is already black and fully opaque below the surface similar to the OE molded nylon parts so maybe they would only need a few minutes in dye to color the surfaces – I don’t know. Anyway, painting the parts seemed like the safest path. By the way, the slight grainy surface texture reminds me of sand castings.
As for durability, I guess we shall see. Most of the parts include very subtle design changes meant to increase their strength – they’re not exact copies of the molded part. The exception being the knuckles; they are nearly exact copies of Kyosho’s die cast metal parts so if anything breaks, it will likely be the knuckles. However, this material is extremely tough so maybe there’s some hope. If they do fail, I can always go back and enhance their strength by increasing thicknesses, adding gussets, etc. Admittedly, my little backyard track isn’t the best venue for durability testing – assuming I can void the trees and corner posts on the deck.
The print material is HP’s Multi Jet Fusion polyamide from i.Materize. I could have chosen Shapeways (they offer MJF plastic) but i.Materize is cheaper and they can accept Sketchup models in their native format. Shapeways won’t accept Sketchup models without first being translated to a generic 3d model format (DAE, OBJ, STL, X3D, X3DB, X3DV, WRL, 3MF, STEP, STP).
For the belt cover, while using the rubber insulator sleeve from a clamp is an excellent idea and should work great, I wanted to test a printed version of the original part first. The material I’ve chosen here is Selective Laser Sintering polyamide because its greater flexibility and ability to capture very fine details make it better suited to this part. Also, high strength really wasn’t a requirement for this part; SLS isn’t as strong as MJF. By the way, the Bronco interior parts I wrote about earlier will also be printed from SLS polyamide for the same reasons.
It could be a while before I’m able to hit the track with this one (too many projects underway at the moment) but I will definitely provide updates.
Doug
Create an account or sign in to join the discussion
You need to be a member in order to post a reply
Create an account
Not a member? register to join our community
Members can start their own topics & subscribe to topics
It’s free and only takes a minute
Sign in
-
- Similar Topics
- Replies
- Views
- Last post
-
- 17 Replies
- 4888 Views
-
Last post by alcyon
-
- 49 Replies
- 7225 Views
-
Last post by nvxwax
-
- 26 Replies
- 3389 Views
-
Last post by CHKTM
-
- 6 Replies
- 1159 Views
-
Last post by 415bayarea
-
- 25 Replies
- 2022 Views
-
Last post by aip47-2008
-
- 18 Replies
- 3372 Views
-
Last post by bully
-
- 39 Replies
- 4497 Views
-
Last post by j0pp3
-
- 11 Replies
- 2018 Views
-
Last post by ecloptima


Who is online
Users browsing this forum: No registered users and 3 guests