Hyperdrive H10 super glue special
-
GeneralZod

- Approved Member
- Posts: 415
- Joined: Sun Dec 09, 2012 7:19 pm
- Location: Colorado
- Has thanked: 150 times
- Been thanked: 162 times
Re: Hyperdrive H10 super glue special
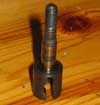
It's time to finally give this car an actual functioning diff instead of the super glue locker it had before. But it seems with this car every part needs attention. This time while putting in a set of diff rings I noticed the Hyperdrive cars must use 16mm or 5/8" inner diameter rings. Nope, don't have any of these so it was time to make my own. Since these are hardened rings, I figured I might use a cone style grinding bit to evenly open up the standard diameter to 5/8". To reduce heat and not screw up the temper, I submerged the bit in a pot of water and used a cordless drill on low speed. It allowed me to slowly widen the ring so it would fit tightly with no play and no run out. It worked quite well but I didn't realize my fingers were contacting the grinding cone and took off layers of my skin with it. Only when I saw blood is when I said "whoops"! 
-
Dadio
- Approved Member
- Posts: 4054
- Joined: Sun Apr 24, 2016 2:21 pm
- Location: Guildford UK
- Has thanked: 2697 times
- Been thanked: 2234 times
Re: Hyperdrive H10 super glue special
All will go well from this point , its had a Blood Sacrifice  you have appeased the RC Gods , some builds require it
If a jobs not worth doing then its certainly not worth doing well.
A problem shared is a problem halved but an advantage shared is no advantage at all.
A problem shared is a problem halved but an advantage shared is no advantage at all.
-
EvolutionRevolution
- Approved Member
- Posts: 1494
- Joined: Tue Feb 01, 2011 3:24 pm
- Location: Netherlands
- Has thanked: 17 times
- Been thanked: 34 times
Re: Hyperdrive H10 super glue special
Ouch.  I hope you flushed your hands well after that, because the color of that water doesn't look too healthy...
But you're doing some really nice work on this car!
But you're doing some really nice work on this car!
-
GeneralZod
- Approved Member
- Posts: 415
- Joined: Sun Dec 09, 2012 7:19 pm
- Location: Colorado
- Has thanked: 150 times
- Been thanked: 162 times
Re: Hyperdrive H10 super glue special
Blood sacrifice.....hmm maybe the rc gods are appeased! The project should be mostly downhill at this time. The shocks will be a bit of a challenge to find though. That would be my last stumbling block. The diff is being assembled and axle spaced equally on each side. I will set the track width to 220 mm for this car. I can go to 235 mm but it seems for this car 220 is just fine. I'll post a pic once the rear axle is finalized.
Btw- my fingers are healing up nicely. That water was clear when I started grinding, not sure why it turned color later in the process....maybe ground up skin?
Btw- my fingers are healing up nicely. That water was clear when I started grinding, not sure why it turned color later in the process....maybe ground up skin?
-
GeneralZod
- Approved Member
- Posts: 415
- Joined: Sun Dec 09, 2012 7:19 pm
- Location: Colorado
- Has thanked: 150 times
- Been thanked: 162 times
Re: Hyperdrive H10 super glue special
Finally, a real working diff! It will need a little breaking in to loosen up a bit but it should be alot smoother than it used to be. I bought some dye more black graphite to try changing the red battery holders to black. I think they were dyed red before so I am not sure how they will accept black now. 
- Attachments
-
-
TRX-1-3
- Approved Member
- Posts: 2012
- Joined: Sat Mar 29, 2014 12:13 pm
- Location: USAG Humphreys, South Korea
- Has thanked: 1938 times
- Been thanked: 942 times
Re: Hyperdrive H10 super glue special
I think black dye will black the red. At least that's what I've gathered from reading some other threads/posts over the years. And I just remembered that I dyed some already dyed yellow parts black some time back. Good luck. Lotta elbow grease went into this one. Way to stick it out.
Hope you're doin' something fun.
-
GeneralZod
- Approved Member
- Posts: 415
- Joined: Sun Dec 09, 2012 7:19 pm
- Location: Colorado
- Has thanked: 150 times
- Been thanked: 162 times
Re: Hyperdrive H10 super glue special
Finally had some time to experiment with the synthetic based dye. Since the battery holders were used and abused, it wouldn't matter if they turned out crappy. So in the pot they go. I wasn't sure about the proper water to dye ratio so I filled the pot halfway with water and added 1/3 bottle of dye more graphite. Uh, looks about right....then to break the surface tension of the water, I added three drops of liquid dawn dish soap. Stirred and heated to just under a boil then backed off heat to a nice simmer. Smelled like crud! I strung thin electrical wire through the parts and let them soak for 25 min. Also threw in a white servo saver to test as well, then turned off the heat to let the parts cool then rinsed with cold water. All I can say is the parts came out very nice! I was quite surprised that even the servo saver looks like factory black now! I will have to also dye the white steering blocks to match the rest of the car. They stand out too much now. I also poured the leftover dye into a couple of old jars to reuse.
Whatever you do, DO NOT use your wife's kitchen stove to do this instead use a portable single burner like this one. (Just don't tell your wife you borrowed her portable single burner to dye some plastic parts!)
I'll post progress pic once I get the steering parts dyed as well.
Whatever you do, DO NOT use your wife's kitchen stove to do this instead use a portable single burner like this one. (Just don't tell your wife you borrowed her portable single burner to dye some plastic parts!)
I'll post progress pic once I get the steering parts dyed as well.
-
GeneralZod
- Approved Member
- Posts: 415
- Joined: Sun Dec 09, 2012 7:19 pm
- Location: Colorado
- Has thanked: 150 times
- Been thanked: 162 times
Re: Hyperdrive H10 super glue special
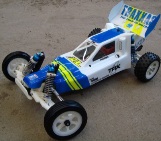
Here is how she sits so far. Parts dyed and came out better than I expected. I decided to make my own battery hold down pieces due to one of the originals had a wallowed out slot and it didn't look quite right on the car. Also worked on the diff a bit to find where it was binding. The buds centering washer was dragging near the threaded part of the axle. Just needed an extra washer to clear the step area near the threads. Hard to explain. Now comes time to decide on electronics layout. Servo may need to sit on the front axle like it was intended. 
-
Dadio
- Approved Member
- Posts: 4054
- Joined: Sun Apr 24, 2016 2:21 pm
- Location: Guildford UK
- Has thanked: 2697 times
- Been thanked: 2234 times
Re: Hyperdrive H10 super glue special
There's been tons of restorations on here but with this one its just so hard to believe its the same car ! really outstanding work !
If a jobs not worth doing then its certainly not worth doing well.
A problem shared is a problem halved but an advantage shared is no advantage at all.
A problem shared is a problem halved but an advantage shared is no advantage at all.
-
GeneralZod
- Approved Member
- Posts: 415
- Joined: Sun Dec 09, 2012 7:19 pm
- Location: Colorado
- Has thanked: 150 times
- Been thanked: 162 times
Re: Hyperdrive H10 super glue special
Thanks! Every part on this car needed some kind of work. Likely the most challenging I have tried recently. Even more so than the 10LSO I repaired a couple years ago. There will be a few more things I will add to this car soon. Trying to keep it mostly period correct but the temptation to modernize it always looms.
-
GeneralZod
- Approved Member
- Posts: 415
- Joined: Sun Dec 09, 2012 7:19 pm
- Location: Colorado
- Has thanked: 150 times
- Been thanked: 162 times
Re: Hyperdrive H10 super glue special
Well I thought the electronics with this car may not need any attention. Wrong....I applied power to the Tekin ESC and discovered no indicator light nor power to the receiver. Time to crack open the case and take a peek. I did the visual and smell test. Nothing stood out. Next, I poked around with a ohm meter and drive FETs seemed OK. Moved to the switching transistor and measured a dead short across the base and collector. That may be the reason the BEC circuit voltage is forced to zero. I desoldered the transistor and verified the short. Yep, its bad. Ordered a few from digikey and hopefully revives the ESC.
-
GeneralZod
- Approved Member
- Posts: 415
- Joined: Sun Dec 09, 2012 7:19 pm
- Location: Colorado
- Has thanked: 150 times
- Been thanked: 162 times
Re: Hyperdrive H10 super glue special
Bingo! Its back from the dead! I then hooked up a motor, servo and receiver. After a quick calibration of the ESC, the servo and motor are now functional. Now, I have to put a new Futaba connector and pins since this one doesn't fit right. Maybe someone crossed the wires in the past resulting in the shorted transistor.
-
GeneralZod
- Approved Member
- Posts: 415
- Joined: Sun Dec 09, 2012 7:19 pm
- Location: Colorado
- Has thanked: 150 times
- Been thanked: 162 times
Re: Hyperdrive H10 super glue special
I want to thank our fellow member Phin for sending me a pair of those elusive delta shocks. This has helped me to move on with the rebuild. Only thing left I need is some help to find the larger center main shock and spring. (Anyone have one rollin around in their old parts bin?)
Made a couple of chassis braces from layers of fiberglass sheet glued and pressed together then shaped with dremel and hand filed. I then sprayed ceramic black engine paint. When fully dried, I rubbed them with paper napkins to give them a worn look to match the old sheen of the main plate.
After some thought, I decided to mount a very fast heli servo on the front axle and adjusted the tie rods and steering angles. A tedious process but I think I was able to get everything pretty well lined up.
Also moved the diff to the other side of the pod to get it ready for the belt drive setup. ESC and receiver are being prepped for install as well as choosing a period correct motor. I tried using a correct era servo but it just didn't look good. The metal geared heli servos appearence is nicer and its small size made it fit better on the axle along with its quick transit speed.
-
GeneralZod
- Approved Member
- Posts: 415
- Joined: Sun Dec 09, 2012 7:19 pm
- Location: Colorado
- Has thanked: 150 times
- Been thanked: 162 times
Re: Hyperdrive H10 super glue special
I was able to obtain a few Hyper goodies. Belts, spurs and pinions. Time to fit a set on this car and several others needing them. I never messed with a belt setup so this is new to me. Cant wait to try it out!
The vintage smell was overpowering upon opening the box! In a strange way, I kinda liked it
Selected a combo that matched my target ratio.
Now time to pick an appropriate era motor.......
The vintage smell was overpowering upon opening the box! In a strange way, I kinda liked it
Selected a combo that matched my target ratio.
Now time to pick an appropriate era motor.......
-
GeneralZod
- Approved Member
- Posts: 415
- Joined: Sun Dec 09, 2012 7:19 pm
- Location: Colorado
- Has thanked: 150 times
- Been thanked: 162 times
Re: Hyperdrive H10 super glue special
Worked a bit more on it tonight. Rebuilt an old Yokomo motor for checking alignment of the belt and pinion. For some odd reason, the motor did not fit up against the aluminum mount. The factory design was off a bit. The top plate on the pod was sitting too low and interferes with the motor. I had to use 4 small washers between the motor mount and top plate to bring it up a bit so the motor would fit. Weird the factory overlooked this. Wired up the motor to the power supply and turned on. Wow, she's real quiet! Though I could hear a strange clicking near the diff. Tracked it down to the old ball cage. Got rid of it with an Associated axle spacer and now it is silent.
Also had some time to install the electrics. Just have to build a NiMH pack and wire it up. I will go lipo later but for now, its old school mostly.
Worked to finish the front bumper and front underside chassis guard. Its slowly starting to get back to how it should be. Now I have to find the main center shock. That is the last part I need to get this thing up and rollin.
Create an account or sign in to join the discussion
You need to be a member in order to post a reply
Create an account
Not a member? register to join our community
Members can start their own topics & subscribe to topics
It’s free and only takes a minute
Sign in
-
- Similar Topics
- Replies
- Views
- Last post
-
- 5 Replies
- 2772 Views
-
Last post by PBR Allstar
-
- 5 Replies
- 1703 Views
-
Last post by Dadio
-
- 6 Replies
- 2077 Views
-
Last post by rccars4sal
-
- 10 Replies
- 1504 Views
-
Last post by 1911Colt
-
- 6 Replies
- 946 Views
-
Last post by mikedealer
-
- 9 Replies
- 1746 Views
-
Last post by Coelacanth
-
- 14 Replies
- 21741 Views
-
Last post by 328isjohn
-
- 5 Replies
- 805 Views
-
Last post by RedScampi
Who is online
Users browsing this forum: No registered users and 6 guests