Hi everyone,
I'm new to the forum and have read many many posts. Very good stuff!! I just got a pair of YZ10's (the '88 - '89 ones) and have torn them apart and of course the bulkheads, hubs, and motormount are in pretty rough shape. I've read tons of posts and keep seeing that bead blasting is the way to go but what is the next best alternative? Bead blasting sounds awesome but I don't have a contact for that, couldn't find anything at first glance through google, and probably won't go on that path anyway. So, what is everyone's opinion on the next best option for cleaning up the metal bits on an old Yok? Dremel with wire wheel? soak in some chemical?
Also, I read that it is wise to clear coat the magnesium after whatever finishing technique is used. What paint should be used? Is there a specific brand or type?
Thanks for the help,
Jeff
Magnesium Restore for dummies.....
-
xxxmain
- Approved Member
- Posts: 160
- Joined: Sat Oct 23, 2010 8:20 pm
- Location: Ontario, Canada
- Been thanked: 1 time
Re: Magnesium Restore for dummies.....
I just got back from the hardware store and bought a bunch of wire brushes for my Dremel. I picked up Brass Brushes because they seem to fit the bill perfectly. The back says "Softer than steel, won't scratch soft metals. Brass is non sparking." That all sounded pretty good for what I'm trying to do.
I also picked up some Testors Enamal Dull Coat paint that I'm going to try (Dull to try to take the shin away to be at least similar to the original look). I have a bunch of extra parts so I'll be testing on one magnesium hub. I'll post pics after trying this stuff.
Any tips from the vets would be awesome.
Lates,
Jeff
-
buttmonkey1969
- Regular Member
- Posts: 22
- Joined: Fri Nov 14, 2008 4:41 pm
Re: Magnesium Restore for dummies.....
Jeff,
Like you, I have read up on this very helpful site on how to clean and restore my small pile of mag Yoke parts too. I am going to give this a try before I try anything else... the price is right !
http://www.hobbyking.com/hobbyking/store/uh_viewItem.asp?idproduct=9797
then, coat in clear satin varnish (as sold in craft/art supplies the stuff as used in copper relief work).
I hope your approach with non abrasive brushes work out, would like to see how it goes.
Carl
-
xxxmain
- Approved Member
- Posts: 160
- Joined: Sat Oct 23, 2010 8:20 pm
- Location: Ontario, Canada
- Been thanked: 1 time
Re: Magnesium Restore for dummies.....
Hey Carl, that thing looks awesome. Thanks for the link - I'm going to order one right away.
I just got back from the toy store where I bought a rock tumbler. I'm just doing some testing with that now so I'll have some results and pictures soon of the wire brush method and the rock tumbler method.
Can't wait to play with the cheap bead blaster too!
I just got back from the toy store where I bought a rock tumbler. I'm just doing some testing with that now so I'll have some results and pictures soon of the wire brush method and the rock tumbler method.
Can't wait to play with the cheap bead blaster too!

Re: Magnesium Restore for dummies.....
Just keep in mind while experimenting with cleaning methods that magnesium will burn. Hot and fast. 
- Attachments
-
Gary
-
xxxmain
- Approved Member
- Posts: 160
- Joined: Sat Oct 23, 2010 8:20 pm
- Location: Ontario, Canada
- Been thanked: 1 time
Re: Magnesium Restore for dummies.....
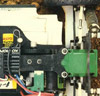
Ok, I just got finished my first test with the Dremel Copper wire wheels and the Testors Paint. I'm very impressed with the results. After the wire wheel the hubs were very polished which is fine but not very original looking. Once I hit some of the dullcoat clear paint they look amazing and they are protected from future corrosion. Here is the before and after pic. I actually painted the hub while holding it with the paper towel inside - this will also prevent clear-coat from building up inside and altering the bearing tolerances.
The actual paint I used was Testors Spray Enamel Dullcote Part # 1260. Still more testing to come with the rock tumbler.
The actual paint I used was Testors Spray Enamel Dullcote Part # 1260. Still more testing to come with the rock tumbler.
- Attachments
-
-
xxxmain
- Approved Member
- Posts: 160
- Joined: Sat Oct 23, 2010 8:20 pm
- Location: Ontario, Canada
- Been thanked: 1 time
Re: Magnesium Restore for dummies.....
Thanks for the reminder! That seems to be one advantage to the Brass wire brushes (sorry, I called them copper wire brushes in a previous post), the brass brushes are non sparking but a great reminder anyway.RedScampi wrote:Just keep in mind while experimenting with cleaning methods that magnesium will burn. Hot and fast.
-
xxxmain
- Approved Member
- Posts: 160
- Joined: Sat Oct 23, 2010 8:20 pm
- Location: Ontario, Canada
- Been thanked: 1 time
Re: Magnesium Restore for dummies.....
Thanks! I'm hoping that the rock tumbler method will clean the parts as well as the wire brushes did because it is much less work to load a bunch of parts, water, and sand into a $25 rock tumbler than to hand polish each part. If the tumbler works I'll just clear-coat the parts after and the restoration of the magnesium is done. I'll keep everyone posted.RedScampi wrote:That does look fantastic!
-
tim.sanderson
- Approved Member
- Posts: 462
- Joined: Wed Oct 13, 2010 9:29 am
- Location: Mississauga, ON, Canada
-
xxxmain
- Approved Member
- Posts: 160
- Joined: Sat Oct 23, 2010 8:20 pm
- Location: Ontario, Canada
- Been thanked: 1 time
Re: Magnesium Restore for dummies.....
I've got some early results on the rock tumbler. I threw in a knuckle, bulkhead, and motormount (the mount was completely painted white) into the rock tumbler 4 hours ago. In the pics you'll see how much of the paint has already come off. The knuckle comparison is pretty crazy too. I'm using the second most course sand (out of 4 choices). I'm going to leave it running over night and see what everything looks like in the morning. The instructions about polishing rocks talks about doing it for many days and even more than a week but I'm sure rocks are much harder than magnesium so less than 24 hours is looking like it will do the job. So far I'm pretty happy with this $25 tumbler. I have a feeling by morning this stuff will be looking pretty sweet.
- Attachments
-
- tumble-hubs.jpg (25.94 KiB) Viewed 2019 times
- tumble-hubs.jpg (25.94 KiB) Viewed 2019 times
-
-
-
tim.sanderson
- Approved Member
- Posts: 462
- Joined: Wed Oct 13, 2010 9:29 am
- Location: Mississauga, ON, Canada
Re: Magnesium Restore for dummies.....
I'm pretty sure the knuckles on my Turbo Optima are magnesium. I'll bring 'em by one day for the same treatment.
-
jwscab

- Super Member
- Posts: 6507
- Joined: Wed Jan 28, 2009 9:42 am
- Location: Chalfont, PA
- Has thanked: 10 times
- Been thanked: 454 times
Re: Magnesium Restore for dummies.....
I'd be very careful with that tumbler. the motor mount looks like the corners and edges are already polished down significantly. I would be concerned with how bearings and bulkhead caps fit after the treatment.
glass beading is still probably the best process, followed by the wire wheel treatment you have already tried and had success with.
glass beading is still probably the best process, followed by the wire wheel treatment you have already tried and had success with.
-
DerbyDan

- Approved Member
- Posts: 1836
- Joined: Tue Sep 08, 2009 8:04 am
- Location: Northampton UK
- Has thanked: 2 times
- Been thanked: 17 times
Re: Magnesium Restore for dummies.....
Yes, I was going to point that out..... I'd be worried to go much on much further.jwscab wrote:I'd be very careful with that tumbler. the motor mount looks like the corners and edges are already polished down significantly. I would be concerned with how bearings and bulkhead caps fit after the treatment.
glass beading is still probably the best process, followed by the wire wheel treatment you have already tried and had success with.
I've got some mag parts that I want cleaning up too - think i'm going to hunt down a local bead blasting company, although that mini blasting kit that you posted a link to, looks interesting
My T.C Showroom; http://www.tamiyaclub.com/member.asp?id=28990
-
xxxmain
- Approved Member
- Posts: 160
- Joined: Sat Oct 23, 2010 8:20 pm
- Location: Ontario, Canada
- Been thanked: 1 time
Re: Magnesium Restore for dummies.....
Yes, I totally agree. I just took the parts out from the tumbler after the overnight session and many of the edges are worn a lot. I saw that happening last night and put a screw in one of the holes to try to reduce the motormount's edge from rubbing in the unit but the screw didn't help too much. The tumbler seems decent for things like hubs but it wears away the square edges and also doesn't get into the little corners (which is the hard part and would have to be done by hand anyway). These parts were test parts and served their purpose but it looks like the rock tumbler isn't the way to go.jwscab wrote:I'd be very careful with that tumbler. the motor mount looks like the corners and edges are already polished down significantly. I would be concerned with how bearings and bulkhead caps fit after the treatment.
I'm going to do one full set of magnesium parts with the brass wire wheel and dullcoat method and once I get my cheap bead blaster I'll do more testing with that on another set of magnesium. Below are the pics from the rock tumbler after 13 hours with medium/course sand. They look much better than before but way too much wear so the Tumbler is getting the axe!
- Attachments
-
Create an account or sign in to join the discussion
You need to be a member in order to post a reply
Create an account
Not a member? register to join our community
Members can start their own topics & subscribe to topics
It’s free and only takes a minute
Sign in
-
- Similar Topics
- Replies
- Views
- Last post
-
- 68 Replies
- 6954 Views
-
Last post by RC10th
-
- 11 Replies
- 1496 Views
-
Last post by Bongo Fury
-
- 18 Replies
- 1812 Views
-
Last post by Brandon G
-
- 5 Replies
- 763 Views
-
Last post by Jay Dub
-
- 5 Replies
- 2422 Views
-
Last post by rctodd1624
-
- 7 Replies
- 1720 Views
-
Last post by Boss155
-
- 20 Replies
- 6987 Views
-
Last post by DennisM
-
- 12 Replies
- 1498 Views
-
Last post by Incredible_Serious


Who is online
Users browsing this forum: No registered users and 9 guests