Your .02 is worth gold, my friend! Now where in the heck am I going to find BRP plastic rivets
NomadRacer's RC10 Trailing Arm Truck
-
NomadRacer

- Approved Member
- Posts: 1467
- Joined: Sun Apr 16, 2017 7:29 am
- Location: Eastern Shore of Virginia
- Has thanked: 81 times
- Been thanked: 79 times
Re: NomadRacer's RC10 Trailing Arm Truck
Bum on Direct Deposit
-
GoMachV

- Approved Member
- Posts: 12184
- Joined: Sun Apr 29, 2012 10:31 pm
- Location: Twin Falls, ID
- Has thanked: 1080 times
- Been thanked: 3729 times
Re: NomadRacer's RC10 Trailing Arm Truck
I’m sure they sourced them from some other industry but not sure which one! They were tiny rivets. I’ll see what I can find
-
NomadRacer
- Approved Member
- Posts: 1467
- Joined: Sun Apr 16, 2017 7:29 am
- Location: Eastern Shore of Virginia
- Has thanked: 81 times
- Been thanked: 79 times
Re: NomadRacer's RC10 Trailing Arm Truck
I've been cutting/filing/sanding for the past couple of nights and getting so close! I've probably dropped the back 6mm so far, about two more to go. 
Bum on Direct Deposit
-
matt1ptkn

- Approved Member
- Posts: 910
- Joined: Wed Dec 12, 2012 8:27 am
- Location: Moundsville, WV
- Has thanked: 80 times
- Been thanked: 133 times
Re: NomadRacer's RC10 Trailing Arm Truck
Wow. That is some very patient precision. Very nicely done!
Matt
Just a part of my RC collection: Matt1ptkn's Toys
"I wish there was a way to tell you're in the good old days, before you've actually left them."
Just a part of my RC collection: Matt1ptkn's Toys
"I wish there was a way to tell you're in the good old days, before you've actually left them."
-
Lonestar

- Approved Member
- Posts: 4270
- Joined: Wed Dec 12, 2007 5:17 am
- Location: Switzerland, yannow, in Europe (or almost)
- Has thanked: 623 times
- Been thanked: 170 times
Re: NomadRacer's RC10 Trailing Arm Truck
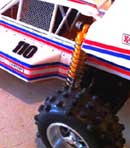
very nice - side pic so we can see the lowered rake, and posibly slammed look?!?NomadRacer wrote: ↑Tue Feb 13, 2018 2:21 pm I've been cutting/filing/sanding for the past couple of nights and getting so close! I've probably dropped the back 6mm so far, about two more to go.
10Tsoclose.jpg
AE RC10 - Made In The Eighties, Loved By The Ladies.
Blue Was Better - now, Blue Is Bankrupt.
Facebook affiliate program manager: "They go out and find the morons for me".
Life is short. Waste it wisely.
Blue Was Better - now, Blue Is Bankrupt.
Facebook affiliate program manager: "They go out and find the morons for me".
Life is short. Waste it wisely.
-
NomadRacer
- Approved Member
- Posts: 1467
- Joined: Sun Apr 16, 2017 7:29 am
- Location: Eastern Shore of Virginia
- Has thanked: 81 times
- Been thanked: 79 times
Re: NomadRacer's RC10 Trailing Arm Truck
I performed a couple of more cuts last night and I'm about 3mm or less from resting on the rear body mount pads. It's touching the tops of the shocks now, which will be and easy cut! After that, it's only some fine work to go for a bit of symmetry. I'll bring you the next pic of it done.Lonestar wrote: ↑Wed Feb 14, 2018 7:16 amvery nice - side pic so we can see the lowered rake, and posibly slammed look?!?NomadRacer wrote: ↑Tue Feb 13, 2018 2:21 pm I've been cutting/filing/sanding for the past couple of nights and getting so close! I've probably dropped the back 6mm so far, about two more to go.
10Tsoclose.jpg
Bum on Direct Deposit
-
NomadRacer
- Approved Member
- Posts: 1467
- Joined: Sun Apr 16, 2017 7:29 am
- Location: Eastern Shore of Virginia
- Has thanked: 81 times
- Been thanked: 79 times
Re: NomadRacer's RC10 Trailing Arm Truck
@Lonestar
Here's what ended up with...
I dropped the rear as much as the body mount and trailing arm hardware would allow. It's pretty close to even now. All's left is to do some fine work of the edges and round some corners off. The body lifts off with ease so I'm quite pleased with my work.
Here's what ended up with...
I dropped the rear as much as the body mount and trailing arm hardware would allow. It's pretty close to even now.
Bum on Direct Deposit
-
Lonestar
- Approved Member
- Posts: 4270
- Joined: Wed Dec 12, 2007 5:17 am
- Location: Switzerland, yannow, in Europe (or almost)
- Has thanked: 623 times
- Been thanked: 170 times
Re: NomadRacer's RC10 Trailing Arm Truck
s'lookign very good - and I'm looking forward to seeing it painted!
AE RC10 - Made In The Eighties, Loved By The Ladies.
Blue Was Better - now, Blue Is Bankrupt.
Facebook affiliate program manager: "They go out and find the morons for me".
Life is short. Waste it wisely.
Blue Was Better - now, Blue Is Bankrupt.
Facebook affiliate program manager: "They go out and find the morons for me".
Life is short. Waste it wisely.
-
NomadRacer
- Approved Member
- Posts: 1467
- Joined: Sun Apr 16, 2017 7:29 am
- Location: Eastern Shore of Virginia
- Has thanked: 81 times
- Been thanked: 79 times
Re: NomadRacer's RC10 Trailing Arm Truck
I got the motor I wanted in today's mail...
MOTIV MC2 13.5 Brushless
MOTIV MC2 13.5 Brushless
Bum on Direct Deposit
Re: NomadRacer's RC10 Trailing Arm Truck
Can you give a tutorial for the Lexan Layman on how you get such beautiful cuts?
This is a great build, now I want to put one like this on my list.
This is a great build, now I want to put one like this on my list.
-
vintage AE
- Approved Member
- Posts: 3012
- Joined: Fri Nov 14, 2008 1:47 pm
- Location: Sunken Lake, Nova Scotia
- Has thanked: 29 times
- Been thanked: 36 times
-
NomadRacer
- Approved Member
- Posts: 1467
- Joined: Sun Apr 16, 2017 7:29 am
- Location: Eastern Shore of Virginia
- Has thanked: 81 times
- Been thanked: 79 times
Re: NomadRacer's RC10 Trailing Arm Truck
As in all things, patience is the key to success. I start out with closely drawn sharpie pen guide lines marked out on the body. Next i drill (by hand) small holes, like 1/16" in the corners of the opening I want to cut out, then carefully join the holes by cutting with a sharp #11 blade. The goal is to get close to the line but not touching it. I use diamond coated files in progressively finer grit to get the opening smooth. I'm not trying to get the cut out to fit perfect the first time. I keep marking new lines,removing material with the files until the fit is near perfect. It takes quite a bit of time, for me anyway, to get those nice cut outs. I probably spent 4-5 nights doing the bed of the truck.
Bum on Direct Deposit
-
Lonestar
- Approved Member
- Posts: 4270
- Joined: Wed Dec 12, 2007 5:17 am
- Location: Switzerland, yannow, in Europe (or almost)
- Has thanked: 623 times
- Been thanked: 170 times
Re: NomadRacer's RC10 Trailing Arm Truck
the most important part appears indeed to be:NomadRacer wrote: ↑Mon Mar 12, 2018 8:34 am As in all things, patience is the key to success. I start out with closely drawn sharpie pen guide lines marked out on the body. Next i drill (by hand) small holes, like 1/16" in the corners of the opening I want to cut out, then carefully join the holes by cutting with a sharp #11 blade. The goal is to get close to the line but not touching it. I use diamond coated files in progressively finer grit to get the opening smooth. I'm not trying to get the cut out to fit perfect the first time. I keep marking new lines,removing material with the files until the fit is near perfect. It takes quite a bit of time, for me anyway, to get those nice cut outs. I probably spent 4-5 nights doing the bed of the truck.
your attention to detail is amazing in all your builds
AE RC10 - Made In The Eighties, Loved By The Ladies.
Blue Was Better - now, Blue Is Bankrupt.
Facebook affiliate program manager: "They go out and find the morons for me".
Life is short. Waste it wisely.
Blue Was Better - now, Blue Is Bankrupt.
Facebook affiliate program manager: "They go out and find the morons for me".
Life is short. Waste it wisely.
Create an account or sign in to join the discussion
You need to be a member in order to post a reply
Create an account
Not a member? register to join our community
Members can start their own topics & subscribe to topics
It’s free and only takes a minute
Sign in
-
- Similar Topics
- Replies
- Views
- Last post
-
- 2 Replies
- 956 Views
-
Last post by Synergy
-
- 33 Replies
- 7869 Views
-
Last post by GoMachV
-
- 2 Replies
- 922 Views
-
Last post by THUNDERSTRIKE1
-
- 7 Replies
- 1358 Views
-
Last post by nvxwax
-
- 11 Replies
- 3740 Views
-
Last post by KidAgain
-
- 3 Replies
- 1128 Views
-
Last post by carloco8
-
- 31 Replies
- 6582 Views
-
Last post by vintage AE
-
- 16 Replies
- 3215 Views
-
Last post by orangemazda
Who is online
Users browsing this forum: No registered users and 11 guests