Project F-Bomb: Reimagining a WLToys 144001

For all things R/C, post '90s to today.

Moderators: scr8p, klavy69

User avatar
Coelacanth
Approved Member
Posts: 7370
Joined: Thu Jul 29, 2010 6:20 pm
Location: Alberta, Canada
Has thanked: 16 times
Been thanked: 288 times

Project F-Bomb: Reimagining a WLToys 144001

Post by Coelacanth »

My 10-year-old daughter enjoyed playing with the 1:18-scale Conqueror crawler I upgraded before the pandemic hit, but I felt it was time for her to get something faster. After a while watching eBay auctions, I came across a used WLToys 144001 1:14-scale buggy that I would've otherwise ignored, but it included a bunch of extra electronics like a couple brushless motors (A GoolRC and a nice Castle motor), a 120A generic ESC, two 2S LiPo batteries and a 3S LiPo battery. I offered $80 CAD plus shipping and the seller accepted. I figured the car would make a decent basher and the electronics were well worth my offer and even then some, even without the car. I never seriously gave the WLToys brand any consideration before, I figured they were just plastic craptastic toy-grade RC's with some shiny aluminum bits for bling thrown in. That may well be the case for most of their stuff, but the 144001 is quite a lot more than that.

EDIT: Feb. 5, 2021

Here's what I received in addition to the WLToys 144001 car and its stock cheapo transmitter, and probably the biggest reason why I pulled the trigger on this eBay item for under $100 USD shipped:

Electronics.jpg

I had to wait for some initial transaction issues with the seller to get ironed out. The original eBay item description included a Castle motor and 3S LiPo battery, shown in the pictures, but weren't received. The seller offered me all this stuff, even though I said I'd be happy with just the motor and battery that were shown in the description...it was an offer I couldn't refuse!

-GoolRC 4300 kV motor (this was initially shipped instead of the Castle 2.5T motor)
-Castle 5700 kV 3.5T motor
-Castle 6900 kV 2.5T motor
-Tamiya Lightly Tuned brushed motor (#53983)...anybody have any info on this? It looks nice for a brushed motor, should clean up well.
-Generic waterproof brushed motor ESC
-Generic 120A v2.3 brushless ESC, looks new
-2 x 7.4V 1500 mAh LiPo batteries
-7.4V 1600 mAh LiPo battery
-11.1V 950 mAh LiPo battery

I'll put some of this stuff up for sale in the B/S/T section to offset most or all of the cost of the car purchase and upgrades; if you see something you might like, send me a PM.

To summarize: The 144001 is a total hobby-grade chassis with almost-toy-grade electronics. If you already have radio gear, an ESC and brushless motor, all you need is an upgraded 3-wire servo and you'll have a fantastic little RC buggy that can be made into a real screamer. The stock servo is a 5-wire unit and unfortunately the receiver is integrated with the stock ESC, so to go brushless, you'll be replacing the ESC, receiver and servo along with your motor of choice. At least it's a real servo, unlike the one-way motors you'll find with most toy-grade RC's, and it at least has an ESC of sorts, not just a crap circuit board. I bought an extra receiver for the FlySky GT3B I already had and will bind it to one of the 10 car presets.

The 144001 chassis is nothing short of pure hobby-grade, I was amazed to be honest. It comes with 21 bearings (a pair at each axle hub, 2 for each diff, 2 at each end of the center shaft, 1 on the center shaft where the motor plate "captures" it, and 4 for the ball-raced steering posts); nice aluminum oil-filled shocks, a ton of adjustability you wouldn't expect from a "toy-grade" RC (shocks, camber links, suspension pin mounts all have multiple mounting points; even the wheelbase can be easily increased a tad by flipping the rear arms and shocks)...you have a ton of inexpensive replacement and upgrade parts support on eBay, Amazon, BangGood or AliExpress.

For this Project F-Bomb--named after my daughter's name Fritsel--I'll be doing a complete tear-down, rebuild and adding some selective upgrades where necessary. You can get stupid and buy complete aluminum upgrade kits that cost up to twice as much as the original $100 USD car, but some of those upgrade parts aren't necessary...or might even be detrimental to performance and sturdiness. I'll be removing the stock 550-size Mabuchi crap brushed motor and swapping in a 21.5T 1489 kV sensored brushless motor I had lying around that would be perfect for a 10-year-old learning to drive an RC car. It will be easy to upgrade that further to a 13.5T motor, but this thing would be a rocket with that kind of power. I also had this old LRP Sphere sensored ESC lying around, might as well put that to use too.

ProposedMotor-ESC-Combo.jpg

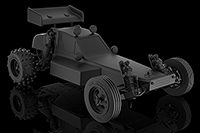
So, here's the car as I received it, in all its glory. Humorously, I just noticed that the previous owner had the wider tires installed on the front. :mrgreen:

Before1.jpg
Before2.jpg

A closeup of the all-plastic front end; I'll be upgrading the hubs & knuckles with alloy bits but will leave the arms plastic. Word is people who "upgrade" to alloy arms end up breaking their gearboxes...you can get a 6-pack of replacement arms for about $17 from China, so I bought a set of those. One of the rear arms on this car was damaged, but the other 3 were good.

Before_FrontEnd1.jpg

One of the common problems found with these 144001's is the sealed diffs weren't packed with much grease. People often ended up with cars doing the "clicky clicky" when the diff gears stripped, especially when people are slapping low-turn motors and 3S LiPos in these to do idiotic speed-runs. The diffs are sealed but can be disassembled. They looked similar to Kyosho Optima gear diffs on the inside. The front & rear gearboxes themselves were packed sufficiently with grease, but I did find the diffs to have just the bare minimum of grease packed inside. Note the 2 bearings at each end of the center shaft, a nice feature.

Before_Gearbox.jpg
Completed projects: CYANide Onroad Optima | Zebra Gold Optima | Barney Optima | OptiMutt RWD Mid
Gallery - Coel's Stalls: Marui Galaxy & Shogun Resto-Mods | FrankenBuff AYK Buffalo | 1987 Buick GNX RC12L3

User avatar
Coelacanth
Approved Member
Posts: 7370
Joined: Thu Jul 29, 2010 6:20 pm
Location: Alberta, Canada
Has thanked: 16 times
Been thanked: 288 times

Re: Project F-Bomb: Reimagining a WLToys 144001

Post by Coelacanth »

Chassis stripped down with motor plate removed. This is a fun little car to work on, once you get the electronics removed, it's like working on any hobby-grade chassis. It even has 12mm hex hubs so using a wide variety of wheels is possible. Only issue is the cross-pins are thinner than the standard 2mm pins you find on most 1:10-scale cars...but if bent, are easily replaced with piano wire or even pieces of paper-clip. I've seen lots of "upgrade" axle extenders but I don't see the point; the car has a relatively short wheelbase as it is, and pushing out the wheels and increasing the track width would only make it have very twitchy steering.

Chassis_Stripped.jpg

You will find the motor plate difficult to remove as the screws are in real tight. Apparently CA glue was used to install the plate. I was able to get mine out without stripping the screws, but I'll be replacing it with a red alloy one that is sold in a set with red upgrade shock towers, which I need to replace anyway as the rear tower is a bit bent. The motor pinion grub screw is practically impossible to remove. Mine had the hex practically stripped out already by the previous owner, who said he was planning to go brushless and had all the parts...but I think I discovered why he gave up on the project. :lol: I'll see what I can do to remove that grub screw and re-use the pinion gear, but I already ordered a replacement gear set (that also upgrades the plastic spur gear with a metal one)...so, replacing the motor plate with another while buying a replacement pinion gear makes removal of the original pinion a moot point.

Rebuilding the diffs; I packed them full of marine grease before reassembly; fortunately all the existing bevel and crown gears were in great shape. Probably wouldn't have been the case if the previous owner actually succeeded in installing a BL ESC, 3S LiPo and 2.5T Castle motor. :shock: The outdrives also fortunately had very little wear.

DiffRebuild1.jpg
DiffRebuild2.jpg

Center shaft and gearboxes greased and oiled and reassembled; I'll be replacing that plastic top chassis plate in the background with an upgrade alloy one as the plastic one is too flexible. The aluminum plate should give the upper chassis more rigidity.

Diffs-CenterShaft_Done1.jpg
Diffs-CenterShaft_Done2.jpg
Completed projects: CYANide Onroad Optima | Zebra Gold Optima | Barney Optima | OptiMutt RWD Mid
Gallery - Coel's Stalls: Marui Galaxy & Shogun Resto-Mods | FrankenBuff AYK Buffalo | 1987 Buick GNX RC12L3

User avatar
Coelacanth
Approved Member
Posts: 7370
Joined: Thu Jul 29, 2010 6:20 pm
Location: Alberta, Canada
Has thanked: 16 times
Been thanked: 288 times

Re: Project F-Bomb: Reimagining a WLToys 144001

Post by Coelacanth »

Next up was rebuilding the shocks. They are pretty nice, not just some shiny bling. Each shock retains the piston ring with a crosspin. The bottom red ring secures 2 outer plastic retainer rings sandwiching 2 O-rings. 2 O-rings for each shock is something I wasn't expecting for a "toy grade" RC. The top caps also have rubber diaphragms beneath. I replaced 2 of the bottom ball-ends as one was deformed and bent. I used Kyosho ball-ends; the shock shafts are 3mm. One of the plastic top ball-ends was pretty gouged but going through my shock parts stash, I couldn't find something that fit exactly, so I'll eventually replace it later. It'll have to do for now.

Shocks_Before.jpg
Shocks_Disassembled.jpg
Shocks_Rebuilt.jpg

Pic of the rear end cleaned up and reassembled in the stock configuration:

RearEnd.jpg

Here's the stock rear shock reassembly. The wheelbase increase involves flipping the arms and mounting the shocks on the front of the tower instead of the rear, but costs nothing and needs no additional parts. I may go that route later but it depends on a particular body I have in mind for this car. It has fenders molded to fit the original car and might not look good with a slightly longer wheelbase. In my reassembly below, I've swapped out the stock black plastic top spacers for some nice red alloy bits, just for aesthetics...I have a lot of red alloy stuff leftover from my Red Tide Lucas Agitator project, still in hiatus, so why not use them? :mrgreen:

RearShocks_StockInstall2.jpg
RearShocks_StockInstall1.jpg

I've already decreased the rear toe-in. The car has a lot of rear toe and it can be easily decreased by reversing the rear plastic hinge pin retainers so the offset holes are outboard instead of inboard. The hinge pin retainers at the front of the rear hinge pins also have the holes offset, but vertically instead of horizontally...so I guess you could tweak rear ride height a bit. Little adjustability details like this aren't what I expected with this car. 8)
Completed projects: CYANide Onroad Optima | Zebra Gold Optima | Barney Optima | OptiMutt RWD Mid
Gallery - Coel's Stalls: Marui Galaxy & Shogun Resto-Mods | FrankenBuff AYK Buffalo | 1987 Buick GNX RC12L3

User avatar
Coelacanth
Approved Member
Posts: 7370
Joined: Thu Jul 29, 2010 6:20 pm
Location: Alberta, Canada
Has thanked: 16 times
Been thanked: 288 times

Re: Project F-Bomb: Reimagining a WLToys 144001

Post by Coelacanth »

Pic of front end disassembled and cleaned; note that the inner hinge pins are standard 1:10-scale 3mm diameter, the outer pins are thinner. I'll have to measure to be sure but wanted to point out the difference.

FrontEnd_Disassembled.jpg

Pic of steering components disassembled; I'm 90% sure there are 4 bearings used here; 2 for sure are used on top and bottom of the post on the left in the picture, and probably another 2 on either side of the black plastic arm on the right--but the aluminum post mostly hides one of them.

Steering_Disassembled.jpg

The stock front end configuration and shock length results in way too much suspension arm droop, prone to dropping dogbones. Even if the shock ball-ends are tightened to as short a length as possible, it's still too much. The solution is surprisingly simple; screw in a short 3mm screw in the hole of each arm as shown circled in my picture here. The more you screw it in, the more the bottom of the screw protrudes below the bottom of the arm and ultimately butts up against the chassis plate, and increasingly limits how far down the arm will droop. I can't take credit for some of these mods, there's a guy who has documented a lot of mod tutorials that are very helpful to anyone planning to mod one of these cheap cars into a killer RC buggy:

https://www.quadifyrc.com/rccarreviews/wl-toys-144001-setup-3-things-you-must-do-before-you-even-turn-it-on

FrontArms_DroopAdjust.jpg
Completed projects: CYANide Onroad Optima | Zebra Gold Optima | Barney Optima | OptiMutt RWD Mid
Gallery - Coel's Stalls: Marui Galaxy & Shogun Resto-Mods | FrankenBuff AYK Buffalo | 1987 Buick GNX RC12L3

User avatar
Coelacanth
Approved Member
Posts: 7370
Joined: Thu Jul 29, 2010 6:20 pm
Location: Alberta, Canada
Has thanked: 16 times
Been thanked: 288 times

Re: Project F-Bomb: Reimagining a WLToys 144001

Post by Coelacanth »

Test-fitting some HPI Vintage VTA wheels & tires, I was pleased to see the proportions look very good for what I have in mind for this build. By comparison, the stock tire diameter is about 72mm while the VTA tire diameter is about 62mm. In my opinion, the stock tire size suits the car for off-road bashing, but looks disproportionately large to my eyes. The track width for the wheels and body I have in mind should be a nicer fit. With all my builds, I feel that the right set of wheels makes any car stand out from the crowd.

Wheels_TestFit.jpg
Completed projects: CYANide Onroad Optima | Zebra Gold Optima | Barney Optima | OptiMutt RWD Mid
Gallery - Coel's Stalls: Marui Galaxy & Shogun Resto-Mods | FrankenBuff AYK Buffalo | 1987 Buick GNX RC12L3

User avatar
matt1ptkn
Approved Member
Posts: 910
Joined: Wed Dec 12, 2012 8:27 am
Location: Moundsville, WV
Has thanked: 80 times
Been thanked: 132 times

Re: Project F-Bomb: Reimagining a WLToys 144001

Post by matt1ptkn »

Pretty cool. I'm looking forward to what you have in store!
Matt

Just a part of my RC collection: Matt1ptkn's Toys

"I wish there was a way to tell you're in the good old days, before you've actually left them."

User avatar
Coelacanth
Approved Member
Posts: 7370
Joined: Thu Jul 29, 2010 6:20 pm
Location: Alberta, Canada
Has thanked: 16 times
Been thanked: 288 times

Re: Project F-Bomb: Reimagining a WLToys 144001

Post by Coelacanth »

For anyone who's not familiar with these 144001's...the naming scheme leaves a lot to be desired, after all...here's the ridiculousness that guys are doing with these cars, at least it shows the amazing potential of the chassis:

Completed projects: CYANide Onroad Optima | Zebra Gold Optima | Barney Optima | OptiMutt RWD Mid
Gallery - Coel's Stalls: Marui Galaxy & Shogun Resto-Mods | FrankenBuff AYK Buffalo | 1987 Buick GNX RC12L3

adam lancia
Approved Member
Posts: 1116
Joined: Tue Feb 05, 2008 6:37 pm
Location: Donkin, Nova Scotia, Canada
Has thanked: 7 times
Been thanked: 41 times

Re: Project F-Bomb: Reimagining a WLToys 144001

Post by adam lancia »

Damn! That's cool! I'm going to have to keep my eyes peeled for one of these, it'll be perfect for the kids to learn on!

User avatar
Coelacanth
Approved Member
Posts: 7370
Joined: Thu Jul 29, 2010 6:20 pm
Location: Alberta, Canada
Has thanked: 16 times
Been thanked: 288 times

Re: Project F-Bomb: Reimagining a WLToys 144001

Post by Coelacanth »

Some of the parts I ordered to move this project along started rolling in from Amazon and eBay. First, an upgrade set of metal gears to replace the original nylon idler gear and metal pinion gear, which is practically impossible to remove without a lot of luck, or by destroying it. The grub screw is glued in with CA cement by the factory. Mine wouldn't come loose no matter what. Heat, PB Blaster, reverse-threaded extractors...no dice.

https://www.amazon.com/Zripool-Reduction-Wltoys-144001-Upgrade/dp/B08HV7BMC2

I needed to replace all the dogbones/CVDs as they're all were bent to varying degrees. These upgrade CVDs are a nice upgrade for the rear axles. It claims to be hardened steel in the eBay description, but even if they're not, they're thicker. They're not straight like the originals, they taper thicker towards the U-joint end, and step up to a thicker shaft diameter. I was surprised that even the thinner end before the step was thicker than the original, which was about 2.48mm or so from end-to-end. The upgrade CVD is 2.60 before the step, 3.0mm at the thicker middle, and tapers thicker than that at the joint. Your eyes aren't deceiving you about the length...the upgrade CVD is about 3 or 4mm longer. I was concerned this might be an issue but even with the droop fixed to a more appropriate angle than original (i.e. more horizontal, less droop), the new CVDs don't go too deep in the outdrives and don't butt up against the outdrives with full shock compression. Nothing to worry about! This car was known to have issues with dogbones/CVDs falling out, probably because they were a bit too short and because the stock configuration has more droop than a 90-year-old man who just ran out of Viagra.

https://www.ebay.ca/itm/2pcs-hardened-steel-CVD-drive-shaft-for-rc-hobby-car-1-14-Wltoys-144001-buggy/203003672668

UpgradeCVDs1.jpg
UpgradeCVDs2.jpg
Completed projects: CYANide Onroad Optima | Zebra Gold Optima | Barney Optima | OptiMutt RWD Mid
Gallery - Coel's Stalls: Marui Galaxy & Shogun Resto-Mods | FrankenBuff AYK Buffalo | 1987 Buick GNX RC12L3

User avatar
Coelacanth
Approved Member
Posts: 7370
Joined: Thu Jul 29, 2010 6:20 pm
Location: Alberta, Canada
Has thanked: 16 times
Been thanked: 288 times

Re: Project F-Bomb: Reimagining a WLToys 144001

Post by Coelacanth »

Some more parts showed up yesterday. I needed to replace the motor mount because I couldn't get the pinion gear off the stock brushed motor. The original rear shock tower was also a little bent. I found this parts combo on Amazon to address both issues, so why not. It'll also continue the red color scheme. This is one of the few proper 3-wire servo models to replace the original 5-wire servo, it has the same dimensions so it will fit right in the stock servo mount. It's a PDI-1181MG.

https://www.amazon.com/LoveinDIY-Metal-Front-Shock-Motor/dp/B08D3QLVDD

https://www.ebay.ca/itm/Upgrade-Digital-Servo-Metal-Steering-Gear-Pdi-1181Mg-17G-3-5Kg-for-Wpl-Rc-F2B6/254628480482

As soon as I get the 6-pack set of replacement arms, I'll be able to replace the one broken front arm and finish rebuilding this li'l beast.

MotorMount_ShockTowers_Servo.jpg
Completed projects: CYANide Onroad Optima | Zebra Gold Optima | Barney Optima | OptiMutt RWD Mid
Gallery - Coel's Stalls: Marui Galaxy & Shogun Resto-Mods | FrankenBuff AYK Buffalo | 1987 Buick GNX RC12L3

User avatar
Coelacanth
Approved Member
Posts: 7370
Joined: Thu Jul 29, 2010 6:20 pm
Location: Alberta, Canada
Has thanked: 16 times
Been thanked: 288 times

Re: Project F-Bomb: Reimagining a WLToys 144001

Post by Coelacanth »

Here's a comparison of the upgrade shock towers with the stock ones. At first, I thought they would just be some shiny alloy bling, but they're significantly thicker. The stock towers are about 2.40mm thick; the upgrade ones are 1.5mm thicker at 3.93mm or so...not including the thicker parts at the top where the shock tops are screwed in. I thought that extra thickness there might be an issue that would affect the mounting position or angle, but the original install uses thick black plastic spacers there anyway, so things pretty much match up. One issue I did find, however, is that the 4 bulkhead mounting holes on each of the towers had to be drilled out to 3mm. The original self-tapping screws wouldn't even fit through those holes. :?

NewShockTowers1.jpg
NewShockTowers2.jpg
NewShockTowers3.jpg

Next up was to install a better brushless motor than the stock 550-size generic brushed motor. I had to scrap my plans to install the 21.5T sensored motor. I found that the motor mounting holes on that motor were spaced further apart than with all the rest of my brushless motors, even though they're all the same diameter of can. Weird! I could've made it work by modding the new motor plate, but when I saw all the other motors had the exact same separation of the mounting holes as the motor plate, I chose the slowest sensored motor I had lying around, a 13.5T SpeedPassion Competition 3.0 motor. I couldn't find the kV rating of this motor anywhere but I believe it's somewhere just at or under 3000 kV. It's the slowest motor I could find that perfectly fit the motor plate. I installed the new pinion gear and after reinstalling the plate, the pinion gear meshes perfectly with the idler gear, no adjustment necessary.

Motor.jpg
Completed projects: CYANide Onroad Optima | Zebra Gold Optima | Barney Optima | OptiMutt RWD Mid
Gallery - Coel's Stalls: Marui Galaxy & Shogun Resto-Mods | FrankenBuff AYK Buffalo | 1987 Buick GNX RC12L3

User avatar
Coelacanth
Approved Member
Posts: 7370
Joined: Thu Jul 29, 2010 6:20 pm
Location: Alberta, Canada
Has thanked: 16 times
Been thanked: 288 times

Re: Project F-Bomb: Reimagining a WLToys 144001

Post by Coelacanth »

The upgrade 3-wire servo I linked earlier slapped right in the stock mounting bracket, snug as a bug in a rug. Surprisingly, the stock servo horn also popped right on, the splines matched right up.

ServoUpgrade.jpg
Completed projects: CYANide Onroad Optima | Zebra Gold Optima | Barney Optima | OptiMutt RWD Mid
Gallery - Coel's Stalls: Marui Galaxy & Shogun Resto-Mods | FrankenBuff AYK Buffalo | 1987 Buick GNX RC12L3

adam lancia
Approved Member
Posts: 1116
Joined: Tue Feb 05, 2008 6:37 pm
Location: Donkin, Nova Scotia, Canada
Has thanked: 7 times
Been thanked: 41 times

Re: Project F-Bomb: Reimagining a WLToys 144001

Post by adam lancia »

I've got my eyes peeled for one of these. It looks like a good starter car for my kids with lots of cheap, available parts. Thanks for the build progress!

User avatar
Coelacanth
Approved Member
Posts: 7370
Joined: Thu Jul 29, 2010 6:20 pm
Location: Alberta, Canada
Has thanked: 16 times
Been thanked: 288 times

Re: Project F-Bomb: Reimagining a WLToys 144001

Post by Coelacanth »

Here is one option I am considering for wheels for this project. It's a rare set made by Kawada...what makes it rare is the wider, negative offset rear wheels with deep-dish look. Finding tires to fit these is like finding hen's teeth! The fronts are standard 26mm-size touring or drift car size. I don't have the wider tires for the rears yet, but I could at least mount the 26mm tires to see how things look.

WheelsOption1b.jpg

I next got to working with installing the ESC and figuring out positioning of the electronics. With a 1:10-scale car, it's a breeze...not so much with a 1:14-scale buggy. One thing I discovered was a nice thoughtful feature of the aftermarket aluminum top deck, you can remove just the rear piece to have access to the motor and pinion/spur gear area without having to remove the whole deck. Very cool. I'm really impressed with this car's design. At the top of my mind is that this buggy was meant to be worked on, unlike most toy-grade RC cars. You can see it with all the adjustment points and everything bolted down and modular. It's not all integrated with big chunks of plastic and difficult if not impossible to disassemble everything or upgrade anything...something I could say about a lot of well-known hobby-grade RC brands!

MotorAccess1a.jpg
MotorAccess1b.jpg

Here's the used LRP sensored ESC installed, with a minimum of motor wires. I ground round notches into the sides of some 3.5mm female EC3 conectors and soldered the motor wires to the connectors with a 90-degree bend so they plug in nice and neat.

ESC_Install.jpg
Completed projects: CYANide Onroad Optima | Zebra Gold Optima | Barney Optima | OptiMutt RWD Mid
Gallery - Coel's Stalls: Marui Galaxy & Shogun Resto-Mods | FrankenBuff AYK Buffalo | 1987 Buick GNX RC12L3

User avatar
Coelacanth
Approved Member
Posts: 7370
Joined: Thu Jul 29, 2010 6:20 pm
Location: Alberta, Canada
Has thanked: 16 times
Been thanked: 288 times

Re: Project F-Bomb: Reimagining a WLToys 144001

Post by Coelacanth »

I figured out where I wanted to mount the receiver, so that the connectors would all be easy to access and antenna have a logical way to be routed. There's not a lot of options for this chassis. Where I wanted to put it, it wouldn't sit flat because of the raised plastic chassis side "skirts" or whatever you want to call them are about 2mm higher than the chassis floor. I decided to fabricate a little receiver mounting plate from a spare chopped-up piece of Kyosho Optima radio plate. With that stuck in place with double-sided tape, the receiver could mount almost perfectly where I wanted it.

ReceiverMountingPlate.jpg

I then fabricated an antenna mount, drilling a hole in the aluminum top deck and shaving a "V" shape into the plastic mount that would overhang the V-shaped cutout of the top deck, thus preventing it from rotating in either direction.

AntennaMount.jpg

As with all my cars, here's the point where the project takes a turn for the unexpected and veers way off-tangent. 8) I found this cool 1979 Ford Escort rally body that I thought would look great. I'm not thrilled that the tires go way past the fenders, but it's gonna be a rally car anyway, so I'll live with it. It'll still look too cool. I've already downloaded a bunch of pictures of the actual car's grille, taillights and emblems, and will print up some vinyl stickers the same way I did for my RC12L3 Buick Grand National pan car body. Once it's painted metallic hot pink with black trim and flat black hood (daughter's choice...heh), it's gonna be one cool little beast! I was extremely lucky...this body was sold out on WarrenRC's eBay store and also at their Phat Bodies online store, but I gave them a call...he said it was sold out, but there was one left on their shelf. I don't think they're making any more. Some of those 70's compact cars were so cool, they had a look reminiscent of their bigger muscle-car cousins. I've always loved those old Dodge Colts but I've never seen anybody make a body of those. Although this is a Ford Escort, I'll try to paint it somewhat reminiscent of a 1974 Dodge Colt GT.

EscortBody1.jpg
EscortBody2.jpg
EscortBody3.jpg
1974 Dodge Colt GT.jpg
Completed projects: CYANide Onroad Optima | Zebra Gold Optima | Barney Optima | OptiMutt RWD Mid
Gallery - Coel's Stalls: Marui Galaxy & Shogun Resto-Mods | FrankenBuff AYK Buffalo | 1987 Buick GNX RC12L3

Post Reply

Create an account or sign in to join the discussion

You need to be a member in order to post a reply

Create an account

Not a member? register to join our community
Members can start their own topics & subscribe to topics
It’s free and only takes a minute

Register

Sign in

  • Similar Topics
    Replies
    Views
    Last post
  • WLToys 144001 at Walmart for $37! (back on sale!)
    by Bottom Feeder » » in 21st Century Modern
    88 Replies
    5898 Views
    Last post by R6cowboy
  • WLToys A959B Project that got out of hand
    by Pyxster » » in 21st Century Modern
    6 Replies
    1278 Views
    Last post by Pyxster
  • rc10 6010 bomb blast
    by scr8p » » in RC10 Buggy Forum
    29 Replies
    2960 Views
    Last post by scr8p
  • A GOOD SPRAY BOMB FOR ALLUMINUM CHASSIS
    by 17nut » » in Temple's RC10 Tech Forum
    6 Replies
    802 Views
    Last post by scr8p
  • Which bomb-proof servo (metal gears)?
    by flipwils11 » » in Temple's RC10 Tech Forum
    6 Replies
    770 Views
    Last post by flipwils11
  • WLTOYS 12th / 14th scale CVDs
    by Chewbacca » » in R/C Off-Topic / Chit-Chat
    2 Replies
    373 Views
    Last post by Chewbacca
  • My First Vintage Tamiya Blackfoot Restoration Project project Finally Finished!
    by TycoTamiya4eva » » in Tamiya Forum
    9 Replies
    200 Views
    Last post by TycoTamiya4eva
  • My RC10T project------slowwww project
    by Truckguy » » in RC10 Truck Forum
    7 Replies
    1536 Views
    Last post by Truckguy

Return to “21st Century Modern”

Who is online

Users browsing this forum: No User AvatarRlayman and 5 guests