My 10T SC conversion
-
Charlie don't surf

- Approved Member
- Posts: 9182
- Joined: Tue Apr 08, 2008 2:44 pm
- Location: USA
- Has thanked: 220 times
- Been thanked: 322 times
-
cautrell05
- Approved Member
- Posts: 209
- Joined: Tue Feb 15, 2011 1:51 pm
- Location: Norfolk Nebraska
Re: My 10T SC conversion
I went with the aluminum because I had plenty of it. I still have a 2foot by 3 foot piece left from my stock car. I dont have any fiberglass and it would have made the front tower a bit harder to make.
The hydradrive came with an old rpm chassis I got a while ago. With all the new parts im sticking on the 10T I have enough left over to put the rpm back together. I am however willing to sell the hydradrive. It came with the rpm cover and 4 or 5 spur gears mounted on an mip 260 gearbox.
Nick
The hydradrive came with an old rpm chassis I got a while ago. With all the new parts im sticking on the 10T I have enough left over to put the rpm back together. I am however willing to sell the hydradrive. It came with the rpm cover and 4 or 5 spur gears mounted on an mip 260 gearbox.
Nick
-
littleVETTE

- Approved Member
- Posts: 1418
- Joined: Mon Aug 11, 2008 4:07 pm
- Location: U.S.A.
- Has thanked: 6 times
- Been thanked: 9 times
Re: My 10T SC conversion
you can't go wrong with that.cautrell05 wrote:I went with the aluminum because I had plenty of it. I still have a 2foot by 3 foot piece left from my stock car. I dont have any fiberglass and it would have made the front tower a bit harder to make.
The hydradrive came with an old rpm chassis I got a while ago. With all the new parts im sticking on the 10T I have enough left over to put the rpm back together. I am however willing to sell the hydradrive. It came with the rpm cover and 4 or 5 spur gears mounted on an mip 260 gearbox.
Nick
-
cautrell05
- Approved Member
- Posts: 209
- Joined: Tue Feb 15, 2011 1:51 pm
- Location: Norfolk Nebraska
Re: My 10T SC conversion
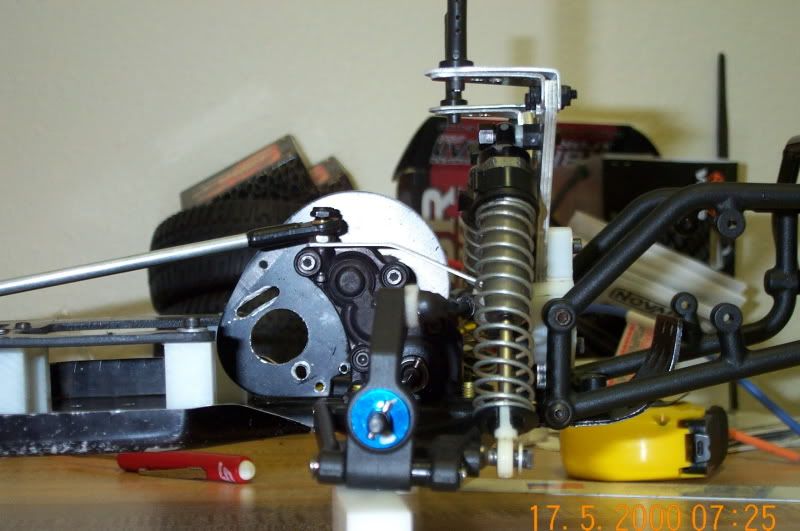
Time for more pictures. The chassis is all together except for electronics and rebuilding the shocks. This is a good shot of the steering before putting the top deck on.
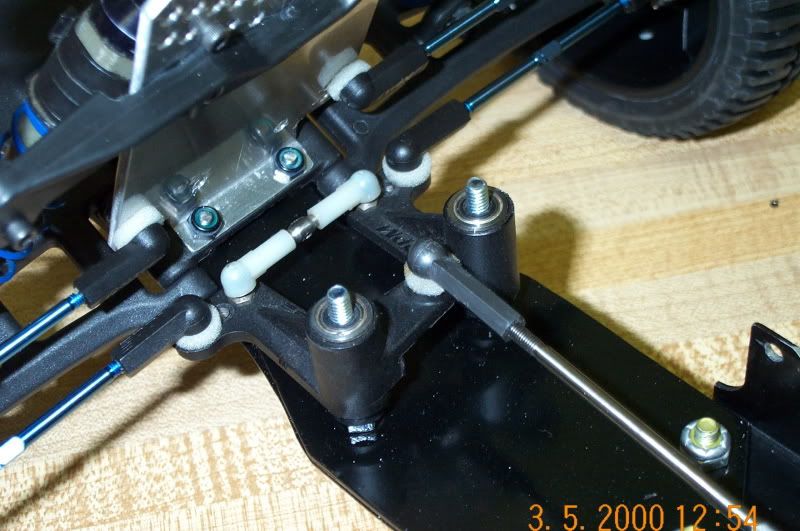
Gives you a good idea of how empty the nose is. BTW If anyone has an extra RPM steering set for th 10T that you would like to part with shoot me a pm. I robbed this one from the RPM chassis that I have sitting that will probably be put back together after this.
Tried dying parts for the first time the other night. I didnt really care for the off white rear arm mounts and transmission case. The main thing however that I wanted to dye was the blocks for the battery hold downs and servo mount. Most of it came out pretty good though.
The case and arm mounts look like they came that way. same with the caster blocks and antenna mount. However, notice the off color block in the middle. That was a test piece of the same material that the battery mounts are made of after it soaked in the pot with the heat on for 30 min. Looks like im stuck with the white unless I get mad and spray paint them.
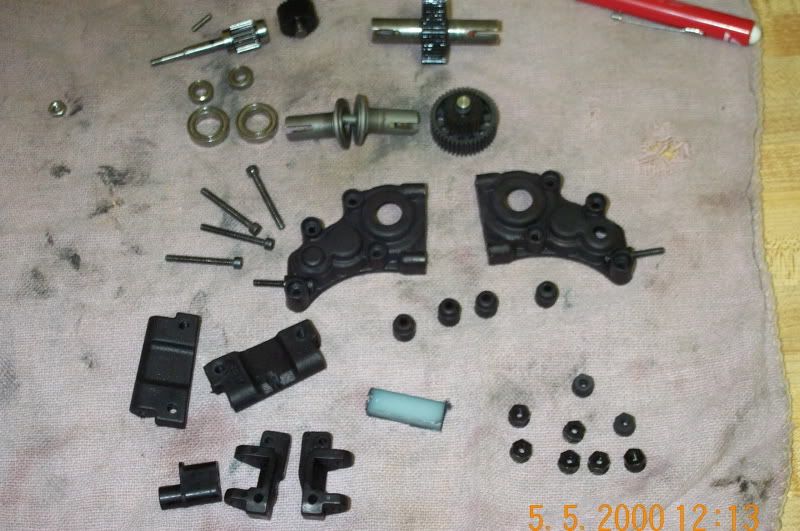
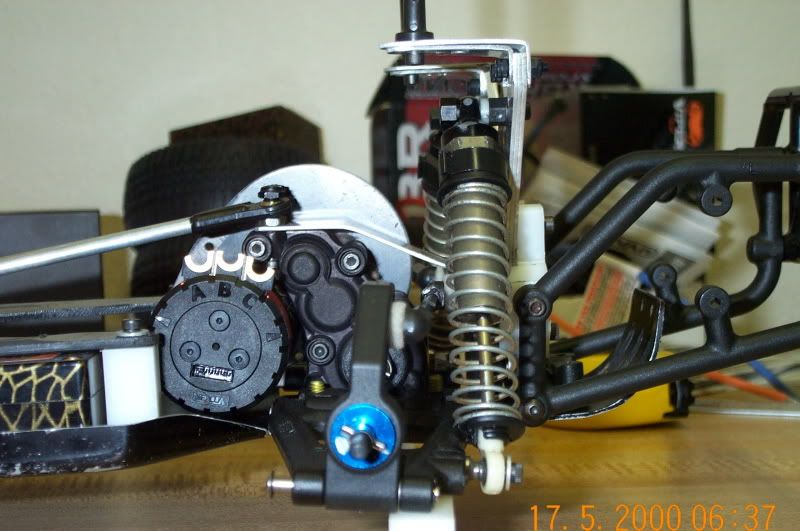
Transmission is back together with new main and idler gears as well as new balls and rings. Noticed something on the diff adjusting screw. An old shock o-ring fits perfectly around the head of the screw and seals the thrust bearing from the outside. It should work well to keep dirt out and provided its an old shock seal there is hardly any extra resistance when turning the outdrives. If it was tight on the screw i would be worried about diff adjustment but it isnt.
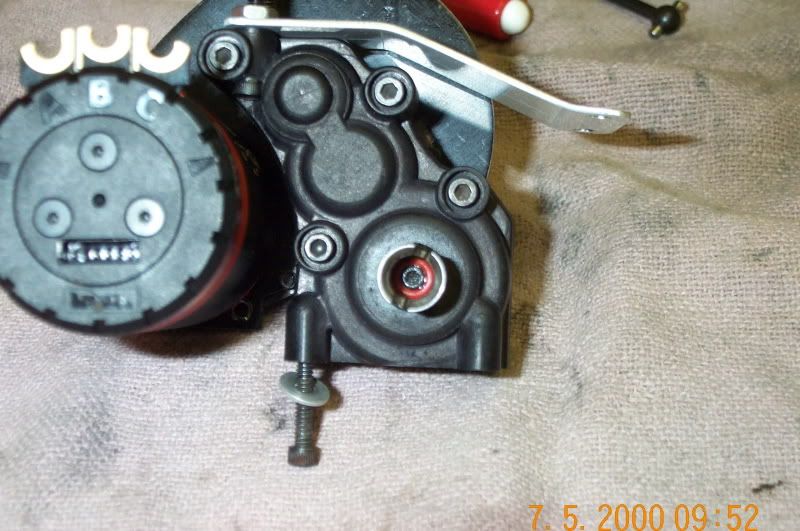
I doubt im the first one to figure it out but I thought I would share it anyway.
The back half looks tons better with the black case and mounts.
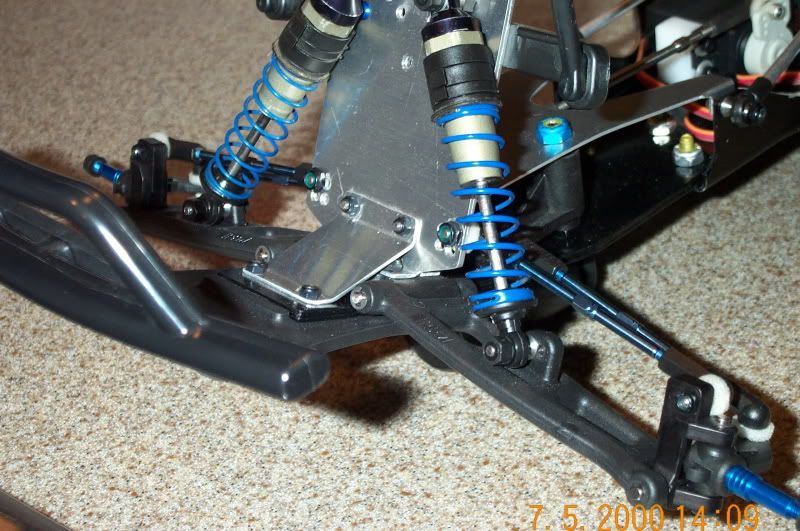
Front end all pimped out ready to go other than shocks. Still cant believe the bump steer came out perfect. Ive never had a truck with good bumpsteer. Should be interesting.
As promised an uncluttered overall shot. The top braces came out exactly like I wanted. aluminum tube over 1/8 carbon rod. Just under 1/2 ounce for the pair vs 1.5 ounces for the old ones.
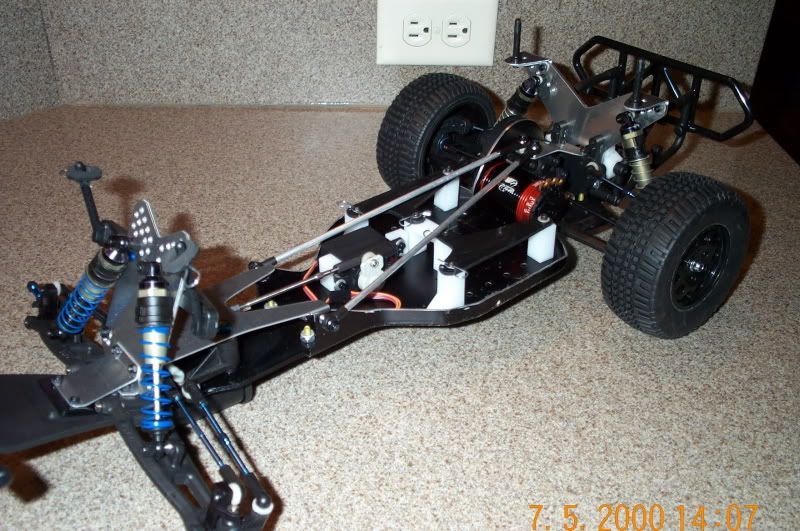
Running out of excuses to paint the body so I suppose I should get at it this weekend. That comnined with wiring the esc and motor as well as taking a foot of wire off of the steering servo should give be a bit to do.
Nick
Gives you a good idea of how empty the nose is. BTW If anyone has an extra RPM steering set for th 10T that you would like to part with shoot me a pm. I robbed this one from the RPM chassis that I have sitting that will probably be put back together after this.
Tried dying parts for the first time the other night. I didnt really care for the off white rear arm mounts and transmission case. The main thing however that I wanted to dye was the blocks for the battery hold downs and servo mount. Most of it came out pretty good though.
The case and arm mounts look like they came that way. same with the caster blocks and antenna mount. However, notice the off color block in the middle. That was a test piece of the same material that the battery mounts are made of after it soaked in the pot with the heat on for 30 min. Looks like im stuck with the white unless I get mad and spray paint them.
Transmission is back together with new main and idler gears as well as new balls and rings. Noticed something on the diff adjusting screw. An old shock o-ring fits perfectly around the head of the screw and seals the thrust bearing from the outside. It should work well to keep dirt out and provided its an old shock seal there is hardly any extra resistance when turning the outdrives. If it was tight on the screw i would be worried about diff adjustment but it isnt.
I doubt im the first one to figure it out but I thought I would share it anyway.
The back half looks tons better with the black case and mounts.
Front end all pimped out ready to go other than shocks. Still cant believe the bump steer came out perfect. Ive never had a truck with good bumpsteer. Should be interesting.
As promised an uncluttered overall shot. The top braces came out exactly like I wanted. aluminum tube over 1/8 carbon rod. Just under 1/2 ounce for the pair vs 1.5 ounces for the old ones.
Running out of excuses to paint the body so I suppose I should get at it this weekend. That comnined with wiring the esc and motor as well as taking a foot of wire off of the steering servo should give be a bit to do.
Nick
-
cautrell05
- Approved Member
- Posts: 209
- Joined: Tue Feb 15, 2011 1:51 pm
- Location: Norfolk Nebraska
Re: My 10T SC conversion
Havent gotten too much done in the last 2 weeks. I have been just sick enough to be misserable but healthy enough to still go to work. by the end of the day all I wanted to do was go to bed. Over what ever it was so now maybe I can accomplish something.
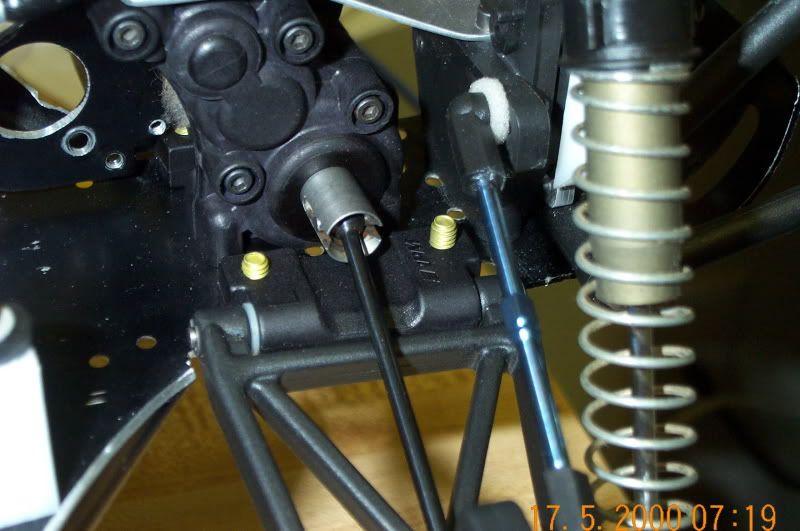
I thought I was done with the chassis and then I noticed that the shock mounting screws were just about stripped out on the rear arms. I can only imagine how many times they were in and out over the last 15 years or so. I got a good deal on a set of the AE rear arms so for now thats what is on it. There are a few small differences between the RPM arms and the AE arms. The RPM arms has no adjustment for the wheelbase. The early 10T arms didnt either but the the T2 and GT did use a .125 spacer betwen the hub and the arm at the outer hingepin just like the newer ones. Kinda worked out in my favor. In normal configuration you have the choice of standard or .125 longer. With the rear arms reversed like on mine its stock or .125 shorter.
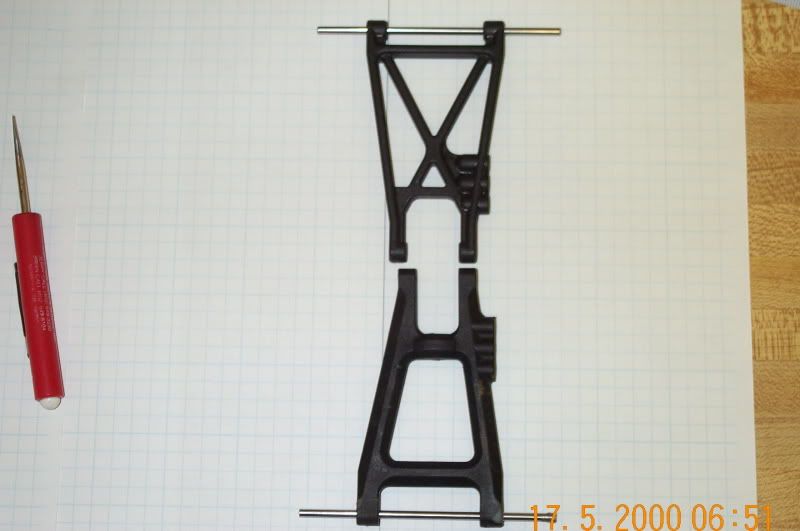
If you look close at the pic you can see the shock mounts are spaced just a little different too. The way it came out the upper shock mount was just a little too far farward and the shock was angled forward from the arm just a little bit. Probably not enough to make a difference but its there.
Heres the before-
And the after-
It probably wont make a difference but it makes me feel better.
Only thing that seemed odd was the arm fits loose on the inner mount. I fit the same on the used RPM mounts and on a set of new AE mounts. Found a plastic washer in my assortment that fits pretty good. The arms are a little snug right now but its that kind of snug that seems to loosen up to perfect after a few runs, not the bound up tight kind.
My liquid mask is finally ready to cut so I suppose I better go get some paint work done this week.
Nick
I thought I was done with the chassis and then I noticed that the shock mounting screws were just about stripped out on the rear arms. I can only imagine how many times they were in and out over the last 15 years or so. I got a good deal on a set of the AE rear arms so for now thats what is on it. There are a few small differences between the RPM arms and the AE arms. The RPM arms has no adjustment for the wheelbase. The early 10T arms didnt either but the the T2 and GT did use a .125 spacer betwen the hub and the arm at the outer hingepin just like the newer ones. Kinda worked out in my favor. In normal configuration you have the choice of standard or .125 longer. With the rear arms reversed like on mine its stock or .125 shorter.
If you look close at the pic you can see the shock mounts are spaced just a little different too. The way it came out the upper shock mount was just a little too far farward and the shock was angled forward from the arm just a little bit. Probably not enough to make a difference but its there.
Heres the before-
And the after-
It probably wont make a difference but it makes me feel better.
Only thing that seemed odd was the arm fits loose on the inner mount. I fit the same on the used RPM mounts and on a set of new AE mounts. Found a plastic washer in my assortment that fits pretty good. The arms are a little snug right now but its that kind of snug that seems to loosen up to perfect after a few runs, not the bound up tight kind.
My liquid mask is finally ready to cut so I suppose I better go get some paint work done this week.
Nick
Re: My 10T SC conversion
looks great.
in the last pic i'd stack a couple of washers under the ball stud, should even out that angle.
in the last pic i'd stack a couple of washers under the ball stud, should even out that angle.
-
cautrell05
- Approved Member
- Posts: 209
- Joined: Tue Feb 15, 2011 1:51 pm
- Location: Norfolk Nebraska
Re: My 10T SC conversion
Right now there is about 1/16 of stud sticking out the back of the bulkhead. If I break a ballstud off thats enough to get ahold of with pliers if needed. The sideways angle on the upper link in back is not any worse than the front uppers on the T4 and SC10. It should be ok.
Nick
Nick
-
cautrell05
- Approved Member
- Posts: 209
- Joined: Tue Feb 15, 2011 1:51 pm
- Location: Norfolk Nebraska
Re: My 10T SC conversion
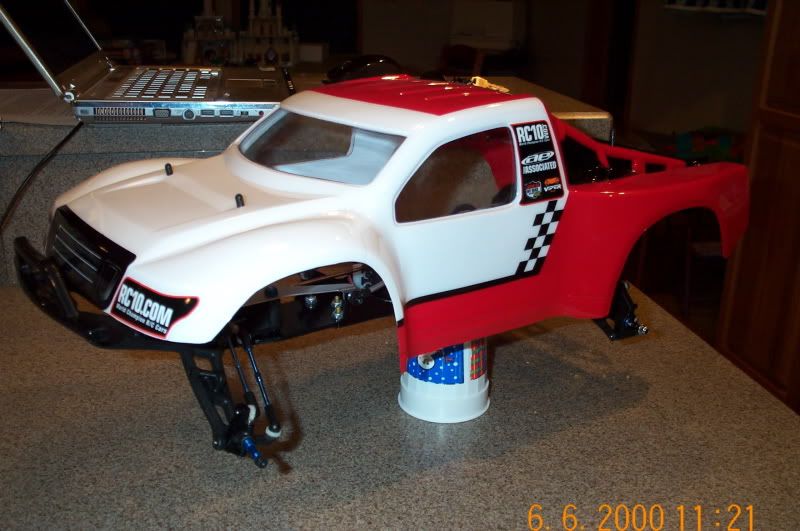
I hate painting bodys!!!!
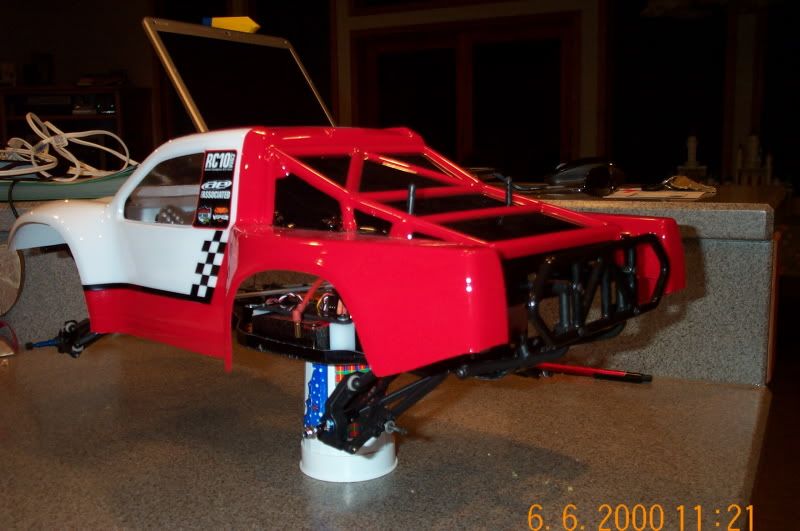
Ok I have that out of my system. Compared to alot of the bodys I have seen painted on the net this one is an beginner grade paint job but at least it looks ok. Still need to get it lettered and stickered but at least the paint is done. I also know why 98% of the short course trucks you see dont have the bed cage painted.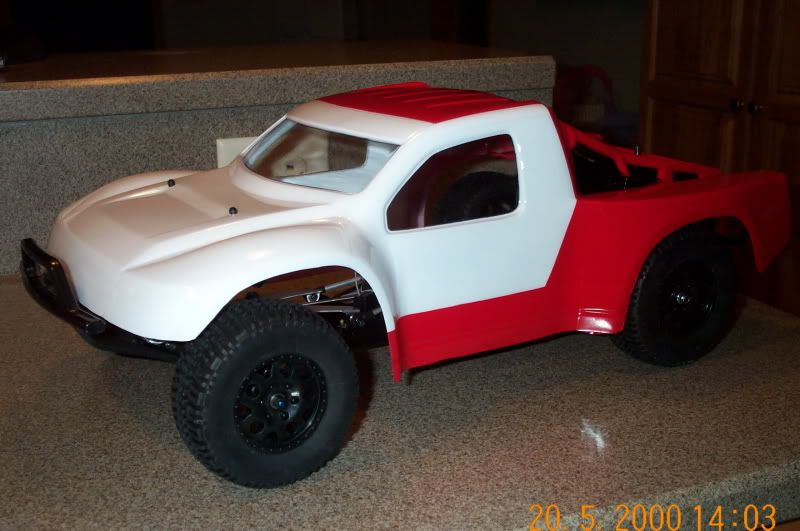
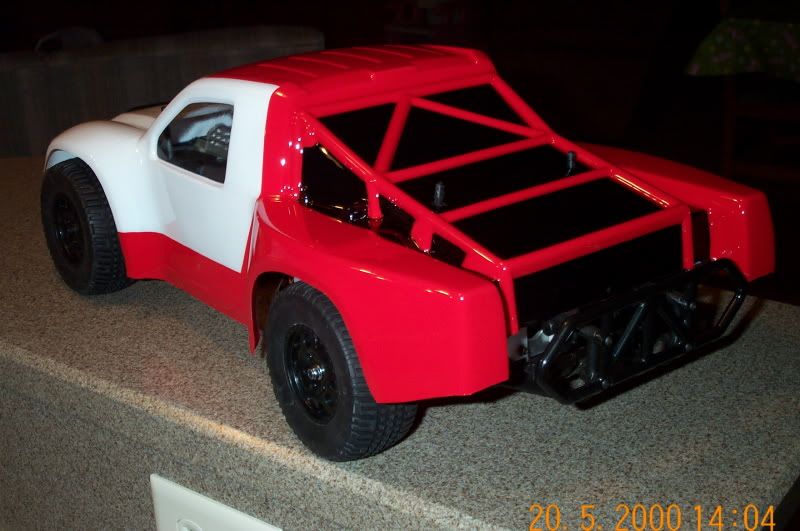
I think I need to raise the rear bumper a little bit. Otherwise it looks ok.
This is what I copied the paint scheme from-
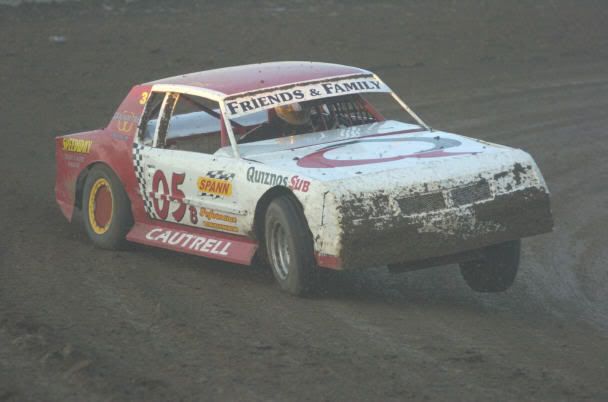
That one is sitting parked this year. $7.50 a gal for race fuel and $120 each for tires that last 6 nights is a bit much. The story Im sticking with is its cheaper to race RC this year. Please dont break it down for the wife lol.
Nick
Ok I have that out of my system. Compared to alot of the bodys I have seen painted on the net this one is an beginner grade paint job but at least it looks ok. Still need to get it lettered and stickered but at least the paint is done. I also know why 98% of the short course trucks you see dont have the bed cage painted.
I think I need to raise the rear bumper a little bit. Otherwise it looks ok.
This is what I copied the paint scheme from-
That one is sitting parked this year. $7.50 a gal for race fuel and $120 each for tires that last 6 nights is a bit much. The story Im sticking with is its cheaper to race RC this year. Please dont break it down for the wife lol.
Nick
Re: My 10T SC conversion
Nice to see that your 'real' car was the basis in paint for your 'little' car - I enjoy paint jobs with a meaning!
Are you going with the Quiznos theme on the SC????
Are you going with the Quiznos theme on the SC????
Wherever you go; there you are!
-
cautrell05
- Approved Member
- Posts: 209
- Joined: Tue Feb 15, 2011 1:51 pm
- Location: Norfolk Nebraska
Re: My 10T SC conversion
Yea thats the plan. I have a friend with all the vinyl cutting equipment that can do it for me. Should turn out pretty good.
Nick
Nick
-
Chewbacca
- Approved Member
- Posts: 609
- Joined: Sat Jun 24, 2006 6:41 am
- Location: Herrenberg, Germany
- Has thanked: 46 times
- Been thanked: 104 times
Re: My 10T SC conversion
Nice work.
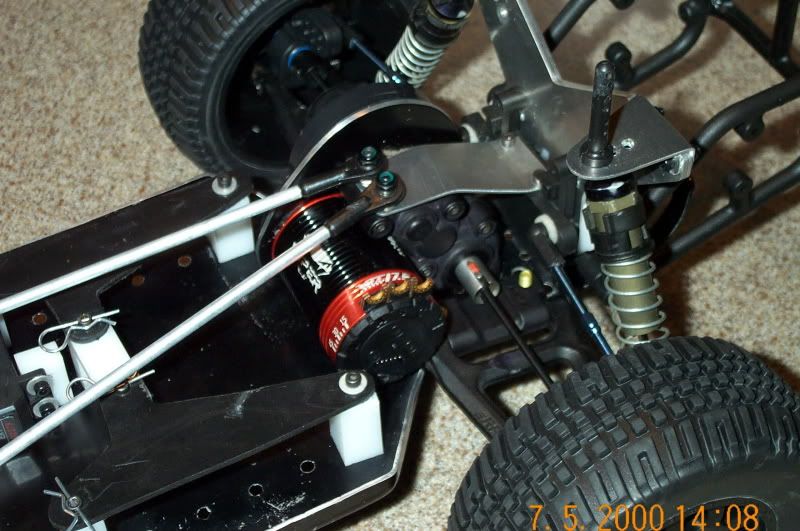
I understand your plan with the centered weight. But depending how hot that esc gets I wouldn't want it between my lipos. Since the esc and servo are fairly light compared to the batteries I'd consider moving the servo up to make room for the esc. Having the batteries weight so far out of center (left to right) will (?) result in sluggish handling on quick steering. I could be wrong though.
Keep up the cool work!
*** POWDER - KING ***
-
cautrell05
- Approved Member
- Posts: 209
- Joined: Tue Feb 15, 2011 1:51 pm
- Location: Norfolk Nebraska
Re: My 10T SC conversion
The esc didnt look as burried untill I got all the wires on it. I will probably move it straight up so the heatsink gets some air and use the fan that came with it. its wired up now so im pretty much stuck as far as location goes. another thing I might look into is a small air scoop to direct air to the esc. should have some more updates soon.
Nick.
Nick.
-
Diggley

- Approved Member
- Posts: 1166
- Joined: Wed Jan 28, 2009 5:44 pm
- Location: is everything...
- Been thanked: 8 times
Re: My 10T SC conversion
Quizno's...MMM, MMM, MMM, MMM toasty! 
Seriously,
Cool build!
Bring on the customs!!!
Seriously,
Cool build!
Bring on the customs!!!
Projects and shelfers:
Late Edinger, RC10B2, Dual Sport, GT, Kyosho Turbo Ultima, Triumph, Tamiya Sand Scorcher, Blackfoot/Monster Beetle, '67 Beetle, Nikko Rhino, Traxxas Fiero, Slash, Hand-built Dune Buggy..all on here somewhere...
Late Edinger, RC10B2, Dual Sport, GT, Kyosho Turbo Ultima, Triumph, Tamiya Sand Scorcher, Blackfoot/Monster Beetle, '67 Beetle, Nikko Rhino, Traxxas Fiero, Slash, Hand-built Dune Buggy..all on here somewhere...
-
cautrell05
- Approved Member
- Posts: 209
- Joined: Tue Feb 15, 2011 1:51 pm
- Location: Norfolk Nebraska
Re: My 10T SC conversion
Long time no update. I got real lazy the last couple of weeks but its getting real close to running order. The chassis is wired and everything is fastened down. I believe the only thing left is shocks and figure out how to mount some nerfbars. Not sure if its even worth it because of how far back the chassis sits compared to the body.
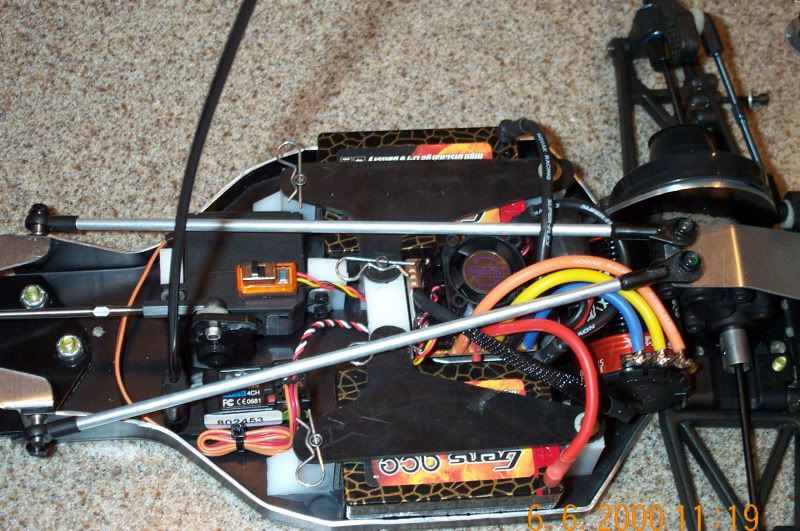
Its a little tight but not bad. everything will come out without too much headache if needed. Go figure. One month after I bought a saddle pack and figured out how to make it all fit they came out with a shorter battery for the Losi 22 that would have fit perfectly sideways with the stock battery cups. Oh well. too late now. It fits with my plan of having all the heavy components within a 6 inch circle. Rear weight should be close to a rear motor truck but hopefullly more stable due to the centered weight. Would be nice to find out this week.
Got a little farther on the body.
Still need to get my quiznos stickers made. Also got the bumper up where it should be.
next up is to go through the shocks and finish stickers. Set camber and toe and go get it dirty.
Nick
-
Jedi Master
- Approved Member
- Posts: 489
- Joined: Thu Mar 10, 2011 10:35 am
- Location: United Kingdom - Sraffs
- Been thanked: 2 times
Re: My 10T SC conversion
Looking really good. Can't wait to hear how it handles! 
Do, or do not! There is no 'try'!
RC; Boats, Buggies, Trucks, Bash's, Racing and of course 'VINTAGE'!
My Ebay Feedback: http://feedback.ebay.co.uk/ws/eBayISAPI.dll?ViewFeedback2&userid=jedimaster768&ftab=AllFeedback
RC; Boats, Buggies, Trucks, Bash's, Racing and of course 'VINTAGE'!
My Ebay Feedback: http://feedback.ebay.co.uk/ws/eBayISAPI.dll?ViewFeedback2&userid=jedimaster768&ftab=AllFeedback
Create an account or sign in to join the discussion
You need to be a member in order to post a reply
Create an account
Not a member? register to join our community
Members can start their own topics & subscribe to topics
It’s free and only takes a minute
Sign in
-
- Similar Topics
- Replies
- Views
- Last post
-
- 9 Replies
- 1802 Views
-
Last post by spydur23
-
- 0 Replies
- 572 Views
-
Last post by Carknowledge101
-
- 5 Replies
- 1080 Views
-
Last post by metallicats33
-
- 7 Replies
- 1680 Views
-
Last post by DaveM
-
- 37 Replies
- 6105 Views
-
Last post by Jim85IROC
-
- 9 Replies
- 2598 Views
-
Last post by InetRC
-
- 5 Replies
- 1011 Views
-
Last post by GoMachV
-
- 7 Replies
- 1206 Views
-
Last post by treehugger
Who is online
Users browsing this forum: No registered users and 6 guests