Ideas on repairing a jrx2 chassis plate
-
Toyotachris1982
- Approved Member
- Posts: 123
- Joined: Tue Nov 16, 2021 1:04 pm
- Has thanked: 17 times
- Been thanked: 13 times
Ideas on repairing a jrx2 chassis plate
Hello All! I have a jrx2 plate chassis and it has some small nicks on the edges and ideas on a product or method to repair them for a shelfie. Also maybe a topcoat that can have the same sheen as the original?
-
Frankentruck
- Super Member
- Posts: 3644
- Joined: Fri Feb 19, 2021 9:59 am
- Location: Texas, USA
- Has thanked: 2484 times
- Been thanked: 2787 times
Re: Ideas on repairing a jrx2 chassis plate
Frankensteined RC10T3 / Franky Jr RC10GT-e (x2) / A+ stamp / Toy Story RC / Graphite replica / B1.5 BFG 5LTi / Clonewald / Hyper Hornet
"I love the effort, but it sure looks like you took the long way around to a tub again"
"I love the effort, but it sure looks like you took the long way around to a tub again"
-
JosephS
- Approved Member
- Posts: 1807
- Joined: Thu Mar 23, 2017 5:31 pm
- Has thanked: 1205 times
- Been thanked: 605 times
Re: Ideas on repairing a jrx2 chassis plate
I was taking a look at the thread and a 2k epoxy primer was used. Typically a can of 2k needs to be used all at once. I found eastwood has a product they call Duraspray that can be shelved and reused. I used the clear coat from this line and it turned out good. It may be worth checking out the primer for your project.Toyotachris1982 wrote: ↑Fri Nov 18, 2022 11:45 am Hello All! I have a jrx2 plate chassis and it has some small nicks on the edges and ideas on a product or method to repair them for a shelfie. Also maybe a topcoat that can have the same sheen as the original?
https://www.eastwood.com/eastwood-2k-duraspray-epoxy-primer-two-component-aerosol-can.html
-
BattleTrak
- Approved Member
- Posts: 716
- Joined: Sun Oct 06, 2019 11:33 pm
- Location: Ill-Noise, USA
- Has thanked: 1107 times
- Been thanked: 602 times
Re: Ideas on repairing a jrx2 chassis plate
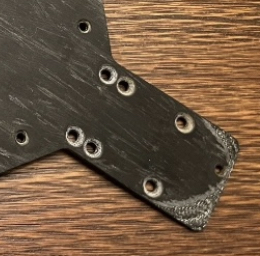
CA/Super glue is what I use to repair edges and chips. I just repaired the tail on this JRX2 chassis. I went over the area with a black Sharpie, built up a few layers of glue then just lightly sanded to smooth and knock the shine off of the glue. I didn’t go too crazy making it perfect because I plan to run this one, but it looks a lot better.
-Brad
-
Toyotachris1982
- Approved Member
- Posts: 123
- Joined: Tue Nov 16, 2021 1:04 pm
- Has thanked: 17 times
- Been thanked: 13 times
Create an account or sign in to join the discussion
You need to be a member in order to post a reply
Create an account
Not a member? register to join our community
Members can start their own topics & subscribe to topics
It’s free and only takes a minute
Sign in
-
- Similar Topics
- Replies
- Views
- Last post
-
- 12 Replies
- 2174 Views
-
Last post by scr8p
-
- 9 Replies
- 1750 Views
-
Last post by jwscab
-
- 7 Replies
- 1507 Views
-
Last post by zuki250
-
- 23 Replies
- 4092 Views
-
Last post by sgirouard
-
- 0 Replies
- 505 Views
-
Last post by Olcivek
-
- 2 Replies
- 469 Views
-
Last post by RETRO R/C
-
- 16 Replies
- 2815 Views
-
Last post by GJW
-
- 10 Replies
- 965 Views
-
Last post by transamman908
Who is online
Users browsing this forum: No registered users and 5 guests