I snapped a photo of my unpainted body with just 4 pieces of masking tape on it and posted it on one of my local off road tracks facebook page. It sparked some questions, so I thought I'd do a photo log of the process I go through on painting a body. Since my body is a really easy one to paint and can be done in less than 2 hours, I thought I'd give this photo log a try.
I didn't think of snapping pics until the masking stage, so to get you up to date...wash your body with soapy water and rinse. I use liquid hand or dish soap, I'm not fussy. Apply you window masks, if you want, some people prefer masking their windows with their own masking tape to get a better fit.
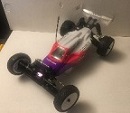
Most of you know this car, this is what we are painting today. The pin stripe makes it really easy to do, you'll see.

I lay the vinyl tape down as my pin stripe in this case.

I then I mask the whole thing with liquid mask.

Hard to tell, but 3 coats of liquid mask, first thin, second to heavy. I water mine down a 1/3 with water and use ~45psi with a medium nozzled airbrush

I cut the liquid mask on the tape on almost each layer. If you do this, you maintain the sharp, crisp edge of the vinyl and you don't risk scoring the body.


Of course, darkest colour to lightest colour is the order when painting from the inside out.
First layer, black shading and blue background.

Cut along the next line and remove that section of liquid mask. Fluorescent orange backed with white...you can see the difference in colour once you back it.


Hard to tell in this lighting, but backing the fluorescent colours always make them pop.

I tend to put on the fluorescent colours too think and the crack if dried to quick with the heat gun, so to even out the head and slow the process down, I use the heat vent in the kitchen, works amazingly well.

Next is pink, now because I need to back it with white after and the fact that white is my last colour, I cut the liquid mask from the tape on the front pink line and remove only the tape. If you don't cut it, the liquid mask is still stuck to the tape and you will pull off the liquid mask with your tape...you don't want that to happen.

Because this is a modern buggy body, at this stage, I will be cutting out the edge of my window masks so I have a pink trim around the windows.

I always take note on each colour and touch up any lines of scrapes that I mistakenly do. I use a micro brush for touch ups and a wooden tooth pick to scrape the unwanted bleeding or over spray off. The wood doesn't scratch the lexan, but does a great job taking the paint off.


Now that the pink stripes are done, I simple just remove the rest of the liquid mask and lay down my white. I also back my pink stripes at this time too.

Once it is dry, then rip off those window masks and the protective film and you are done.