Today I found another source for the body mounts. The proper shock ends are Kyosho part # W-5015, came across them at the same shop.Mr. ED wrote:After seeing the pics, I don't think it should be too hard working around those rare body mounts.
Same for the long shock ends. You could just chop them to the right length.
Kyosho Mantis EP FWD build
-
EvolutionRevolution
- Approved Member
- Posts: 1494
- Joined: Tue Feb 01, 2011 3:24 pm
- Location: Netherlands
- Has thanked: 17 times
- Been thanked: 34 times
Re: Kyosho Mantis EP FWD build
-
EvolutionRevolution
- Approved Member
- Posts: 1494
- Joined: Tue Feb 01, 2011 3:24 pm
- Location: Netherlands
- Has thanked: 17 times
- Been thanked: 34 times
Re: Kyosho Mantis EP FWD build
Having now seen the Hype version on Ebay Germany, the Hype is NOT the same car. Looks like a typical old-style Chinese knock-off, e.g. every part changed up to a degree to sell the 'same' car without real parts compatibility. The chassis is very different (looks like two EP frames put end to end with a different motor mount), and many of the other parts have small differences.Mr. ED wrote:Come to think of it. The rwd was much later on also sold, mostly in germany, by Hype. The same company that sold a cheaped down version of the triumph... Chadori or chadory.
-
Mr. ED

- Approved Member
- Posts: 5483
- Joined: Thu Dec 21, 2006 1:30 am
- Location: Back @ home: Belgium
- Has thanked: 62 times
- Been thanked: 62 times
Re: Kyosho Mantis EP FWD build
Thanks for that correction. Any modifications in the design which might fit and improve the mantis?
-
EvolutionRevolution
- Approved Member
- Posts: 1494
- Joined: Tue Feb 01, 2011 3:24 pm
- Location: Netherlands
- Has thanked: 17 times
- Been thanked: 34 times
Re: Kyosho Mantis EP FWD build
Apart from including the swing bar by default instead of it being a hard to find optional part, none that I could easily see.
-
EvolutionRevolution
- Approved Member
- Posts: 1494
- Joined: Tue Feb 01, 2011 3:24 pm
- Location: Netherlands
- Has thanked: 17 times
- Been thanked: 34 times
Re: Kyosho Mantis EP FWD build
Miniature update:
Originally I had planned to use some PureTen Alpha wheel axes for the rear wheels, but I decided to use the proper Mantis wheel axles:
Parts:
And assembled:
I might replace the stock plastic hexes by aluminium ones, still have to think a bit about that.
Originally I had planned to use some PureTen Alpha wheel axes for the rear wheels, but I decided to use the proper Mantis wheel axles:
-
EvolutionRevolution
- Approved Member
- Posts: 1494
- Joined: Tue Feb 01, 2011 3:24 pm
- Location: Netherlands
- Has thanked: 17 times
- Been thanked: 34 times
Re: Kyosho Mantis EP FWD build
My alternate source for the body mounts worked out fine, after a small scare because Ebay.com seemed to behave a bit strangely with items only available on Ebay.de. The body mounts in the picture below are actually for the Mantis Mini, and move the correct position of the mount holes in the body by 0.5 cm:
Also shown in the picture are the correct eyelets for the shocks, and the Mantis body mount mounts, which I ordered just in case I needed the alternate parts I didn't have yet. Turns out that isn't the case: I can use the front Mantis Mini mounts at the back in combination with the body I want to use, and will attach other front body mounts to the bumper, so they can also keep the foam bumper that I want to add in place.
As for the MI-5 body mounts I had ordered at a Canadian hobby shop, nothing yet (and also a worrying lack of communication) - scrap that, the parts just turned up expertly packed and in good condition in my mailbox today (August 19th). Still, it took them two weeks to ship (ordered July 31st, sent August 14th) and a shipping confirmation or reply to my email would have been nice...bit confused here on whether to recommend them or not
So now I have a choice of body mounts. Mi-5 includes body posts for use on the bumper, too.
-
EvolutionRevolution
- Approved Member
- Posts: 1494
- Joined: Tue Feb 01, 2011 3:24 pm
- Location: Netherlands
- Has thanked: 17 times
- Been thanked: 34 times
Re: Kyosho Mantis EP FWD build
So, the Mi-5 body mounts look like this:
They also include the servo mounts and the wheel hexes, which are quite wide (6 mm!).
These are the MI-2B body mount mounts:
And these are the MI-32 body mounts:
Comparing the MI-5 mounts to the MI-32 body mounts shows there are some other differences besides the location of the holes in the body.
MI-32 also places the body posts further apart.
I decided to first install the rear axles. With the hex installed, these had quite a bit of side-to-side play, so I added a 0.3 mm thick shim on the inside:
The outside takes a 0.2 mm shim:
Assembled:
The hex fits quite snugly and doesn't fall off easily.
Then it's time to install the rear body posts (MI-5):
You need to use a screw with a small head, unlike Kyosho's usual wide-head screws.
Close-up of the attachment point on the rear body mount mounts:
I had to replace the rear body mount mounts as one was mismolded and it turned out to be impossible to install the body post.
These are the MI-2B body mount mounts:
I decided to first install the rear axles. With the hex installed, these had quite a bit of side-to-side play, so I added a 0.3 mm thick shim on the inside:
Then it's time to install the rear body posts (MI-5):
Close-up of the attachment point on the rear body mount mounts:
-
EvolutionRevolution
- Approved Member
- Posts: 1494
- Joined: Tue Feb 01, 2011 3:24 pm
- Location: Netherlands
- Has thanked: 17 times
- Been thanked: 34 times
Re: Kyosho Mantis EP FWD build
Rear body mounts installed:
And this is a mock-up of what I have in mind:
Body = Kyosho's rendition of the Renault Maxi Megane, a rally game car that was popular back then.
However, I'm not sure I will be able to use the bumper-mounted front mounts without using the extension parts - they might just be too low. The problem is that using the extension parts makes it impossible to use the body mounts to hold down the foam bumper, unless I modify the parts. On the other hand, I'd like to avoid using the regular front body mounts, as I would have to cut those off just above the servo (seems a waste...).
I then installed the mount for the antenna tube. Parts:
It slots into one of the slots available for the ESC/receiver switch:
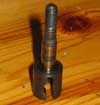
Then I decided to finish the rear end by adding the shocks. W-5015 ball end next to the shorter-but-still-too-long ball ends I wanted to use:
Added to shocks, together with aluminium balls:
Shock parts needed for filling shocks, together with 300WT oil included with shocks:
One perfectly bouncy shock + spring and plastic spring perches:
I was a bit worried because it's been a while since I (re)build a shock, but they turned out fine and I didn't make a mess.
However, I'm not sure I will be able to use the bumper-mounted front mounts without using the extension parts - they might just be too low. The problem is that using the extension parts makes it impossible to use the body mounts to hold down the foam bumper, unless I modify the parts. On the other hand, I'd like to avoid using the regular front body mounts, as I would have to cut those off just above the servo (seems a waste...).
I then installed the mount for the antenna tube. Parts:
-
EvolutionRevolution
- Approved Member
- Posts: 1494
- Joined: Tue Feb 01, 2011 3:24 pm
- Location: Netherlands
- Has thanked: 17 times
- Been thanked: 34 times
Re: Kyosho Mantis EP FWD build
Both rear shocks and the hardware required to install them:
One rear shock installed:
The setscrew for adjusting ride height is located right below the shock and is very difficult to access once the shock is installed.
Here's how it attaches at the top (of course the screw holding both the shock and the swing bar got loose when I tried to tighten down the nylon nut for the shock...):
And here's how it attaches at the bottom:
The shock just clears the shock tower and the suspension arm.
Anyway, rear end complete :
:
It's weird how just attaching the shocks makes the car look much less like a beginner's car...
Here's how it attaches at the top (of course the screw holding both the shock and the swing bar got loose when I tried to tighten down the nylon nut for the shock...):
Anyway, rear end complete
-
EvolutionRevolution
- Approved Member
- Posts: 1494
- Joined: Tue Feb 01, 2011 3:24 pm
- Location: Netherlands
- Has thanked: 17 times
- Been thanked: 34 times
Re: Kyosho Mantis EP FWD build
Picked up this Cross hinge pin set to replace the screw pins and inner hinge pins by proper steel hinge pins:
Also picked up a Japanese Kyosho catalogue that showcases the Mantis Mini (Mini and Fiat 600):
...and many of the hop-ups:
MIW-5 Special rod set is, as I suspected, a stiffener rod set for holding the chassis halves together, but the price (6,000 yen - about 60 bucks) is absolutely outrageous. Seems overly expensive, even if the rods were made out of titanium (which I don't know). No wonder that option can't be found...
-
EvolutionRevolution
- Approved Member
- Posts: 1494
- Joined: Tue Feb 01, 2011 3:24 pm
- Location: Netherlands
- Has thanked: 17 times
- Been thanked: 34 times
Re: Kyosho Mantis EP FWD build
Let's continue with this one for a bit...
Somewhere last year I bought these rear uprights:
Now that I finally have some time to do something hobby-related about a year of crazy upstairs neighbour antics, packing, moving, and unpacking, I figured I'd do something to my Mantis and make some use of these too:
So comparison with the original uprights:
They are a lot less bulky and also reduce the track width by about 1.5 mm per side.
Somewhere last year I bought these rear uprights:
-
EvolutionRevolution
- Approved Member
- Posts: 1494
- Joined: Tue Feb 01, 2011 3:24 pm
- Location: Netherlands
- Has thanked: 17 times
- Been thanked: 34 times
Re: Kyosho Mantis EP FWD build
Mounting them together with the hinge pins:
And that's the rear end really done:
Also installed the hinge pins on the front:
And a better antenna mount:
And put the front body mounts on the bumper, including extension pieces.
Let's see when I'll be able to post the next update...2025? 

-
klavy69

- Moderator
- Posts: 5204
- Joined: Thu May 29, 2008 4:11 pm
- Location: Fulton, IL (Land of one stop light but we DO have a windmill!)
- Has thanked: 628 times
- Been thanked: 294 times
-
Lavigna

- Super Member
- Posts: 1415
- Joined: Wed Aug 05, 2015 4:24 am
- Location: Petaluma, CA
- Has thanked: 1037 times
- Been thanked: 1320 times
Re: Kyosho Mantis EP FWD build
Great build thread! So glad you are updating it and continuing with your build.
My Photo Gallery --->https://www.rc10talk.com/viewtopic.php?f=77&t=38934
Create an account or sign in to join the discussion
You need to be a member in order to post a reply
Create an account
Not a member? register to join our community
Members can start their own topics & subscribe to topics
It’s free and only takes a minute
Sign in
-
- Similar Topics
- Replies
- Views
- Last post
-
- 17 Replies
- 2884 Views
-
Last post by Germano
-
- 0 Replies
- 151 Views
-
Last post by Dangeruss
-
- 18 Replies
- 3946 Views
-
Last post by Lonestar
-
- 4 Replies
- 1695 Views
-
Last post by Germano
-
- 311 Replies
- 35874 Views
-
Last post by GoMachV
-
- 15 Replies
- 3056 Views
-
Last post by bearrickster
-
- 161 Replies
- 15123 Views
-
Last post by GoMachV
-
- 5 Replies
- 1940 Views
-
Last post by LTO_Dave
Who is online
Users browsing this forum: No registered users and 8 guests