My blasphemous MIP 4-10 project
-
slow_jun
- Approved Member
- Posts: 958
- Joined: Mon Oct 05, 2009 10:59 am
- Location: Manila/Singapore
- Been thanked: 3 times
Re: My blasphemous MIP 4-10 project
“It is more shameful to distrust our friends than to be deceived by them.”
― Confucius
― Confucius
-
slotcarrod
- Approved Member
- Posts: 4415
- Joined: Tue Nov 25, 2008 10:57 pm
- Location: Calgary Alberta Canada
- Has thanked: 1 time
- Been thanked: 45 times
Re: My blasphemous MIP 4-10 project
Cool build!
You have a nice voice as well!
 JKing, I mean that in a nice way btw!
You have a nice voice as well!
Rod Littau
Slotcarrod's Rumpus Room: http://www.rc10talk.com/viewtopic.php?f=77&t=16113
25 Years of the RC10: http://www.rc10talk.com/viewtopic.php?f=35&t=13059
Slotcarrod's Rumpus Room: http://www.rc10talk.com/viewtopic.php?f=77&t=16113
25 Years of the RC10: http://www.rc10talk.com/viewtopic.php?f=35&t=13059
-
stickboy007

- Approved Member
- Posts: 740
- Joined: Sun Sep 16, 2012 6:13 pm
- Location: Mahopac, NY
- Been thanked: 53 times
Re: My blasphemous MIP 4-10 project
No worries. I am not creeped outslotcarrod wrote:Cool build!
You have a nice voice as well!
https://www.youtube.com/watch?v=2ORCnvGnaAM
Hahaha...
-
stickboy007
- Approved Member
- Posts: 740
- Joined: Sun Sep 16, 2012 6:13 pm
- Location: Mahopac, NY
- Been thanked: 53 times
Re: My blasphemous MIP 4-10 project
I actually did this a little while ago, but forgot to post it here. I figured out a fix for the front tensioner. The original problem was the gold nut holding down the two bearings at the front was too close to the steering rack, and some rubbing took place during part of the steering throw. I ended up replacing those flanged bearings with a SC10 4x4 belt roller. It mounts with one bearing (I used a 3x8 bearing), and the bearing mount is inset into roller. This means I can tighten the nut down a few mm further inward to generate clearance against the steering rack. So the drivetrain is all set now.
I have a body ready to paint, and will get to that soon. In order to mount the body without the nose rubbing against the front pulley, what I'm going to do is use a RC10T front body mount post and screw that into the front servo mount hole (probably with a few spacers to elevate the body slightly...we'll see what I need for good clearance). That should finish this one off nicely.
I have already started the SP-2 build and will post pictures soon.
- Attachments
-
-
-
-
stickboy007
- Approved Member
- Posts: 740
- Joined: Sun Sep 16, 2012 6:13 pm
- Location: Mahopac, NY
- Been thanked: 53 times
Re: My blasphemous MIP 4-10 project
Okay, so here are my first pics of the SP-2 project. I had promised to do something a bit more traditional here, and I plan on sticking to that. However, there are some modern bits which I think look really nice and would add some nice accents to this build. Besides, "faithful" restorations have already been done, quite nicely I might add. Time to move on...
I really like the JC honeycomb motor plate, which would look out of place if I didn't use the FT blue aluminum screws and nuts to match. So those are staying, although I must say that the aluminum 8-32 philips screws are soft as butter. Especially the blue ones. If you're not careful, they will deform very easily, so what I did was to pre-tap all of the arm mounts (and wherever else those screws go, or will go) and then thread the blue screws in.
The MIP SP-1 rear gearbox mounts with two 8-32 screws on the bottom, but with a shorter than standard length (can't remember the length, though). I got real lucky and found a SP-100 slipper unit on sabulatech, which I think we can agree is perfect for this build. The only problem was the idler shaft. The original MIP unit for this is part # SP-20. Impossible to find like the rest of this MIP 4wd stuff, but I found through a separate thread on here that the Tamiya Sand Scorcher idler gear is a perfect fit. Sure enough, it is, although you do have to bore out the hole at the end a little bit (which the grub screw slots through, to mount the pulley on the idler shaft). Interesting side note about the front gearbox, by the way. This older SP-2 gearbox has an actual ball diff up front, while the "diff" in the Legend gearbox is really just two one way bearings, one for each side. So the Legend is not full-time 4wd, but instead more like a YZ10 or CAT 2000 where most or all of the brake bias goes to the rear, while the SP-2 is full-time 4wd with an adjustable front diff.
You will note that I am running the chain not entirely correctly through the red tensioner piece. That is because I want to lift the bottom part of the chain up, to make clearance for running the stock battery configuration. The instructions originally called for running the battery laterally, but I want to do something different here. Between the tensioner position and the fact that the steering rack must be pulled back to make space for the gearbox (which is a bit larger than the Legend gearbox - side note --> I hate drilling holes in these chassis. Too painful to watch), this leaves little room for the servo, which can no longer mount using the original holes. Plus, since I'm running the battery lengthwise, I can't simply put the servo off to the side like I did with the Legend project. What I'm thinking of doing (eventually) is running a low profile servo up against the battery cup, in a stand-up position. There may be enough space to make it all fit. Or, I can run a low profile servo and cut the mounting arms off, and then tape the servo to the chassis a-la old school. I'll play around with that when the time comes and see what works best.
I'm waiting on a rear bulkhead to arrive, which is why the mockup you see here does not include one. One thing I wonder about, though, is that it appears to me, from other images of the SP-2 on this site, that the bottom of the chain more or less rides along the hole you cut in the bulkhead. In other words, there is no "tensioner" or bearing assembly, as was the case in the Legend, which lifted the bottom part of the belt so as not to rub it against the bulkhead. I guess the chain can rub against the bulkhead and it would be less of an issue.
The next step will be the rear bulkhead and mounting the arms and shocks. I want to use fiberglass towers front and rear, plus a fiberglass transmission brace. Revolution Design Racing Products made a cool fiberglass tower/brace set, which unfortunately does not sell in separate pieces. So I had to spend $$ for the full set, just to get the brace Oh well...I think it will go nicely here. I have HG clear shocks that will mount on this, and I'll be using white arms front and rear. We'll see how it looks.
I really like the JC honeycomb motor plate, which would look out of place if I didn't use the FT blue aluminum screws and nuts to match. So those are staying, although I must say that the aluminum 8-32 philips screws are soft as butter. Especially the blue ones. If you're not careful, they will deform very easily, so what I did was to pre-tap all of the arm mounts (and wherever else those screws go, or will go) and then thread the blue screws in.
The MIP SP-1 rear gearbox mounts with two 8-32 screws on the bottom, but with a shorter than standard length (can't remember the length, though). I got real lucky and found a SP-100 slipper unit on sabulatech, which I think we can agree is perfect for this build. The only problem was the idler shaft. The original MIP unit for this is part # SP-20. Impossible to find like the rest of this MIP 4wd stuff, but I found through a separate thread on here that the Tamiya Sand Scorcher idler gear is a perfect fit. Sure enough, it is, although you do have to bore out the hole at the end a little bit (which the grub screw slots through, to mount the pulley on the idler shaft). Interesting side note about the front gearbox, by the way. This older SP-2 gearbox has an actual ball diff up front, while the "diff" in the Legend gearbox is really just two one way bearings, one for each side. So the Legend is not full-time 4wd, but instead more like a YZ10 or CAT 2000 where most or all of the brake bias goes to the rear, while the SP-2 is full-time 4wd with an adjustable front diff.
You will note that I am running the chain not entirely correctly through the red tensioner piece. That is because I want to lift the bottom part of the chain up, to make clearance for running the stock battery configuration. The instructions originally called for running the battery laterally, but I want to do something different here. Between the tensioner position and the fact that the steering rack must be pulled back to make space for the gearbox (which is a bit larger than the Legend gearbox - side note --> I hate drilling holes in these chassis. Too painful to watch), this leaves little room for the servo, which can no longer mount using the original holes. Plus, since I'm running the battery lengthwise, I can't simply put the servo off to the side like I did with the Legend project. What I'm thinking of doing (eventually) is running a low profile servo up against the battery cup, in a stand-up position. There may be enough space to make it all fit. Or, I can run a low profile servo and cut the mounting arms off, and then tape the servo to the chassis a-la old school. I'll play around with that when the time comes and see what works best.
I'm waiting on a rear bulkhead to arrive, which is why the mockup you see here does not include one. One thing I wonder about, though, is that it appears to me, from other images of the SP-2 on this site, that the bottom of the chain more or less rides along the hole you cut in the bulkhead. In other words, there is no "tensioner" or bearing assembly, as was the case in the Legend, which lifted the bottom part of the belt so as not to rub it against the bulkhead. I guess the chain can rub against the bulkhead and it would be less of an issue.
The next step will be the rear bulkhead and mounting the arms and shocks. I want to use fiberglass towers front and rear, plus a fiberglass transmission brace. Revolution Design Racing Products made a cool fiberglass tower/brace set, which unfortunately does not sell in separate pieces. So I had to spend $$ for the full set, just to get the brace
- Attachments
-
-
-
-
-
-
-
-
aeiou
- Approved Member
- Posts: 1071
- Joined: Fri Apr 13, 2007 4:04 pm
- Location: Atlanta, GA
- Been thanked: 1 time
Re: My blasphemous MIP 4-10 project
Nice work on these! I like your belt tensioner idea. 
Correct, there's no tensioner at the bulkhead - you just run the chain through the lower bulkhead hole.stickboy007 wrote:I'm waiting on a rear bulkhead to arrive, which is why the mockup you see here does not include one. One thing I wonder about, though, is that it appears to me, from other images of the SP-2 on this site, that the bottom of the chain more or less rides along the hole you cut in the bulkhead. In other words, there is no "tensioner" or bearing assembly, as was the case in the Legend, which lifted the bottom part of the belt so as not to rub it against the bulkhead. I guess the chain can rub against the bulkhead and it would be less of an issue.
-
stickboy007
- Approved Member
- Posts: 740
- Joined: Sun Sep 16, 2012 6:13 pm
- Location: Mahopac, NY
- Been thanked: 53 times
-
Mark Westerfield
- Approved Member
- Posts: 348
- Joined: Wed Apr 23, 2008 9:32 am
- Location: Connecticut, USA
- Has thanked: 14 times
- Been thanked: 35 times
-
stickboy007
- Approved Member
- Posts: 740
- Joined: Sun Sep 16, 2012 6:13 pm
- Location: Mahopac, NY
- Been thanked: 53 times
Re: My blasphemous MIP 4-10 project
Yeah, I've thought about that. I even considered doing that with this SP-2. It would be very cool, but I don't have any more MIP 4wd conversions in hand. Some people here are working on 3d printing repro 4-10 parts, so I wouldn't be surprised if other people here get to a 4wd 10T before I could.
-
njdriver04

- Approved Member
- Posts: 187
- Joined: Tue Dec 13, 2011 7:03 pm
- Location: USA NJ
- Has thanked: 2 times
Re: My blasphemous MIP 4-10 project
interesting build, I like the older look because it never gets old to me, the look of the more modern stuff has already gotten old to me. Each his own great build.. keep rolling
-
stickboy007
- Approved Member
- Posts: 740
- Joined: Sun Sep 16, 2012 6:13 pm
- Location: Mahopac, NY
- Been thanked: 53 times
Re: My blasphemous MIP 4-10 project
I'll have to do this in two posts...
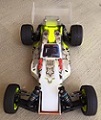
The front drivetrain was a little tricky here. The SP-2 uses metric bearings for the steering knuckles and front gearbox (the Legend uses SI bearings). In some sense, this is moot, because I do not have the original SP-2 front universals, and those were made for the short front arms anyway. I wanted to find a solution for the "wide" front arms in later RC10s (and since I was using white arms, it made sense anyway to use the Legend castor blocks and steering knuckles, which are also white). This meant doing something new. I took a stab at it using B4 rear CVDs (MIP CVDs, of course), and voila. The dogbone is the perfect length, although the diameter of the universal joint is a bit large for the opening in the steering knuckle. It fits, but only just barely, and you have to remove the CVD collar to obtain clearance. Nonetheless, it works.
I had initially tried using TC3 wheel axles, but they are actually a little too short. So, I had to find a solution for B4 wheel axles up front. Basically, I ended up using a couple of spacers and a wheel hex (SC10 front or rear...can't remember) to push the front wheels out to where the threading starts. Any further inwards, and the lock nut would not reach the wheel and tighten down correctly. I went with Lazer ZX5 front wheels (next set of pics...I'll post soon), which are flush and so should give me maximum inward compensation in terms of wheel offset. You do have to ream the ZX5 wheel hole a little bit, to fit around the B4 axle. The Kyosho white plastic matches well with the white RC10 re-re rear wheels (i.e., no off-white delta). As with all of my nicer shelfer projects, I went with Yokomo tires: TR-37 rears and TF-320 fronts (pics in the following post).
The chain runs nicely over the inline battery strap, although I did add two 1mm spacers between the nose plate and brace tubes for a little extra tension.
Front and rear shocks are HG clear shocks. They were a very lucky find, and I figured appropriate for this build. I do have to say, though, that those shocks are not very friendly. Despite being machined, the tolerances are not as good as standard AE shocks. I found the rear shocks binding against the pistons, and so I had to shave the pistons down a little bit to help them run smoothly. I also went with x-ring seals all around. They're smoother than the red o-rings and fit better in these shock bodies. I had tried the standard red o-rings initially, but they get distorted as you mount them into the shock body and clip the top seal fastener down. Very ugly. Purple RPM two-stage pistons all-around and Losi 25wt oil (mostly for the green color, but actually it dampens nicely with the purple pistons). It is very cool seeing the two-stage pistons in action on a clear shock body
- Attachments
-
-
-
-
-
-
stickboy007
- Approved Member
- Posts: 740
- Joined: Sun Sep 16, 2012 6:13 pm
- Location: Mahopac, NY
- Been thanked: 53 times
Re: My blasphemous MIP 4-10 project
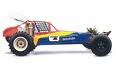
...And here are some outside pics from earlier today, with the body, wing, and wheels all mounted up. I went with my usual flames paint scheme, but tried mixing the colors up a bit here. I was not too sure about it at first, but it all comes down to the synergy with the decal color/patterns. I think it looks alright. One thing I had to do was bend the front nose down on the body. Since I mounted the chain in such a way that it runs high, I have to push the nose up (via two slots on either side of the body, that mount against the nose brace screws) in order to clear everything. This meant bending the body nose down in order to wrap around the front of the gearbox. I probably would have had to do this even if the chain were mounted normally, though. It's pretty easy to do. Just use a space heater or heat gun and bend it while warm, then let it cool while holding the bend in place.
Anyway, this was a fun build. Do I personally like the SP-2 project more, or the Legend project more? Hard to say. Technically, I'm not done with either yet. Still working on the body for the Legend, and still need to mount electronics in the SP-2, but those are smaller details that will resolve soon. Overall, I'd say I probably did more "new" things with the Legend build, and so that was more technically interesting, while the SP-2 was somewhat enlightening to learn how the same basic platform had quite a different design in its earlier iteration. Regardless, I consider myself very lucky to have the chance to work on both of them. Check that one off the bucket list.
Anyway, this was a fun build. Do I personally like the SP-2 project more, or the Legend project more? Hard to say. Technically, I'm not done with either yet. Still working on the body for the Legend, and still need to mount electronics in the SP-2, but those are smaller details that will resolve soon. Overall, I'd say I probably did more "new" things with the Legend build, and so that was more technically interesting, while the SP-2 was somewhat enlightening to learn how the same basic platform had quite a different design in its earlier iteration. Regardless, I consider myself very lucky to have the chance to work on both of them. Check that one off the bucket list.
- Attachments
-
-
-
-
-
-
-
-
-
-
-
aeiou
- Approved Member
- Posts: 1071
- Joined: Fri Apr 13, 2007 4:04 pm
- Location: Atlanta, GA
- Been thanked: 1 time
Re: My blasphemous MIP 4-10 project
That looks great! Interesting combination using the wide arms and Legend knuckles and hubs up front. So with those MIP pucks CVDs, you get full travel without binding??
Create an account or sign in to join the discussion
You need to be a member in order to post a reply
Create an account
Not a member? register to join our community
Members can start their own topics & subscribe to topics
It’s free and only takes a minute
Sign in
-
- Similar Topics
- Replies
- Views
- Last post
-
- 39 Replies
- 4023 Views
-
Last post by juicedcoupe
-
- 19 Replies
- 3267 Views
-
Last post by Charlie don't surf
-
- 71 Replies
- 14340 Views
-
Last post by Lavigna
-
- 21 Replies
- 5568 Views
-
Last post by amx73
-
- 27 Replies
- 10358 Views
-
Last post by Lonestar
-
- 16 Replies
- 1681 Views
-
Last post by LowClassCC
-
- 12 Replies
- 3635 Views
-
Last post by Erich Reichert
-
- 10 Replies
- 5226 Views
-
Last post by lotus15racer
Who is online
Users browsing this forum: No registered users and 11 guests