Race Modified; Mardave Meteor Project
-
Coelacanth

- Approved Member
- Posts: 7421
- Joined: Thu Jul 29, 2010 6:20 pm
- Location: Alberta, Canada
- Has thanked: 16 times
- Been thanked: 325 times
Re: Race Modified; Mardave Meteor Project
I've been able to remove it with just a toothbrush, hot water and Dawn dish soap. I think that's what it is, too...mold release guck.
Completed projects: CYANide Onroad Optima | Zebra Gold Optima | Barney Optima | OptiMutt RWD Mid
Gallery - Coel's Stalls: Marui Galaxy & Shogun Resto-Mods | FrankenBuff AYK Buffalo | 1987 Buick GNX RC12L3
Gallery - Coel's Stalls: Marui Galaxy & Shogun Resto-Mods | FrankenBuff AYK Buffalo | 1987 Buick GNX RC12L3

-
Lonestar
- Approved Member
- Posts: 4270
- Joined: Wed Dec 12, 2007 5:17 am
- Location: Switzerland, yannow, in Europe (or almost)
- Has thanked: 623 times
- Been thanked: 170 times
Re: Race Modified; Mardave Meteor Project
wd40 works very well too 
AE RC10 - Made In The Eighties, Loved By The Ladies.
Blue Was Better - now, Blue Is Bankrupt.
Facebook affiliate program manager: "They go out and find the morons for me".
Life is short. Waste it wisely.
Blue Was Better - now, Blue Is Bankrupt.
Facebook affiliate program manager: "They go out and find the morons for me".
Life is short. Waste it wisely.
-
sheriff
- Approved Member
- Posts: 190
- Joined: Tue Aug 30, 2011 7:36 am
- Location: Cheshire, England
- Has thanked: 1 time
Re: Race Modified; Mardave Meteor Project
Dan, only just seen this thread, great read and the car looks superb!
I've just sold an unbuilt NIB meteor, wish I'd kept it now! Still have enough parts to build 2 cars though.
Oh, apply silicone spray on those tyres, you'll be amazed.
I've just sold an unbuilt NIB meteor, wish I'd kept it now! Still have enough parts to build 2 cars though.
Oh, apply silicone spray on those tyres, you'll be amazed.
-
DerbyDan
- Approved Member
- Posts: 1837
- Joined: Tue Sep 08, 2009 8:04 am
- Location: Northampton UK
- Has thanked: 2 times
- Been thanked: 19 times
Re: Race Modified; Mardave Meteor Project
Thanks Sheriff.... I think by the time i've finished with this project most parts will be new/unused - of the Mardave parts the only non-new bits will be the steering bell cranks & the steering levers/hubs..... oh, & one rear wishbonesheriff wrote:Dan, only just seen this thread, great read and the car looks superb!
I've just sold an unbuilt NIB meteor, wish I'd kept it now! Still have enough parts to build 2 cars though.
Oh, apply silicone spray on those tyres, you'll be amazed.
Anyway - with massive thanks to DennisM this project is going to be even more faithfull to the magazine feature than I ever thought imaginable - Dennis sent me these two fantastic parts that I just never in a million years thought i'd get my hands on but will really authenticity to this build;

.... the same Kawada MX1 motor & the PB Mustang wing mount bracket - only the power of this forum & the generous members on it would make these things possible! - Dennis - I owe you one!
My T.C Showroom; http://www.tamiyaclub.com/member.asp?id=28990

Re: Race Modified; Mardave Meteor Project
Nice build. I love the simplicity of the Mardave cars. I have an Apache, a Meteor, a Marauder and 4 Cobras in various states of repair. I also used to race 1/8th scale Mardave nitro stock cars in the early eighties.
I've used Autoglym Vinyl and Rubber Care on my Meteor tyres and it worked a treat with a bit of a scrub. They stay shiny for ages (but not too shiny ). I imagine any similar automotive product would work.
I've used Autoglym Vinyl and Rubber Care on my Meteor tyres and it worked a treat with a bit of a scrub. They stay shiny for ages (but not too shiny
-
Asso_man!

- Approved Member
- Posts: 3960
- Joined: Thu Aug 03, 2006 7:49 am
- Location: EU
- Has thanked: 40 times
- Been thanked: 81 times
Re: Race Modified; Mardave Meteor Project
I've had the same issue with some new/old tires and the best solution was to scrub it dry with a hard shoe brush. Very nice build and period mods, I love the English cars!DerbyDan wrote:It's funny you should say that, I tried cleaning up the tyres, they are new but the white residue (what I presume is mould release agent) just won't budge even with a good scrub with warm water & washing up liquid
_____________________________________________
_____________________________________________
Come and visit the stable
_____________________________________________
Come and visit the stable
-
DerbyDan
- Approved Member
- Posts: 1837
- Joined: Tue Sep 08, 2009 8:04 am
- Location: Northampton UK
- Has thanked: 2 times
- Been thanked: 19 times
Re: Race Modified; Mardave Meteor Project
Problem solved!... I exchanged my three piece wheels for a brand new pair of the later dished type wheels, complete with some nice shiney new tyres
There has been some progress on this project, albiet very slow. I've drawn up the motor bracket/heatsink & the bracket required to fit the rear chassis stiffener & had these two items waterjet cut from 2mm thk aluminium & then folded up on our brakepress here at work.
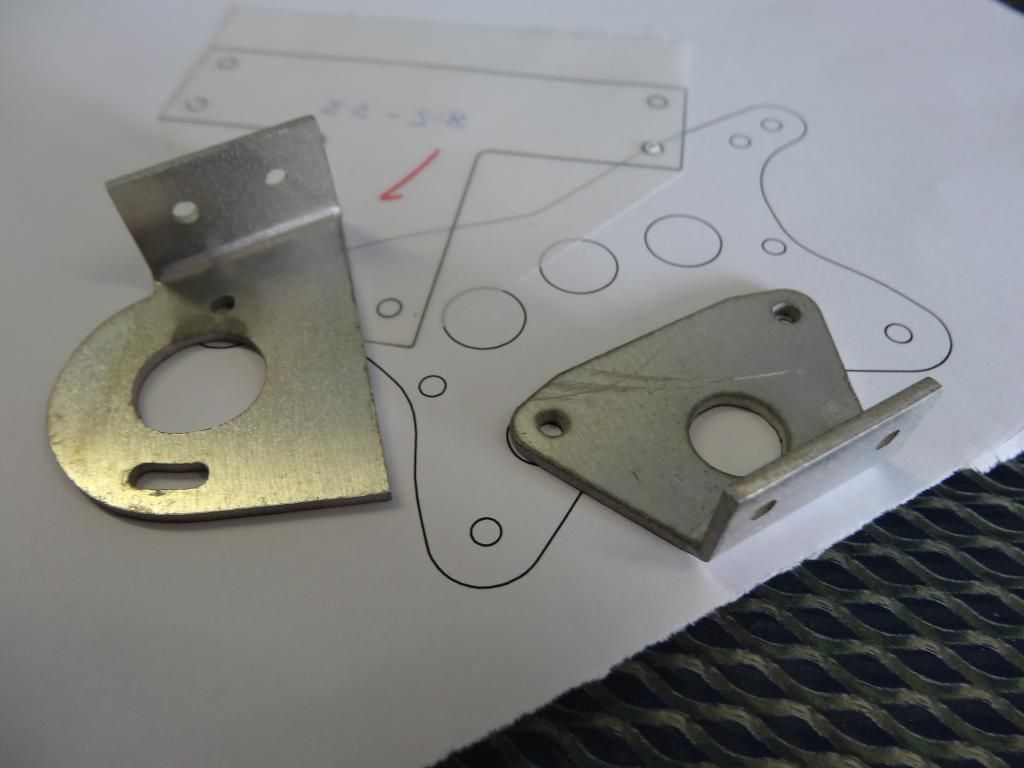
As you can see, i've also drawn up the rear shock tower & the 'T' shaped rear chassis stiffener - I will get these cut from some FRP/G10 material, probably by Fibrelyte.
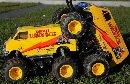
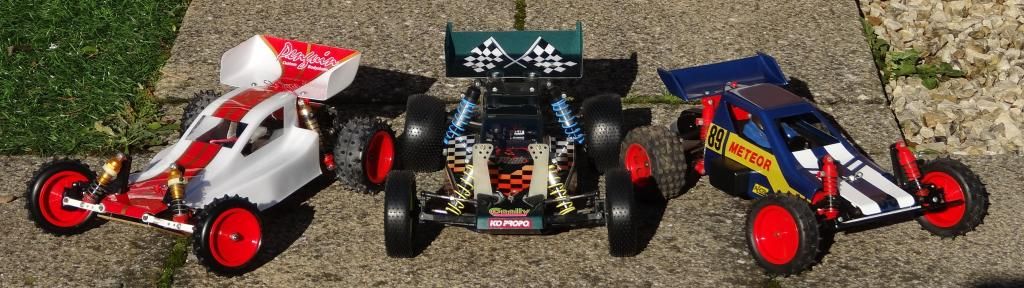
Also here's a photo I took recently of all three of my 1/10th Mardave buggies - two Meteors & my old Cobra racer... I also have a Marauder in bits.. that's being gradually cleaned up & will get rebuilt one-day (hopefully sooner rather than later)
There has been some progress on this project, albiet very slow. I've drawn up the motor bracket/heatsink & the bracket required to fit the rear chassis stiffener & had these two items waterjet cut from 2mm thk aluminium & then folded up on our brakepress here at work.


As you can see, i've also drawn up the rear shock tower & the 'T' shaped rear chassis stiffener - I will get these cut from some FRP/G10 material, probably by Fibrelyte.
Also here's a photo I took recently of all three of my 1/10th Mardave buggies - two Meteors & my old Cobra racer... I also have a Marauder in bits.. that's being gradually cleaned up & will get rebuilt one-day (hopefully sooner rather than later)

My T.C Showroom; http://www.tamiyaclub.com/member.asp?id=28990
Re: Race Modified; Mardave Meteor Project
I often wondered what became of this project Dan,I see it's culminated very nicely.
Well done mate.
Chris at Mardave told me ages ago that he hadn't got the shell moulds for either the
short or LWB anymore.
Well done mate.
Chris at Mardave told me ages ago that he hadn't got the shell moulds for either the
short or LWB anymore.
-
Hammerstien
- Regular Member
- Posts: 3
- Joined: Wed Aug 14, 2013 6:30 pm
Re: Race Modified; Mardave Meteor Project
looks great sir just got lwb body to paint on mine and sort wing mount out 
could do with some repro bearing spurs though
could do with some repro bearing spurs though
-
crusaderlyf
- Approved Member
- Posts: 361
- Joined: Wed Nov 12, 2008 9:03 pm
- Location: China
- Been thanked: 1 time
Re: Race Modified; Mardave Meteor Project
DerbyDan wrote:Thanks Sheriff.... I think by the time i've finished with this project most parts will be new/unused - of the Mardave parts the only non-new bits will be the steering bell cranks & the steering levers/hubs..... oh, & one rear wishbonesheriff wrote:Dan, only just seen this thread, great read and the car looks superb!
I've just sold an unbuilt NIB meteor, wish I'd kept it now! Still have enough parts to build 2 cars though.
Oh, apply silicone spray on those tyres, you'll be amazed.
Anyway - with massive thanks to DennisM this project is going to be even more faithfull to the magazine feature than I ever thought imaginable - Dennis sent me these two fantastic parts that I just never in a million years thought i'd get my hands on but will really authenticity to this build;
.... the same Kawada MX1 motor & the PB Mustang wing mount bracket - only the power of this forum & the generous members on it would make these things possible! - Dennis - I owe you one!
I always love the kawada MX-1 motor it looks very cool, two of them in my collections.
Re: Race Modified; Mardave Meteor Project
Hi
I happened on your article recently as I have been stripping down and rebuilding my old Meteor over the past few weeks. It's been interesting and very helpful. The photo of the dismantled diff was particularly useful as mine had disintegrated! I also appreciated your efforts on the body shells as picked up one of those repro Penguin body shells (my original one suffering from a bad paint job).
I'm now grappling with the problem of replacement tyres. I wondered if anyone knows whether there are any new tyres available to fit the red wheels. Not many vendors provide the dimensions on their web sites.
-
DerbyDan
- Approved Member
- Posts: 1837
- Joined: Tue Sep 08, 2009 8:04 am
- Location: Northampton UK
- Has thanked: 2 times
- Been thanked: 19 times
Re: Race Modified; Mardave Meteor Project
Well - sorry guys I forgot this thread even existed.... but since my 'runner/racer' version of the Mardave Meteor is currently entered into this months Car of the month competition I though it best to update the story to where we are now!
Up until now this thread seems to have been following the intended build for a shelf-queen car based on a whole bunch of new parts (including a NIP chassis) & basing the whole build on the heavily modified car of Greg Halliday car that was the subject of a series of magazine articles in the UK mag Radio Race Car International between 1988 & 1990.
However, over time I've collected a few more parts (including another very beaten up car) - enough to build a runner version of the shelf car..... something that I've always found quite tantalising since its always one thing to build a dream car just to look at - but to actually experience how it drives is something that I think I find more fun!
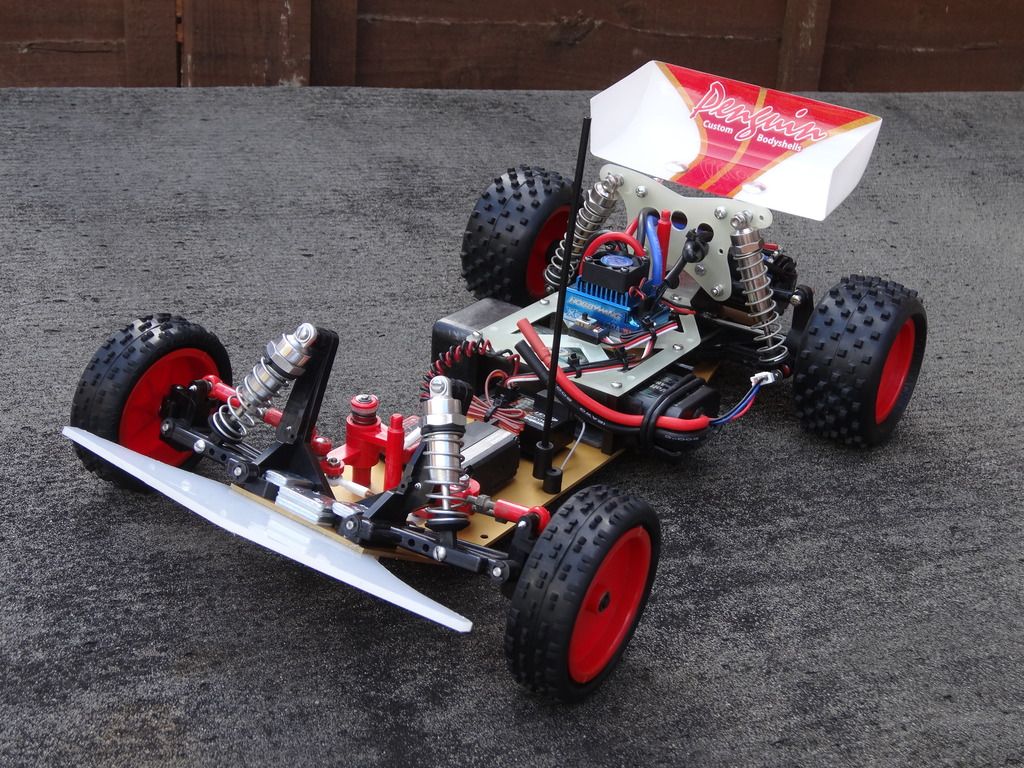
So below is a collection of photos of the car that I've built from the 'best of the rest' parts & is going to run at this years Vintage Revival meeting to be held at the end of this month - the car is fitted with a 13.5 brushless motor controlled by a Hobbywing V2 120amp esc - the idea that the 'mild' 13.5 motor shouldn't put too much strain on the gearbox (which has no slipper) from a standing start or accelerating from low speeds - but can have timing dialled in to obtain a bit more top-end.
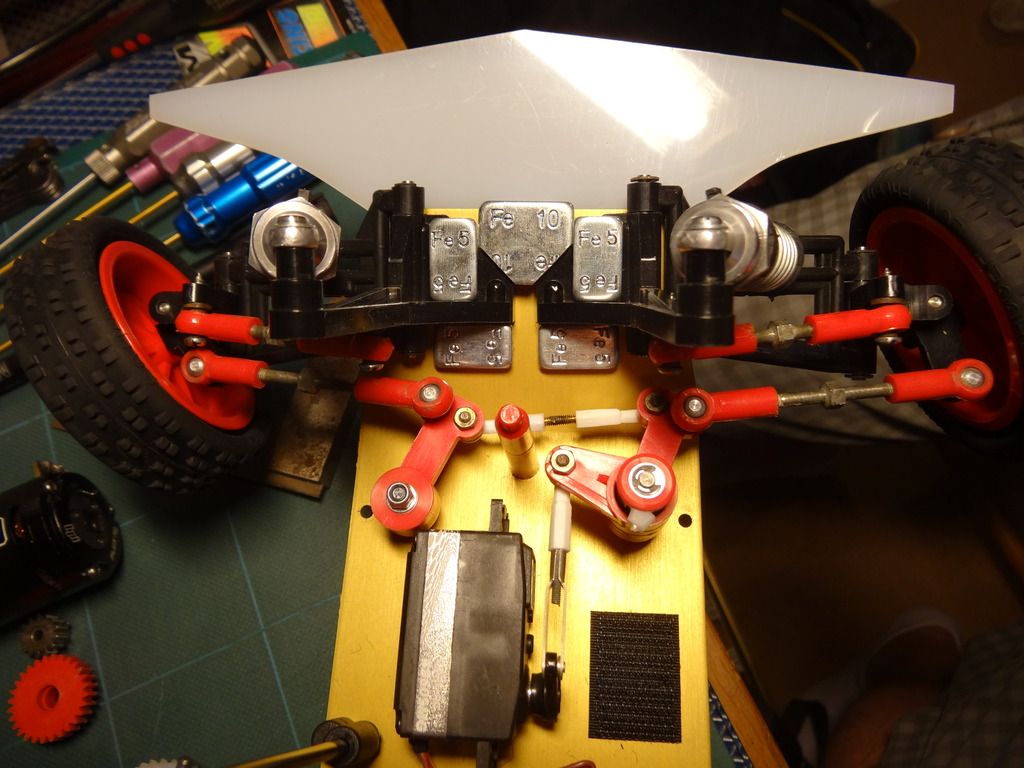
Home-made bumper made from plastic nylon sheet (shape based on the magazing car) - also inboard mounted steering bellcranks to minimise bumpsteer & lots of weight to get that front end 'turned-in'
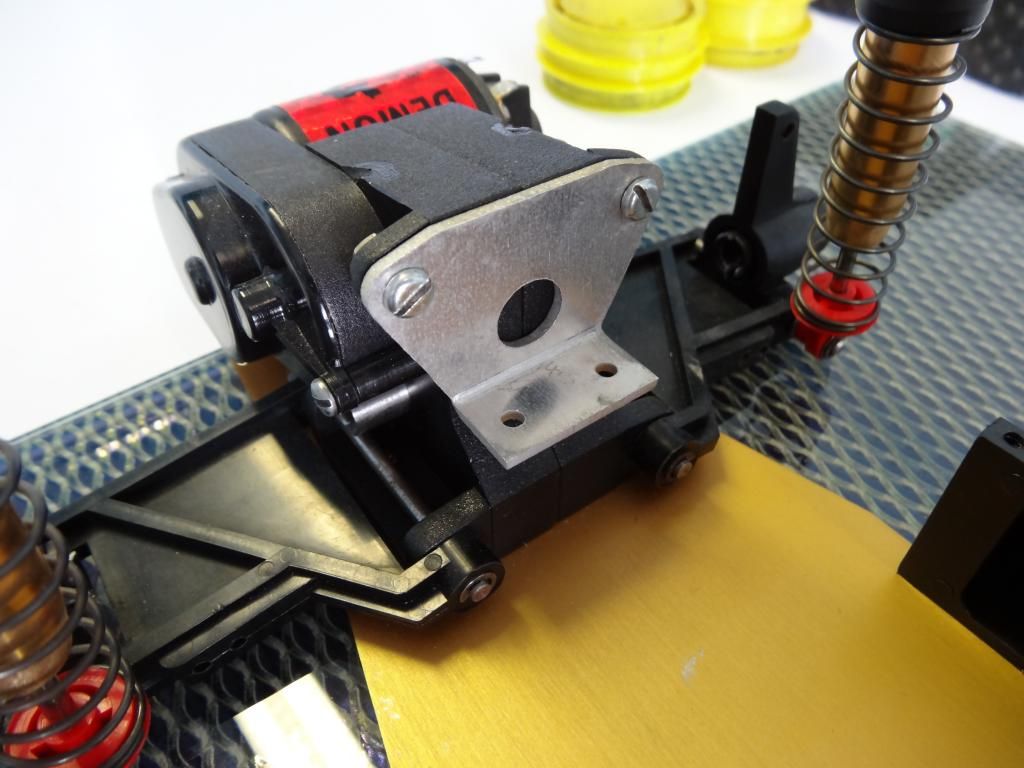
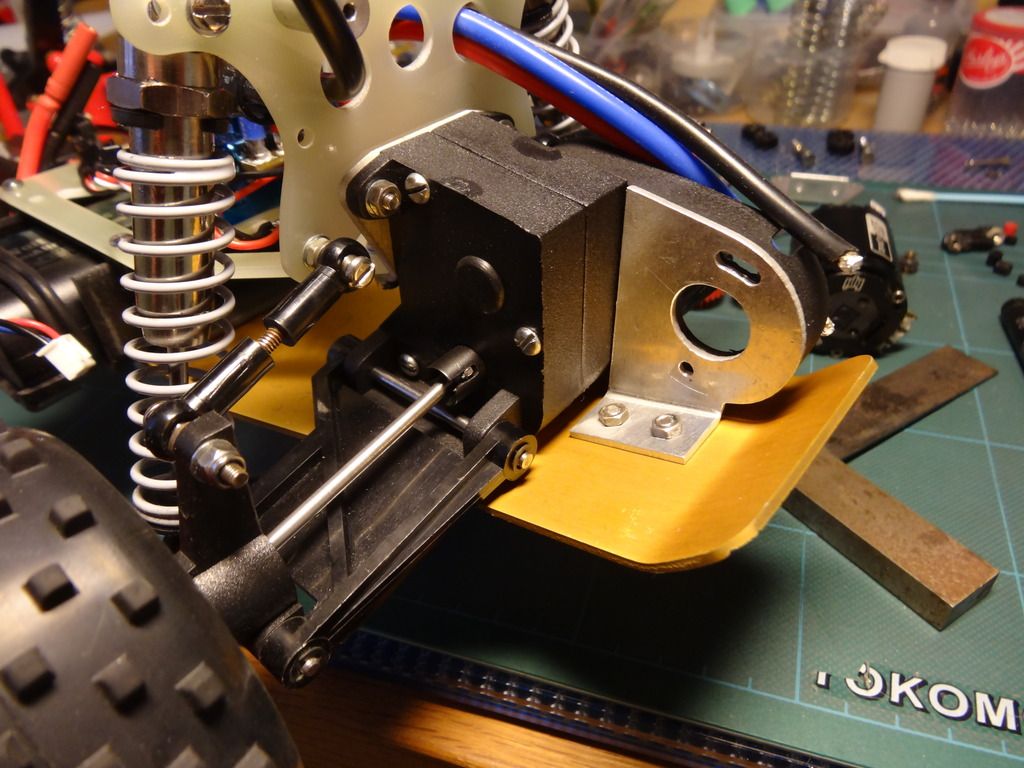
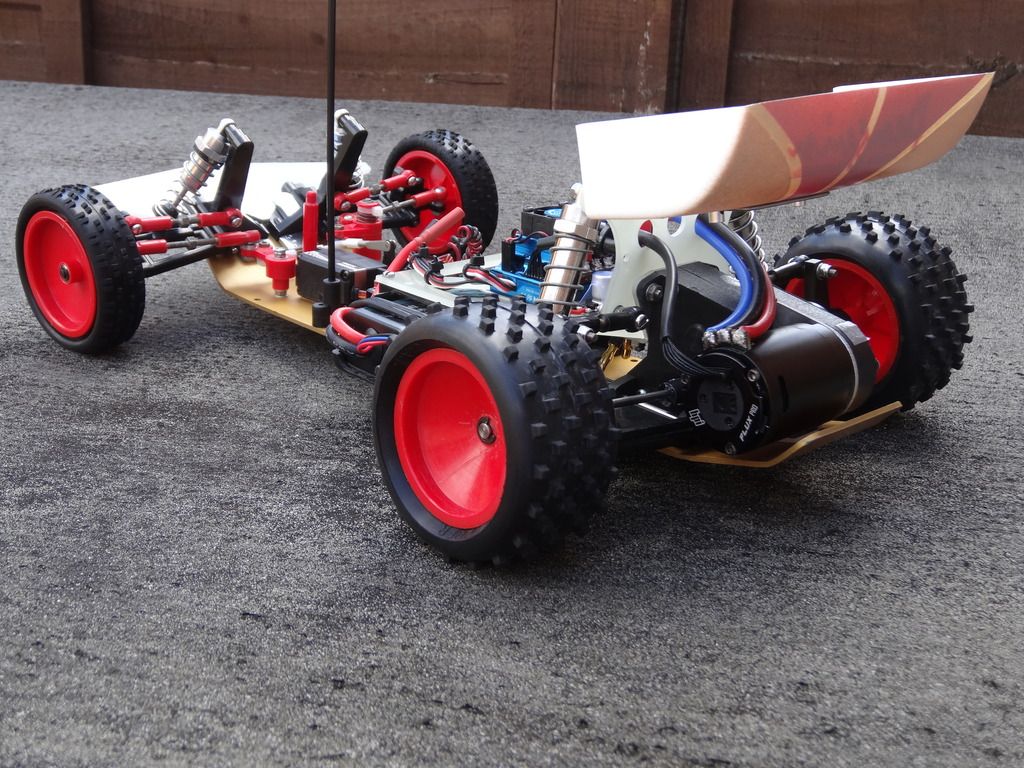
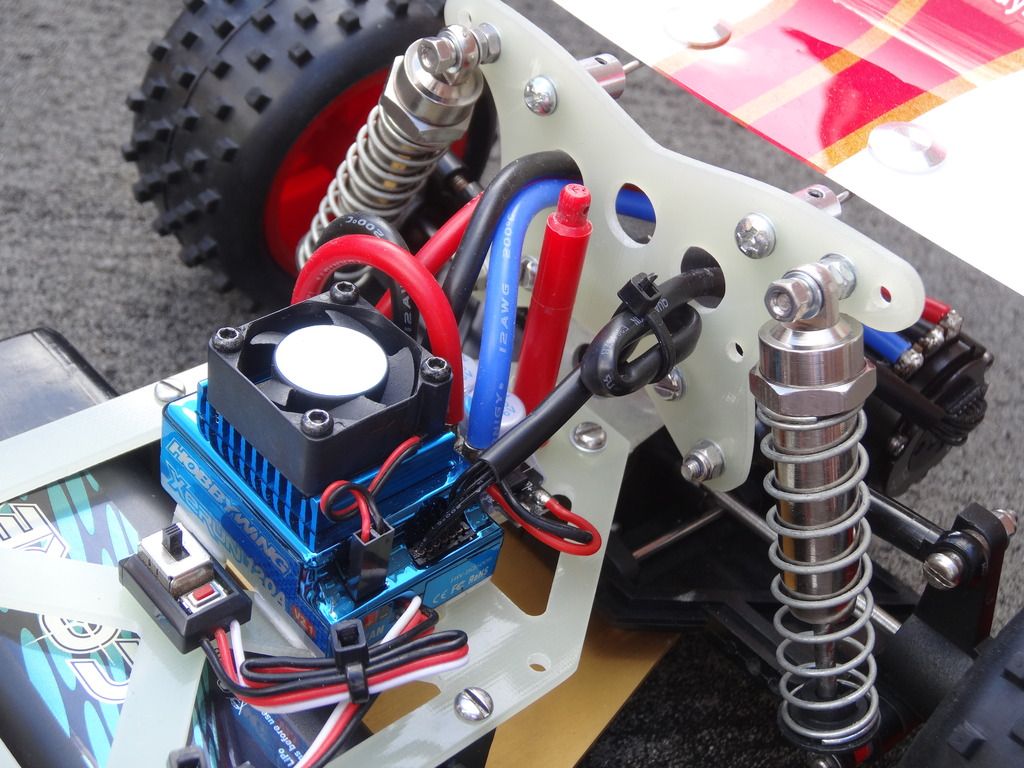
Close up of rear end showing aluminium motor mount - that I drew up (along with the shocktower/rear chassis brace bracket) on CAD, had laser cut & folded. This is intended to dissipate hear away from the motor into the chassis - a common problem Bitd was that the heat from the motor mounted directly to the plastic gearbox would cause it to 'warp' so much that it would force the pinion out of mesh with the spur causing it [the spur] to get chewed up in the process. Photo also shows the Fibrelyte cut rear shock tower - again cut to my supplied CAD file
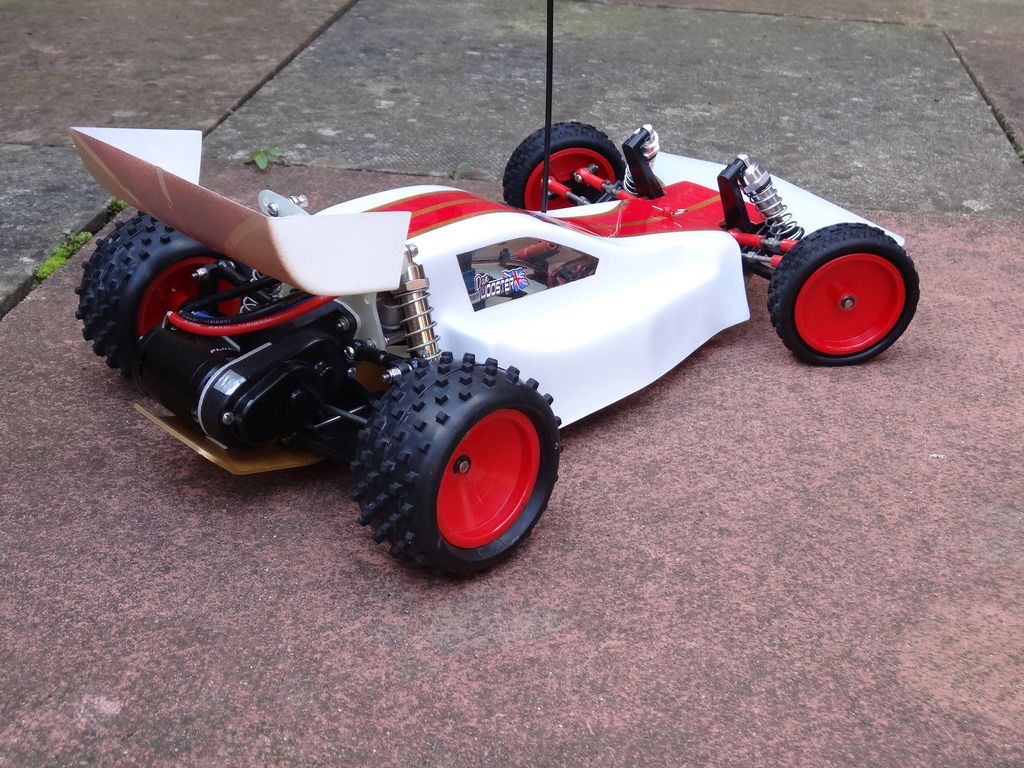
Bodyshell fitted is the one that I sprayed up for Penguin Custom Bodies ebay advert - but now trimmed at the back to suit the custom shock tower - which unlike the original does not provide a fixing for the body - a second 'front' body post is used to mount the body at the rear...
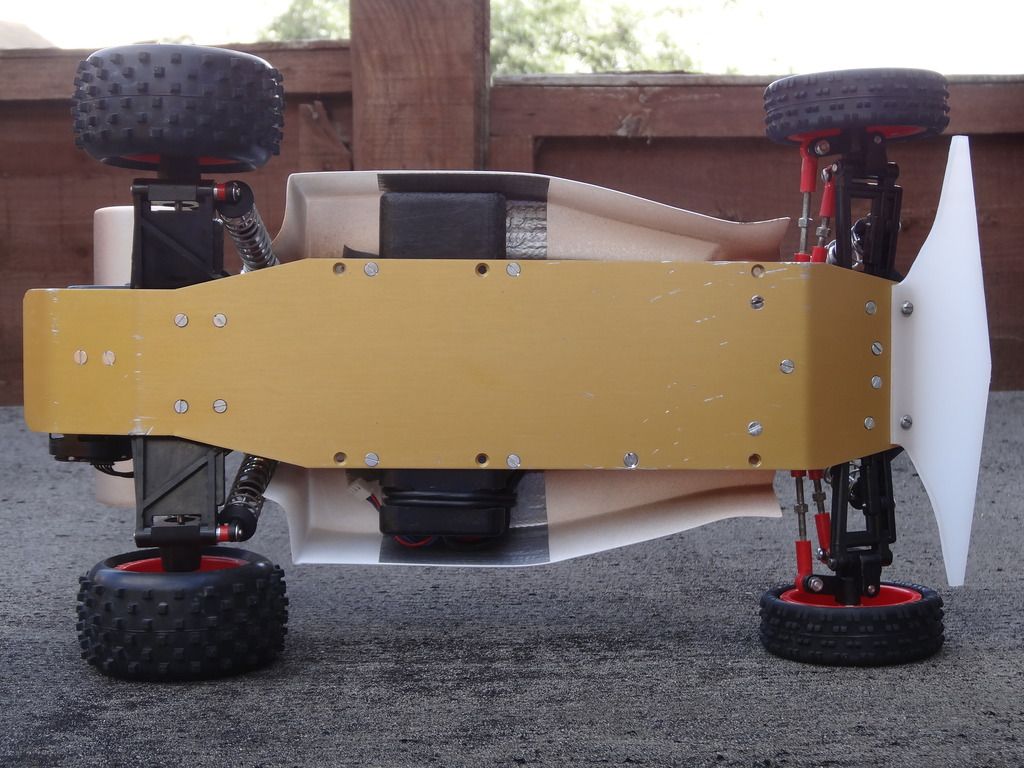
Long wheelbase chassis is just one simple folded piece of aluminium.
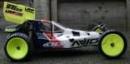
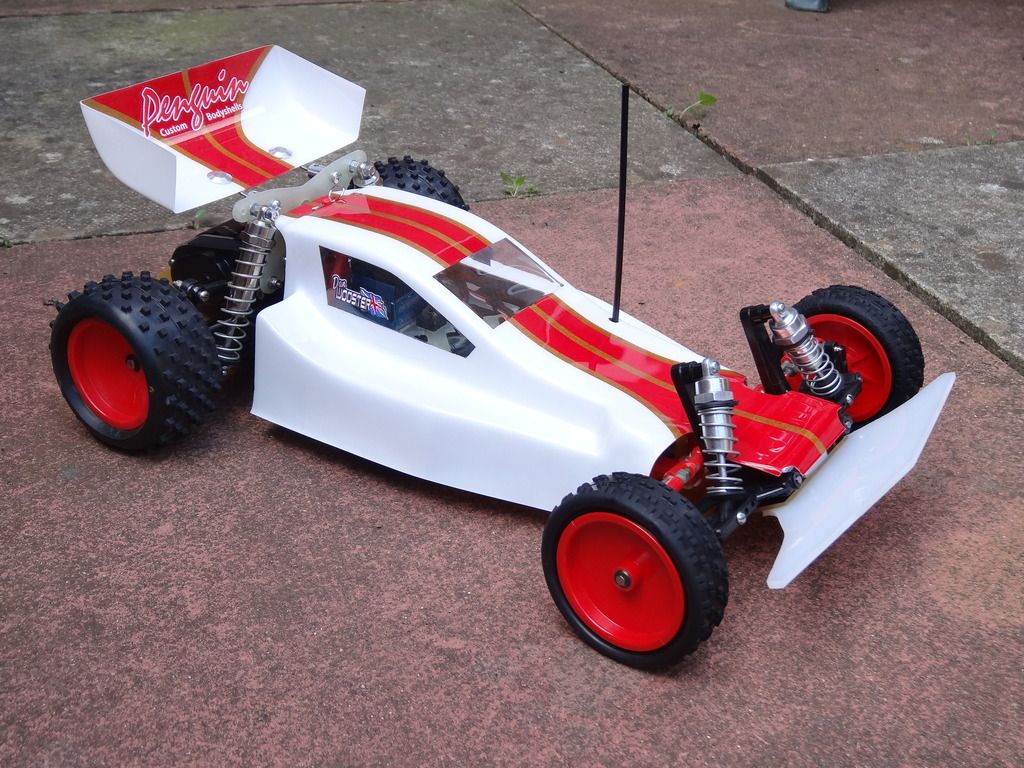
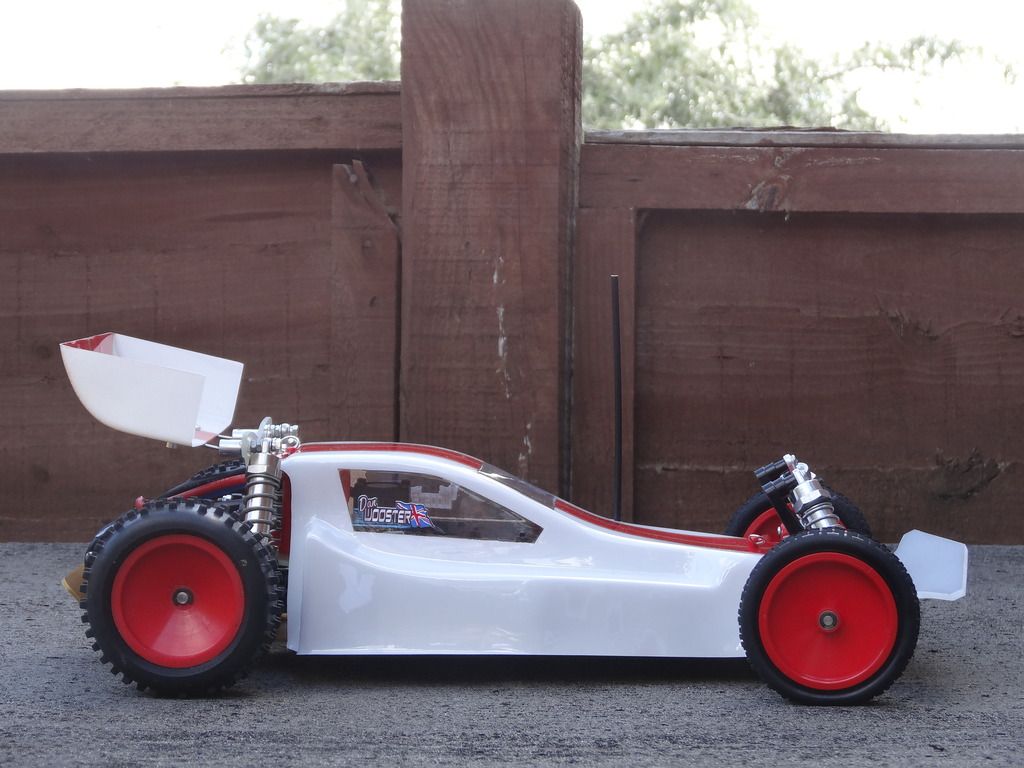
Side profile - the body that suits the LWB chassis is actually quite sleek looking IMO

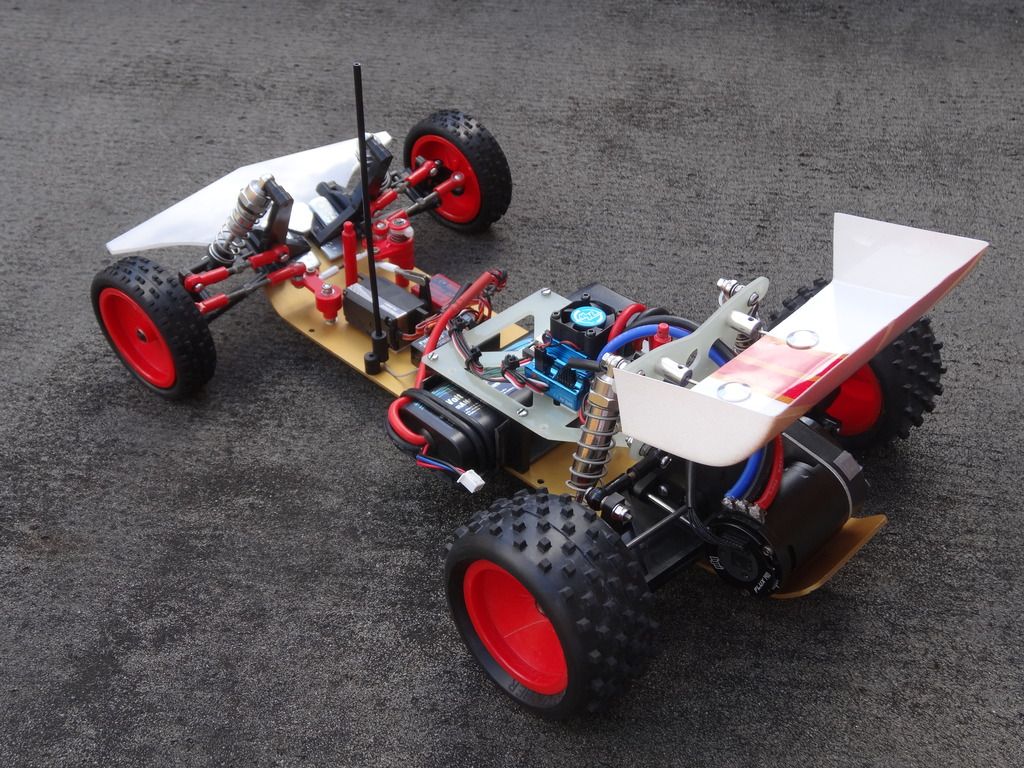
Hobbywing speedo mounted onto custom-made rear chassis brace - rounded Core LiPo sits across the chassis beneath.
Up until now this thread seems to have been following the intended build for a shelf-queen car based on a whole bunch of new parts (including a NIP chassis) & basing the whole build on the heavily modified car of Greg Halliday car that was the subject of a series of magazine articles in the UK mag Radio Race Car International between 1988 & 1990.
However, over time I've collected a few more parts (including another very beaten up car) - enough to build a runner version of the shelf car..... something that I've always found quite tantalising since its always one thing to build a dream car just to look at - but to actually experience how it drives is something that I think I find more fun!
So below is a collection of photos of the car that I've built from the 'best of the rest' parts & is going to run at this years Vintage Revival meeting to be held at the end of this month - the car is fitted with a 13.5 brushless motor controlled by a Hobbywing V2 120amp esc - the idea that the 'mild' 13.5 motor shouldn't put too much strain on the gearbox (which has no slipper) from a standing start or accelerating from low speeds - but can have timing dialled in to obtain a bit more top-end.
Home-made bumper made from plastic nylon sheet (shape based on the magazing car) - also inboard mounted steering bellcranks to minimise bumpsteer & lots of weight to get that front end 'turned-in'

Close up of rear end showing aluminium motor mount - that I drew up (along with the shocktower/rear chassis brace bracket) on CAD, had laser cut & folded. This is intended to dissipate hear away from the motor into the chassis - a common problem Bitd was that the heat from the motor mounted directly to the plastic gearbox would cause it to 'warp' so much that it would force the pinion out of mesh with the spur causing it [the spur] to get chewed up in the process. Photo also shows the Fibrelyte cut rear shock tower - again cut to my supplied CAD file

Bodyshell fitted is the one that I sprayed up for Penguin Custom Bodies ebay advert - but now trimmed at the back to suit the custom shock tower - which unlike the original does not provide a fixing for the body - a second 'front' body post is used to mount the body at the rear...

Long wheelbase chassis is just one simple folded piece of aluminium.

Side profile - the body that suits the LWB chassis is actually quite sleek looking IMO


Hobbywing speedo mounted onto custom-made rear chassis brace - rounded Core LiPo sits across the chassis beneath.


My T.C Showroom; http://www.tamiyaclub.com/member.asp?id=28990
Create an account or sign in to join the discussion
You need to be a member in order to post a reply
Create an account
Not a member? register to join our community
Members can start their own topics & subscribe to topics
It’s free and only takes a minute
Sign in
-
- Similar Topics
- Replies
- Views
- Last post
-
- 7 Replies
- 5908 Views
-
Last post by DerbyDan
-
- 0 Replies
- 2545 Views
-
Last post by chevron
-
- 63 Replies
- 9696 Views
-
Last post by Darkmard
-
- 3 Replies
- 2317 Views
-
Last post by Dadio
-
- 4 Replies
- 2675 Views
-
Last post by Miggers
-
- 8 Replies
- 2026 Views
-
Last post by Frankentruck
-
- 5 Replies
- 1384 Views
-
Last post by Trackingz
-
- 18 Replies
- 2425 Views
-
Last post by Marky
Who is online
Users browsing this forum: No registered users and 5 guests