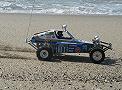
FERRETTIs A&L nearly but not quite
-
Synergy

- Approved Member
- Posts: 1787
- Joined: Sat Dec 23, 2006 5:57 am
- Location: North East England
- Has thanked: 127 times
- Been thanked: 70 times
I thought about that Sho and I think you are correct but my painting and masking skills are not up to it 
Experience is that marvelous thing that enables you to recognize a mistake when you make it again.
Here's my TC Showroom
http://www.tamiyaclub.com/showroom.asp?id=18028
Here's my TC Showroom
http://www.tamiyaclub.com/showroom.asp?id=18028
-
Dr. Robotnik

- Approved Member
- Posts: 1442
- Joined: Wed Oct 11, 2006 11:05 am
- Location: Nutterham, United Kingdom
- Been thanked: 2 times
-
shodog
- Approved Member
- Posts: 3816
- Joined: Thu Oct 05, 2006 3:09 pm
- Location: Washington
- Has thanked: 3 times
- Been thanked: 86 times
It's actually so easy, you will kick yourself for not doing it sooner. here are a set of mine that I painted with tamiya clear orange paintFERRETTI wrote:I thought about that Sho and I think you are correct but my painting and masking skills are not up to it

First, polish the lip of the wheel. then mask most of the lip off. you don't hav eto worry about the area where dimples are. Spray your paint, then take the masking tape off and use laquer thinner on a Q-tip to remove the paint from the dimpled area.
-
Dr. Robotnik
- Approved Member
- Posts: 1442
- Joined: Wed Oct 11, 2006 11:05 am
- Location: Nutterham, United Kingdom
- Been thanked: 2 times
-
Synergy
- Approved Member
- Posts: 1787
- Joined: Sat Dec 23, 2006 5:57 am
- Location: North East England
- Has thanked: 127 times
- Been thanked: 70 times
Yes Shodog I saw those ones and did think they looked totally stunning. I might give it a go but one of the other problems I have is no airbrush set up.
Experience is that marvelous thing that enables you to recognize a mistake when you make it again.
Here's my TC Showroom
http://www.tamiyaclub.com/showroom.asp?id=18028
Here's my TC Showroom
http://www.tamiyaclub.com/showroom.asp?id=18028
-
Synergy
- Approved Member
- Posts: 1787
- Joined: Sat Dec 23, 2006 5:57 am
- Location: North East England
- Has thanked: 127 times
- Been thanked: 70 times
However can you get a flat enough application from a canshodog wrote:Ferretti, Tamiya makes the clear paint in rattle cans now.
Experience is that marvelous thing that enables you to recognize a mistake when you make it again.
Here's my TC Showroom
http://www.tamiyaclub.com/showroom.asp?id=18028
Here's my TC Showroom
http://www.tamiyaclub.com/showroom.asp?id=18028


-
Synergy
- Approved Member
- Posts: 1787
- Joined: Sat Dec 23, 2006 5:57 am
- Location: North East England
- Has thanked: 127 times
- Been thanked: 70 times
Well if that's a rattle can finish it's good enough for me. In the UK flat usually refers to smoothness, sorry Sho I should have been a little clearer.
Experience is that marvelous thing that enables you to recognize a mistake when you make it again.
Here's my TC Showroom
http://www.tamiyaclub.com/showroom.asp?id=18028
Here's my TC Showroom
http://www.tamiyaclub.com/showroom.asp?id=18028
-
templeofspeed
- Approved Member
- Posts: 2087
- Joined: Tue Aug 01, 2006 10:02 pm
- Location: Central Ohio
- Been thanked: 8 times
Well, you chaps also tend to lay down some unbelieveable brush paint jobs... I know what you meant by flat (thinned to eliminate brush strokes). Not matte.FERRETTI wrote:Well if that's a rattle can finish it's good enough for me. In the UK flat usually refers to smoothness, sorry Sho I should have been a little clearer.
-
Dr. Robotnik
- Approved Member
- Posts: 1442
- Joined: Wed Oct 11, 2006 11:05 am
- Location: Nutterham, United Kingdom
- Been thanked: 2 times
Cheers shodog I'll look into that 

By the way Ferretti I noticed you mounted your nose plate under the chassis, was there any reason for that? I mounted mine with the plate on top for no particular reason.

I was wondering does anyone know what the correct set up is, if there is one? The chassis is countersunk and so is the nose plate so that's what confused me when I was assembling my car.
Cheers
By the way Ferretti I noticed you mounted your nose plate under the chassis, was there any reason for that? I mounted mine with the plate on top for no particular reason.
I was wondering does anyone know what the correct set up is, if there is one? The chassis is countersunk and so is the nose plate so that's what confused me when I was assembling my car.
Cheers
-
Asso_man!

- Approved Member
- Posts: 3959
- Joined: Thu Aug 03, 2006 7:49 am
- Location: EU
- Has thanked: 40 times
- Been thanked: 70 times
I guess Ferretti mounted it under the chassis because he used a composite craft nose plate that is totally flat and had most probably problems with mounting the steering rack without any binding/scratching. If you use the standard aluminium nose plate, mount it on the top of the chassis, like on a gold tub...
_____________________________________________
_____________________________________________
Come and visit the stable
_____________________________________________
Come and visit the stable
-
Dr. Robotnik
- Approved Member
- Posts: 1442
- Joined: Wed Oct 11, 2006 11:05 am
- Location: Nutterham, United Kingdom
- Been thanked: 2 times
I think I know what you mean. Like the proper RC10 nose plate has a kink where it joins the chassis right? I think Ferretti has used the same nose plate as me and generally the cars are very similar and I didn't seem to have any binding problems....Asso_man! wrote:I guess Ferretti mounted it under the chassis because he used a composite craft nose plate that is totally flat and had most probably problems with mounting the steering rack without any binding/scratching. If you use the standard aluminium nose plate, mount it on the top of the chassis, like on a gold tub...
Speak up Ferretti, I need to know
This thread makes me really want to finish mine first!!!
-
Synergy
- Approved Member
- Posts: 1787
- Joined: Sat Dec 23, 2006 5:57 am
- Location: North East England
- Has thanked: 127 times
- Been thanked: 70 times
The nose plate I have has chamfered edges, if it were mounted on top the chamfer would be the wrong direction, does that make senseDr. Robotnik wrote:I think I know what you mean. Like the proper RC10 nose plate has a kink where it joins the chassis right? I think Ferretti has used the same nose plate as me and generally the cars are very similar and I didn't seem to have any binding problems....Asso_man! wrote:I guess Ferretti mounted it under the chassis because he used a composite craft nose plate that is totally flat and had most probably problems with mounting the steering rack without any binding/scratching. If you use the standard aluminium nose plate, mount it on the top of the chassis, like on a gold tub...
Speak up Ferretti, I need to know
This thread makes me really want to finish mine first!!!
Experience is that marvelous thing that enables you to recognize a mistake when you make it again.
Here's my TC Showroom
http://www.tamiyaclub.com/showroom.asp?id=18028
Here's my TC Showroom
http://www.tamiyaclub.com/showroom.asp?id=18028
Create an account or sign in to join the discussion
You need to be a member in order to post a reply
Create an account
Not a member? register to join our community
Members can start their own topics & subscribe to topics
It’s free and only takes a minute
Sign in
-
- Similar Topics
- Replies
- Views
- Last post
-
- 11 Replies
- 1559 Views
-
Last post by Synergy
-
- 13 Replies
- 1895 Views
-
Last post by rc-10 gold pan
-
- 2 Replies
- 579 Views
-
Last post by bdrmbully
-
- 19 Replies
- 1875 Views
-
Last post by scr8p


Who is online
Users browsing this forum: ![]() Facebook [Bot] and 71 guests
Facebook [Bot] and 71 guests