Anodizing should always be done in large batches, otherwise piece-part wise it turns out to be very expensive. JHarris drops my stuff off for me at the anodizers due to proximity for him. Just keep in mind it is pricey for small lots/batches. Contact JHarris if money is no object and he will give you the places information.
I wanted the 2-56 threaded ones because the 4-40 look too big to me personally. I always felt it was better to go smaller than larger as you can always tap for bigger set screws if a definitive answer comes down one-day that 4-40 was used; but Curtis himself, who made the 1st ones, indicated that they do not look like 4-40 to him either as they would be too big and that he might have used 2-56 ones in this particular area since it is narrow and that is the next standard size down from 4-40... even though back then he always tried to use 4-40 normally on things where he could. But like the gears in the transmission, they too are not 4-40 screws either. So my guess and Curtis' guess is that he used 2-56 set screws.
I actually did an overlay of mine onto the box art collars and found that the size of the entry hole agrees with the 2-56 size hole. But honestly, I don't think it really matters that much. Just find a size you are happy with!
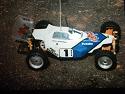
My Vintage Box Art RC10 replicas
-
Ruffy

- Approved Member
- Posts: 879
- Joined: Mon Jan 11, 2010 6:49 pm
- Location: Orlando, Florida
- Been thanked: 66 times
Re: My Box Art replicas of the RC10
My modded motorplate is finished, a little polishing and then light gold anodizing like my front spring adjusters and she will be ready to put back on the car. Noseplate is being done as we speak! Thankfully my welders owe me a few favors for either engineering or computer related things.
Look Ma, No Holes!
My custom machined heatsinks for the Novak are almost ready, and look exactly like the original one Novak did. Thanks for the great pics of it to use as reference Asso_Man!
Look Ma, No Holes!
-
Ruffy
- Approved Member
- Posts: 879
- Joined: Mon Jan 11, 2010 6:49 pm
- Location: Orlando, Florida
- Been thanked: 66 times
Re: My Box Art replicas of the RC10
Motorplate is done with the welding and grinding. Body post hole removed.
Next step, everything to anodizing.
Look Ma' no body post hole!
Next step, everything to anodizing.
Look Ma' no body post hole!
-
JHarris
- Approved Member
- Posts: 526
- Joined: Sat Jan 16, 2010 11:17 am
- Location: Orlando, Florida
- Been thanked: 2 times
Re: My Box Art replicas of the RC10
Let me know if you want me to pick it up, meet you in the middle or if you want to swing by and drop it off. I will get it over there as soon as I have it in hand. I need to pick up stuff for Miguel anyway.
-
m_vice

- Approved Member
- Posts: 1312
- Joined: Fri Feb 23, 2007 12:46 pm
- Location: Dallas, TX
- Been thanked: 2 times
Re: My Box Art replicas of the RC10
Love the product Ruffy, It looks AWESOME... you are doing some cool stuff man and they are a great addition to the forum.
thanks.
thanks.

-
RC10resto
- Super Member
- Posts: 3007
- Joined: Tue Sep 09, 2008 2:26 am
- Location: Los Angeles, CA
- Has thanked: 1441 times
- Been thanked: 548 times
Re: My Box Art replicas of the RC10
Ruffy you are killing me 
That is good stuff, when do you start on the RC10 First Prototype Replica
Awesome stuff
That is good stuff, when do you start on the RC10 First Prototype Replica
Awesome stuff
-
Ruffy
- Approved Member
- Posts: 879
- Joined: Mon Jan 11, 2010 6:49 pm
- Location: Orlando, Florida
- Been thanked: 66 times
Re: My Box Art replicas of the RC10
EDIT*
I just understood what you asked RCResto. Actually, I haven't started one but was thinking of doing one if I got bored. I'd actually machine all the parts myself out of virgijn nylon or delrin so it even had that transluscent "look" to the hand made parts. This would take some time and I would do myself on nights and weekends, this way the labor is free since I have access to all the machines I need.
I am trying to get things done quickly for this build, so that the build thread will be complete from start to end, as I did not want it to draw out for long periods then hunt down my thread. I will be ready soon, and post a ton of pics from start to finish as I have taken pics as I did things nightly.
-
scr8p

- Administrator
- Posts: 16734
- Joined: Tue Feb 07, 2006 9:46 pm
- Location: Northampton, PA
- Has thanked: 33 times
- Been thanked: 1193 times
Re: My Box Art replicas of the RC10
since i haven't seen any tub alterations yet, and maybe you've done them and just not posted pics, but the one thing that has always kept me from even bothering to do a boxart replica is the kickup on the rear of the chassis. the production tub is quite a bit taller than the boxart. which in turn, makes the slots go further under the motor. you can see what i mean in the pic on the side of the box where the right tire is off. even in the right side profile pic on the box, you can tell the 2 screws that attach the tub to the motor plate are lower than a production car.
-
Ruffy
- Approved Member
- Posts: 879
- Joined: Mon Jan 11, 2010 6:49 pm
- Location: Orlando, Florida
- Been thanked: 66 times
Re: My Box Art replicas of the RC10
Not sure if they are the same or not, but it will be easy for me to check using CAD and Photoshop, I'll check tonight and let you know if it is just a point-of-view / perception visual anomally or the same.
-
kenooze

- Approved Member
- Posts: 566
- Joined: Fri Jan 19, 2007 11:02 am
- Location: Paris
- Been thanked: 7 times
Re: My Box Art replicas of the RC10
Ruffy, I really hope than the anodizing process will do not alterate your job.
I already tried to weld some parts (as the square cutting area of the productiong B2 rear lower plate ), after griding they looks ace, but the anodizing process show the welding joint.
It may depends if you use or not the same aluminium to weld your part as the original alumiunim...
I already tried to weld some parts (as the square cutting area of the productiong B2 rear lower plate ), after griding they looks ace, but the anodizing process show the welding joint.
It may depends if you use or not the same aluminium to weld your part as the original alumiunim...
-
Ruffy
- Approved Member
- Posts: 879
- Joined: Mon Jan 11, 2010 6:49 pm
- Location: Orlando, Florida
- Been thanked: 66 times
Re: My Box Art replicas of the RC10
Kenooze:
Agreed, that is why I had him specifically use the same type of welding rod for my parts that the chassis is made from, as he has been under that understanding from the onset. We planned for this in advance.
We have extensive background with all forms of anodizing here, the perils of mis-matched materials, and problems from differing dips and temps... including hard anodizing which I have had done on my C-17 trainers for the thrust fan deflector actuators.

Re: My Box Art replicas of the RC10
Can I ask what welding rod was used? I was planning a prototype replica of my own but you will probably beat me to it with the resources you have. I've yet to see one done and thought you guys would get a kick out of the first one.
Thanks,
Mike
Thanks,
Mike
-
Ruffy
- Approved Member
- Posts: 879
- Joined: Mon Jan 11, 2010 6:49 pm
- Location: Orlando, Florida
- Been thanked: 66 times
Re: My Box Art replicas of the RC10
fastang; I will ask my Sr. Chief welder and let you know. I assume he used a welding rod compatible with 6061 for anodizing after the metallurgy tests, but I will let you know for sure tomorrow after I ask him.
scr8p; you are absolutely right, but it is only 1/4" of an inch max. difference.
If you absolutely wanted to try and make a "perfect" replica of the boxter, then this would mean that you would have to add filler to the slots-top of the chassis area where the motor resides, remake the radii in the slots, fill the two existing holes, cut it back approx. .25", drill two new holes, drill & tap 2ea. 4-40 holes in the motor plate after you fill these as well and then re-anodize it all. Too much work for an extremely minor thing to me, and I definitely wouldn't let it stop you from making a boxter.
As for myself, after I did the numercial comparsions between images, felt it is not enough of a deal for me to go to that extreme, even though I could have it done as quickly as tomorrow, but instead will just proceed to drop these parts and the chassis off tonight for the light gold anodizing so I can put my car back together.
But you are spot on about there being a difference there.
-
Ruffy
- Approved Member
- Posts: 879
- Joined: Mon Jan 11, 2010 6:49 pm
- Location: Orlando, Florida
- Been thanked: 66 times
Re: My Box Art replicas of the RC10
fastang, I missed the welder yesterday, but cornered him just now and he said that in fact it was ER5356 aluminum alloy weld rod, specifically for 6061 weld repair when the application is to be anodized afterwards. ER5356 filler works fine with 6061 and doesn't have the problem of 'looking different' after anodizing.
ER4043 is generally the preferred filler for 6061, the exception being when color match is required after anodizing. ER4043 will ALWAYS turn dark grey after anodizing ( due to the much higher Si content )
ER5356 is the next best choice and is readily available.
ER4043 is generally the preferred filler for 6061, the exception being when color match is required after anodizing. ER4043 will ALWAYS turn dark grey after anodizing ( due to the much higher Si content )
ER5356 is the next best choice and is readily available.
Create an account or sign in to join the discussion
You need to be a member in order to post a reply
Create an account
Not a member? register to join our community
Members can start their own topics & subscribe to topics
It’s free and only takes a minute
Sign in
-
- Similar Topics
- Replies
- Views
- Last post
-
- 1 Replies
- 1913 Views
-
Last post by RC10resto
-
- 3 Replies
- 1029 Views
-
Last post by iamogre
-
- 10 Replies
- 1504 Views
-
Last post by Vintagemishal
-
- 71 Replies
- 11150 Views
-
Last post by limestang
-
- 23 Replies
- 4242 Views
-
Last post by skunk.werkz
-
- 16 Replies
- 3092 Views
-
Last post by wevarc10
-
- 23 Replies
- 3101 Views
-
Last post by limestang
-
- 3 Replies
- 582 Views
-
Last post by templeofspeed
Who is online
Users browsing this forum: ![]() Ahrefs [Bot],
Ahrefs [Bot], ![]() Tbot [Bot] and 10 guests
Tbot [Bot] and 10 guests