Turbo Optima mid SE
-
Coelacanth

- Approved Member
- Posts: 7361
- Joined: Thu Jul 29, 2010 6:20 pm
- Location: Alberta, Canada
- Has thanked: 16 times
- Been thanked: 280 times
Re: Turbo Optima mid SE
How durable does that anodizing seem? A good while ago, I bought some Dynamite brand alloy parts that were "anodized", but you could practically scrape it off with a fingernail. Anodizing is supposed to be a real pain to remove, unless chemically removed (oven cleaner).
Completed projects: CYANide Onroad Optima | Zebra Gold Optima | Barney Optima | OptiMutt RWD Mid
Gallery - Coel's Stalls: Marui Galaxy & Shogun Resto-Mods | FrankenBuff AYK Buffalo | 1987 Buick GNX RC12L3
Gallery - Coel's Stalls: Marui Galaxy & Shogun Resto-Mods | FrankenBuff AYK Buffalo | 1987 Buick GNX RC12L3
-
radioactivity

- Super Member
- Posts: 800
- Joined: Wed Jan 24, 2018 11:46 am
- Location: Dripping Springs Tx
- Has thanked: 337 times
- Been thanked: 499 times
Re: Turbo Optima mid SE
The only real "test of durability" I have done is in final color matching.
After the final sealing with Nickel Acetate, I used some Turtle wax rubbing compound to slightly lighten darker anodized parts.
The compound does remove some ano and dye as was evident on the soft white cotton rag used with the compound.
"Would a fingernail scratch the ano" I sure don't think so. It took a bit of firm rubbing to lighten to darker pieces.
The somewhat "harder" anodization processes would be 1mil depth and boiling water sealing could also lead to a harder finish.
I chose Nickel Acetate for a better "glossier" finish.
True Hard Anodization is an entirely different and sophisticated process and on Duralumin?????
When anodizing if the pores are too small ( .1- .3 ) dye is too large to enter pores. If pores are too large dye will "wash" out of pores.
.6 mil is a fairly happy medium. I tried to go to 1mil but could not get good dyeing.
Could have been several other factors as well that limited me to approximately .6mil
Though I tried my best to achieve .6mil ano depth, accurately calculating surface area is a challenge on such small parts.
All above info is only my limited experience and an amalgamation of exhaustively reading numerous forums and numerous failures
And for any other nubile DIY anodizers, I spent roughly 4 hours per part, start to finish. 13 parts so far!.
I guess I now know why no one would accept the job.
Chuck
Hydrodip how to https://www.rc10talk.com/viewtopic.php?f=62&t=42727
When all you have is a hammer everything looks like a nail
When all you have is a hammer everything looks like a nail
-
radioactivity
- Super Member
- Posts: 800
- Joined: Wed Jan 24, 2018 11:46 am
- Location: Dripping Springs Tx
- Has thanked: 337 times
- Been thanked: 499 times
Re: Turbo Optima mid SE
As a side note to the process...
Different color dyes can require different ano processes to some extent.
Black is apparently more difficult for the DIYer's. Blues are more tolerant to dyeing, from what I have gathered.
Chuck
Different color dyes can require different ano processes to some extent.
Black is apparently more difficult for the DIYer's. Blues are more tolerant to dyeing, from what I have gathered.
Chuck
Hydrodip how to https://www.rc10talk.com/viewtopic.php?f=62&t=42727
When all you have is a hammer everything looks like a nail
When all you have is a hammer everything looks like a nail
-
Coelacanth
- Approved Member
- Posts: 7361
- Joined: Thu Jul 29, 2010 6:20 pm
- Location: Alberta, Canada
- Has thanked: 16 times
- Been thanked: 280 times
Re: Turbo Optima mid SE
What about red? 
Completed projects: CYANide Onroad Optima | Zebra Gold Optima | Barney Optima | OptiMutt RWD Mid
Gallery - Coel's Stalls: Marui Galaxy & Shogun Resto-Mods | FrankenBuff AYK Buffalo | 1987 Buick GNX RC12L3
Gallery - Coel's Stalls: Marui Galaxy & Shogun Resto-Mods | FrankenBuff AYK Buffalo | 1987 Buick GNX RC12L3
-
radioactivity
- Super Member
- Posts: 800
- Joined: Wed Jan 24, 2018 11:46 am
- Location: Dripping Springs Tx
- Has thanked: 337 times
- Been thanked: 499 times
Re: Turbo Optima mid SE
Haven't tried red dye but I found a Caswell forum post on their red dye problems.
https://forum.caswellplating.com/forum/anodizing-questions/1659-dye-problems
Chuck
https://forum.caswellplating.com/forum/anodizing-questions/1659-dye-problems
Chuck
Hydrodip how to https://www.rc10talk.com/viewtopic.php?f=62&t=42727
When all you have is a hammer everything looks like a nail
When all you have is a hammer everything looks like a nail
-
radioactivity
- Super Member
- Posts: 800
- Joined: Wed Jan 24, 2018 11:46 am
- Location: Dripping Springs Tx
- Has thanked: 337 times
- Been thanked: 499 times
Re: Turbo Optima mid SE
So I had this servo arm from a previous build and decided to try and sand and polish only portions of it.
Had no idea if the anodizing of the electric blue would effect the existing black anodizing but thought I'd give it a try.
A very small part that really won't be seen but well worth the effort to experiment
First sanded and polished the upper front, back and sides....
Then anodized, dyed and sealed.
Chuck
Had no idea if the anodizing of the electric blue would effect the existing black anodizing but thought I'd give it a try.
A very small part that really won't be seen but well worth the effort to experiment
First sanded and polished the upper front, back and sides....
Then anodized, dyed and sealed.
- ano20.JPG (48.77 KiB) Viewed 1328 times
- ano20.JPG (48.77 KiB) Viewed 1328 times
Hydrodip how to https://www.rc10talk.com/viewtopic.php?f=62&t=42727
When all you have is a hammer everything looks like a nail
When all you have is a hammer everything looks like a nail
-
radioactivity
- Super Member
- Posts: 800
- Joined: Wed Jan 24, 2018 11:46 am
- Location: Dripping Springs Tx
- Has thanked: 337 times
- Been thanked: 499 times
Re: Turbo Optima mid SE
Tried a little experiment with a 1/2" X 1/2" block of 6061 t6 aluminum.
Question was, how deep of a shade of blue could be achieved with the exact same electric blue I used on all the other parts.
Most all of the other parts are Duralumin.
Decided to anodize to 1mil (as thick as can be achieved without going to hard anodizing), heat the dye to 140 degrees and let it stay in the dye for 30 minutes.
All of the previously anodized parts were in the dye at 100 degrees for 1 minute.
The difference kind of surprised me.
The second pic also has a pair of AE shock bushings. The test block is almost an exact match to the FT blue. Just a little darker.
Chuck
- Attachments
-
Hydrodip how to https://www.rc10talk.com/viewtopic.php?f=62&t=42727
When all you have is a hammer everything looks like a nail
When all you have is a hammer everything looks like a nail
-
radioactivity
- Super Member
- Posts: 800
- Joined: Wed Jan 24, 2018 11:46 am
- Location: Dripping Springs Tx
- Has thanked: 337 times
- Been thanked: 499 times
Re: Turbo Optima mid SE
Decided to test fit and trim the belt covers.
Probably will use 3M double stick to hold the covers and just a couple screws.
Some basic assembly of the chassis is required and I wanted to see a few of the other parts assembled.
A couple screw holes need a little drop of CA to "tighten" them up but all in all the sub assembly went fairly smooth.
Not so sure of the look of button head screws with their washers. I think maybe the flathead look better.
I did add the small hose clamp rubber thingy/seal from the transmission to upper belt cover.
It works OK, better than nothing.
Still haven't anodized the chassis. I would leave it polished but all you have to do is look at it cross-eyed and it gets scratched.
Chuck
Hydrodip how to https://www.rc10talk.com/viewtopic.php?f=62&t=42727
When all you have is a hammer everything looks like a nail
When all you have is a hammer everything looks like a nail
-
radioactivity
- Super Member
- Posts: 800
- Joined: Wed Jan 24, 2018 11:46 am
- Location: Dripping Springs Tx
- Has thanked: 337 times
- Been thanked: 499 times
Re: Turbo Optima mid SE
A little better close up of my mod to seal the upper belt cover. The original piece's Kyosho part# is apparently OT-103.
Also recessing the screw under the upper belt cover so the belt cover can be flush to the upper deck.
I left a small portion of the metal in the rubber part to maybe get it to seal against the cover better, I may not leave it in.
Chuck
Also recessing the screw under the upper belt cover so the belt cover can be flush to the upper deck.
I left a small portion of the metal in the rubber part to maybe get it to seal against the cover better, I may not leave it in.
Chuck
Hydrodip how to https://www.rc10talk.com/viewtopic.php?f=62&t=42727
When all you have is a hammer everything looks like a nail
When all you have is a hammer everything looks like a nail
-
radioactivity
- Super Member
- Posts: 800
- Joined: Wed Jan 24, 2018 11:46 am
- Location: Dripping Springs Tx
- Has thanked: 337 times
- Been thanked: 499 times
Re: Turbo Optima mid SE
And a close up of the old upper deck... tried to remove many layers of CA and GKW but it looked pretty terrible.
And the nice new deck from GoMachV. Way better!
The new deck will never see glue or any adhesive, only double sided tape that can be easily removed.
Also wont need so many screws to hold it in place.
Even wet sanded the edges and ran some CA over the edges to give a cleaner look.
We used to do the CA edges on all the CF chassis BITD to keep them from splitting so bad but it also makes them look nicer.
Chuck
Hydrodip how to https://www.rc10talk.com/viewtopic.php?f=62&t=42727
When all you have is a hammer everything looks like a nail
When all you have is a hammer everything looks like a nail
-
tintin74
- Approved Member
- Posts: 89
- Joined: Thu Jul 24, 2014 3:28 am
- Location: France
- Has thanked: 2 times
- Been thanked: 23 times
Re: Turbo Optima mid SE
Hey Chuck,
What an awesome thread you got there, congratulations on a super detailed build!
I have build many Mids and Optimas, but never to that level! Then again, I have never tried anodizing parts.
Lots of great tips as well.
I cannot wait to see the end result!
Tintin.
What an awesome thread you got there, congratulations on a super detailed build!
I have build many Mids and Optimas, but never to that level! Then again, I have never tried anodizing parts.
Lots of great tips as well.
I cannot wait to see the end result!
Tintin.
Check out http://www.kyosho-optima.com and my Facebook Group https://www.facebook.com/groups/optimaseries/
-
radioactivity
- Super Member
- Posts: 800
- Joined: Wed Jan 24, 2018 11:46 am
- Location: Dripping Springs Tx
- Has thanked: 337 times
- Been thanked: 499 times
Re: Turbo Optima mid SE
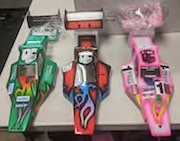
A few "smalls" from all over the globe that I've gotten recently.
Getting the right color is pretty much an educated guess. Then wait a month or more...
Chuck
Getting the right color is pretty much an educated guess. Then wait a month or more...
Chuck
Hydrodip how to https://www.rc10talk.com/viewtopic.php?f=62&t=42727
When all you have is a hammer everything looks like a nail
When all you have is a hammer everything looks like a nail
-
Coelacanth
- Approved Member
- Posts: 7361
- Joined: Thu Jul 29, 2010 6:20 pm
- Location: Alberta, Canada
- Has thanked: 16 times
- Been thanked: 280 times
Re: Turbo Optima mid SE
Fortunately that light blue anodize is a very common and consistent shade of blue. The darker navy blue anodize is much more uncommon.
Completed projects: CYANide Onroad Optima | Zebra Gold Optima | Barney Optima | OptiMutt RWD Mid
Gallery - Coel's Stalls: Marui Galaxy & Shogun Resto-Mods | FrankenBuff AYK Buffalo | 1987 Buick GNX RC12L3
Gallery - Coel's Stalls: Marui Galaxy & Shogun Resto-Mods | FrankenBuff AYK Buffalo | 1987 Buick GNX RC12L3
-
radioactivity
- Super Member
- Posts: 800
- Joined: Wed Jan 24, 2018 11:46 am
- Location: Dripping Springs Tx
- Has thanked: 337 times
- Been thanked: 499 times
Re: Turbo Optima mid SE
Small updates...
I took out the button head screws and replaced them.
I think I like the look of the flat head screws with washers better.
Also trimmed c-clips to fit in washers for the front and rear suspension shafts.
These also were just enough to eliminate a little shaft endplay.
I got some 4mm screws and anodized washers that retain the new upper deck to the front diff housing.
And a change to the shock mounts, pretty clean now.
Chuck
Hydrodip how to https://www.rc10talk.com/viewtopic.php?f=62&t=42727
When all you have is a hammer everything looks like a nail
When all you have is a hammer everything looks like a nail
-
radioactivity
- Super Member
- Posts: 800
- Joined: Wed Jan 24, 2018 11:46 am
- Location: Dripping Springs Tx
- Has thanked: 337 times
- Been thanked: 499 times
Re: Turbo Optima mid SE
While doing a preliminary mock-up to check fit and finish of all the parts I ran into a couple issues.
1. Front C-hubs- the upper pivot ball hole was totally stripped out.
2. Motor plate holes for gear cover are almost stripped.
3. Shock springs were still fairly rough even after using a Dremel cotton wheel with compound and elbow grease.
Started with the shock springs, the easiest fix...
You have to look close at the original spring on the right but the surface still had crust or corrosion or something on it. It just wasn't nice and smooth.
Having the 8" cotton wheel on the bench grinder and some medium grit polishing compound I carefully brought them to a nice shine.
That worked way, way better than the Dremel.
May dust them with Tamiya PS31 to bring back the original color. I think they were originally the "medium springs" blackish in color springs.
I did look at other, colored, springs as a possible option.
The vintage Losi springs a51xx are the correct diameter, while most other springs for 10mm shocks are too small. 12mm modern shock springs are too large.
Ordered new C-hubs, so whenever they get here that will be remedied...
New motor plate??
Chuck
Hydrodip how to https://www.rc10talk.com/viewtopic.php?f=62&t=42727
When all you have is a hammer everything looks like a nail
When all you have is a hammer everything looks like a nail
Create an account or sign in to join the discussion
You need to be a member in order to post a reply
Create an account
Not a member? register to join our community
Members can start their own topics & subscribe to topics
It’s free and only takes a minute
Sign in
-
- Similar Topics
- Replies
- Views
- Last post
-
- 68 Replies
- 18795 Views
-
Last post by Garage Hack
-
- 52 Replies
- 10430 Views
-
Last post by HKS_TRD
-
- 7 Replies
- 2000 Views
-
Last post by Bo Wallen
-
- 19 Replies
- 6326 Views
-
Last post by lin6499
-
- 6 Replies
- 1144 Views
-
Last post by Coelacanth
-
- 7 Replies
- 2496 Views
-
Last post by RC10CE75
-
- 5 Replies
- 1355 Views
-
Last post by HKS_TRD
-
- 10 Replies
- 1919 Views
-
Last post by Lonestar


Who is online
Users browsing this forum: No registered users and 4 guests