I picked this up at a garage sale the other day and while not mint condition I thought it would still clean up well.
Being a toy I didn't think it would come apart without ruining it, so I didn't take any before pictures. So far I managed to get everything apart without breaking anything.
All I've done is clean the plastics, polish the pins and start stripping the wheels. Getting the green paint off sucks but the result is worth it.
The big question is do I try to restore it somewhat original with original controller (all or nothing steering etc), or put some proportional radio gear in it to make more drivable and "fun"
Tyco Jet Hopper Refurbish
-
RC10th
- Approved Member
- Posts: 4761
- Joined: Sat Feb 16, 2013 9:51 am
- Location: Australia
- Has thanked: 52 times
- Been thanked: 1548 times
-
RC10th
- Approved Member
- Posts: 4761
- Joined: Sat Feb 16, 2013 9:51 am
- Location: Australia
- Has thanked: 52 times
- Been thanked: 1548 times
Re: Tyco Jet Hopper Refurbish
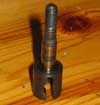
I always wondered how those simple 2 speed "Fast" and "Slow" gear boxes worked. We'll, they are simple but clever at the same time. Basically two different gear ratios with a shift fork that engages either "F" or "S"
The axle was a bit bent so I straightened it. I cleaned up all the internals, greased the gears and bushings, smooth as silk.
The axle was a bit bent so I straightened it. I cleaned up all the internals, greased the gears and bushings, smooth as silk.
- Attachments
-
-
I was old school - when old school wasn't cool !
-
RC10th
- Approved Member
- Posts: 4761
- Joined: Sat Feb 16, 2013 9:51 am
- Location: Australia
- Has thanked: 52 times
- Been thanked: 1548 times
Re: Tyco Jet Hopper Refurbish
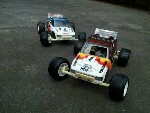
Front suspension and front bumper all mounted, much smoother now. I figured I'd put it together as a rolling chassis first before deciding which route to go.
Top half of chassis, rear shocks and nerf bars mounted. It's starting to take shape.
Top half of chassis, rear shocks and nerf bars mounted. It's starting to take shape.
- Attachments
-
-
I was old school - when old school wasn't cool !
-
RC10th
- Approved Member
- Posts: 4761
- Joined: Sat Feb 16, 2013 9:51 am
- Location: Australia
- Has thanked: 52 times
- Been thanked: 1548 times
Re: Tyco Jet Hopper Refurbish
Finally finished cleaning green paint off the last wheel, tomorrow I'll press on the wheel hexes.
- Attachments
-
I was old school - when old school wasn't cool !
-
RC10th
- Approved Member
- Posts: 4761
- Joined: Sat Feb 16, 2013 9:51 am
- Location: Australia
- Has thanked: 52 times
- Been thanked: 1548 times
Re: Tyco Jet Hopper Refurbish
I pressed the rear wheel hexes onto the axle today which was the hardest part. Just gotta work on the body and electronics now.....
- Attachments
-
I was old school - when old school wasn't cool !
-
RC10th
- Approved Member
- Posts: 4761
- Joined: Sat Feb 16, 2013 9:51 am
- Location: Australia
- Has thanked: 52 times
- Been thanked: 1548 times
Re: Tyco Jet Hopper Refurbish
Polished up the body which came out better then I thought, luckily it wasn't too scratched. Unfortunately it was missing the front spot lights and all of the decals so I'll have to sticker it up with whatever looks good. The roll cage was also painted green so I had the fun of removing the green paint.
I like the red version better and thought about painting it red, however, the body is molded in black so I'll probably just leave it.
So far it's turning out pretty nice.
I like the red version better and thought about painting it red, however, the body is molded in black so I'll probably just leave it.
So far it's turning out pretty nice.
- Attachments
-
-
I was old school - when old school wasn't cool !
-
Mr. ED

- Approved Member
- Posts: 5483
- Joined: Thu Dec 21, 2006 1:30 am
- Location: Back @ home: Belgium
- Has thanked: 62 times
- Been thanked: 62 times
Re: Tyco Jet Hopper Refurbish
Get yourself some silver pinstriping tape and number decals. It doesn't need more than that really.
-
RC10th
- Approved Member
- Posts: 4761
- Joined: Sat Feb 16, 2013 9:51 am
- Location: Australia
- Has thanked: 52 times
- Been thanked: 1548 times
Re: Tyco Jet Hopper Refurbish
Pinstriping tape is a good idea, thanks. I was going to use one of the Parma or Autographics NASCAR sticker sheets for the small decals to replicate the Jet Hopper decals as best I can.
I stripped the controller down and cleaned and greased all the contacts, I also removed and greased the stick pivots so now they move smoothly instead of the grabby plastic feel. Unfortunately there is a problem with the cars PCB board as everything works except forward which is sketchy. Luckily my electronics friend said he'll have a look at it as he thinks it's a blown FET or transistor.
I've also replaced all the switch and battery box wires as they have gone hard and brittle.
- Attachments
-
-
I was old school - when old school wasn't cool !
-
RC10th
- Approved Member
- Posts: 4761
- Joined: Sat Feb 16, 2013 9:51 am
- Location: Australia
- Has thanked: 52 times
- Been thanked: 1548 times
Re: Tyco Jet Hopper Refurbish
I got some good news today that the Jet Hopper electronics will live. The forward transistor was blown which is an easy fix. The factory set up is pretty lame compared to what it could be but to preserve any collectability I'm sticking to the standard stuff.
I was old school - when old school wasn't cool !
-
hibernaculum

- Approved Member
- Posts: 38
- Joined: Thu Feb 19, 2009 10:08 pm
- Location: Australia
- Has thanked: 5 times
- Been thanked: 4 times
Re: Tyco Jet Hopper Refurbish
Great effort here. Those original transmitters are actually very easy to fix, and the vast majority out there which have "intermittent signal issues", simply need a careful clean-down. They are pretty resilient, but you went the extra mile and ID'd a transistor issue as well. Very glad to hear you are keeping the car original too, and trying to bring it back from a poor state.
NIB examples of the Jet Hopper have sold for as much as $1000 under bidding in the past, which is a peak price higher than many vintage kits. Thus it's well worth restoring the classic toys, as well as the classic kits.
NIB examples of the Jet Hopper have sold for as much as $1000 under bidding in the past, which is a peak price higher than many vintage kits. Thus it's well worth restoring the classic toys, as well as the classic kits.
-
RC10th
- Approved Member
- Posts: 4761
- Joined: Sat Feb 16, 2013 9:51 am
- Location: Australia
- Has thanked: 52 times
- Been thanked: 1548 times
Re: Tyco Jet Hopper Refurbish
Thanks, it has been a fun little project so far. I've spent a fair bit of time on the Jet Hopper but it has been worth it so far. I didn't take very good pics or any before pics as I half expected this project to flop, likely by breaking it myself in the process.
The car was muddy, painted, batteries left in, axle bent like someone stood on it. I think that's what blew the transistor in the PCB board, someone likely put batteries in the car to see if it worked, tried to go forward with the locked gearbox and burned out the forward transistor in the process.
Everyone I speak to has good memories of the Jet Hopper. Even though it's just a toy it was a pioneer that started many kids in RC cars.
I see you have involvement in rctoymemories, I used your page to determine mine is a second generation Jet Hopper. I also happened to look up the Nikko Turbo panther on your site which was my first (toy) RC car. I used to chase the seagulls on the Santa Cruz Wharf as a kid with it. Thank you for the info...
I was old school - when old school wasn't cool !
-
hibernaculum
- Approved Member
- Posts: 38
- Joined: Thu Feb 19, 2009 10:08 pm
- Location: Australia
- Has thanked: 5 times
- Been thanked: 4 times
Re: Tyco Jet Hopper Refurbish
Yeah, the Jet Hopper is a pretty tough little car compared to most others. So I'd agree that the bent axle might have caused the transistor issue. Great job getting the wheels off and straightening it out, that's a tricky job as well.
Glad to hear the site has helped. Yep, relative to the ones released worldwide, yours is like a Jet Hopper Mk2. Overseas (mainly Japan) they had an earlier variant which had different front tyres (taller), no LED on the car, different suspension, and a few other things - extremely rare to find these. Within Australia, we probably only had the one or two types. And while yours is closer to a Mk2 globally, yours is definitely a Mk1 "within the Metro/Taiyo branded release" (Australia/NZ).
As it probably shows, I've been a fan of these models for ages The Nikko Turbo Panther was awesome as well, and the more popular one in Europe. Hope to continue the site for many years to come with hundreds more models, so feel free to drop me a line there if you ever need any specific info.
Glad to hear the site has helped. Yep, relative to the ones released worldwide, yours is like a Jet Hopper Mk2. Overseas (mainly Japan) they had an earlier variant which had different front tyres (taller), no LED on the car, different suspension, and a few other things - extremely rare to find these. Within Australia, we probably only had the one or two types. And while yours is closer to a Mk2 globally, yours is definitely a Mk1 "within the Metro/Taiyo branded release" (Australia/NZ).
As it probably shows, I've been a fan of these models for ages
-
RC10th
- Approved Member
- Posts: 4761
- Joined: Sat Feb 16, 2013 9:51 am
- Location: Australia
- Has thanked: 52 times
- Been thanked: 1548 times
Re: Tyco Jet Hopper Refurbish
I thought I'd get on to this again. The faulty transistor has been replaced in the car and everything reassembled. Everything works as it should and the "Turbo" feature always brings a smile to your face.
I was surprised at just how smooth and quiet the car was, it hardly makes any noise. The steering on the other hand sucks as you can only turn while the power (throttle) is on, this makes driving rather interesting. If you don't want to crash into something you have to accelerate to turn which likely will make you crash into something else, which means you have to accelerate again to turn etc etc..... you can see where this is going
I think this will sit on my shelf as a memento and come out to play when someone asks about it.
All ready for stickers.....
- Attachments
-
I was old school - when old school wasn't cool !
-
RC10th
- Approved Member
- Posts: 4761
- Joined: Sat Feb 16, 2013 9:51 am
- Location: Australia
- Has thanked: 52 times
- Been thanked: 1548 times
Re: Tyco Jet Hopper Refurbish
This was a really fun project. It's still missing a few pieces like bumper support and front spotlights but oh well.
One more for good measure.
One more for good measure.
- Attachments
-
I was old school - when old school wasn't cool !
-
EvolutionRevolution
- Approved Member
- Posts: 1494
- Joined: Tue Feb 01, 2011 3:24 pm
- Location: Netherlands
- Has thanked: 17 times
- Been thanked: 34 times
Create an account or sign in to join the discussion
You need to be a member in order to post a reply
Create an account
Not a member? register to join our community
Members can start their own topics & subscribe to topics
It’s free and only takes a minute
Sign in
-
- Similar Topics
- Replies
- Views
- Last post
-
- 19 Replies
- 2737 Views
-
Last post by Dadio
-
- 5 Replies
- 1908 Views
-
Last post by SMOKE-DOG
-
- 12 Replies
- 2070 Views
-
Last post by greazy
-
- 6 Replies
- 1481 Views
-
Last post by Doomed
-
- 6 Replies
- 876 Views
-
Last post by Diggley
-
- 2 Replies
- 142 Views
-
Last post by silvertriple
-
- 0 Replies
- 792 Views
-
Last post by Qtschmidt
-
- 5 Replies
- 1448 Views
-
Last post by hugger19
Who is online
Users browsing this forum: No registered users and 3 guests