Thanks Joey.
The build of the spare car has well advanced, but I came across an issue with the slipper setup. The spring to load the slipper doesn't have parallel front and back planes. And the back slipper plate has play on the axle => giant wobble on the spur when the slipper is even slightly tightened up.
I'm gonna try to solve it using my dremel on the spring. If it doesn't work out I'll have to look for a better spring.
While the dremel is out I'm gonna work on the front arms a little too. The upward travel of the arms is very limited as the arm quickly touches the outdrive of the diff.
Re: Academy Wyvern, 23 Mar 2013, suspension update
-
EvolutionRevolution
- Approved Member
- Posts: 1495
- Joined: Tue Feb 01, 2011 3:24 pm
- Location: Netherlands
- Has thanked: 20 times
- Been thanked: 36 times
Re: Academy Wyvern, 27 Aug 2012 update: body painted
Can't you sandwich the spring between two washers?
-
Mr. ED

- Approved Member
- Posts: 5475
- Joined: Thu Dec 21, 2006 1:30 am
- Location: Back @ home: Belgium
- Has thanked: 58 times
- Been thanked: 56 times
Re: Academy Wyvern, 27 Aug 2012 update: body painted
It is sandwiched between 2 washers already : one on the nut end and the other one is part of the pressure bearing.
The problem is that the end faces of the spring are not perpendicalar too the spring center axis. So when you tighten up the spring the spring load is uneven on the pressure bearing.
I tried the dremel on it yesterday and it's better now. funnily it got even better when I tightened up the nut further ... puzzled.
Continuing the build I found the optional ball-diff uses the same spring. But here it didn't cause any problem.
-
Mr. ED
- Approved Member
- Posts: 5475
- Joined: Thu Dec 21, 2006 1:30 am
- Location: Back @ home: Belgium
- Has thanked: 58 times
- Been thanked: 56 times
Re: Academy Wyvern, 27 Aug 2012 update: body painted

-
Mr. ED
- Approved Member
- Posts: 5475
- Joined: Thu Dec 21, 2006 1:30 am
- Location: Back @ home: Belgium
- Has thanked: 58 times
- Been thanked: 56 times
Re: Academy Wyvern, 3 Sept 2012 update: building time!
Ok, here we go.
I didn't follow the instructions; having built the first car , I wanted to follow an order inverse to how I'd take it apart for a rebuild or repair.
As each part is new from the package I took a pic of each in its package. But I'm not going to post them all: would be a bit too much.
Here's the chassis. Unlike some of the other parts I only got 1 in those boxes. It's made of a very shiny composite with bakelite (an early plastic invented by a belgian called Baekelant in the early 20th century).
It looks a little more 'pro', but I guess it's not as good as the the blank GF10 chassis of the Wyvern. The Wyvern EX was priced a little higher than its pro brother, only because it contained the Mabushi 540 and an MSC Talk about poor marketing
  A separate nose piece with built-in bumper in souple nylon
Mating can start
A separate nose piece with built-in bumper in souple nylon
Mating can start  the nose piece adds a nice kick-up upfront and gives more clearance for landing from jumps: thumbs up
Check out these arms: nice and wide, made of fiber reinforced plastic
Hinge-pins with E-clipses, classic pain in the B
The front gearbox; they sure know their plastics and mouldings at Academy
The front end put roughly put together and ready to take the diff, but let's get on with the rear first
the nose piece adds a nice kick-up upfront and gives more clearance for landing from jumps: thumbs up
Check out these arms: nice and wide, made of fiber reinforced plastic
Hinge-pins with E-clipses, classic pain in the B
The front gearbox; they sure know their plastics and mouldings at Academy
The front end put roughly put together and ready to take the diff, but let's get on with the rear first
I didn't follow the instructions; having built the first car , I wanted to follow an order inverse to how I'd take it apart for a rebuild or repair.
As each part is new from the package I took a pic of each in its package. But I'm not going to post them all: would be a bit too much.
Here's the chassis. Unlike some of the other parts I only got 1 in those boxes. It's made of a very shiny composite with bakelite (an early plastic invented by a belgian called Baekelant in the early 20th century).
It looks a little more 'pro', but I guess it's not as good as the the blank GF10 chassis of the Wyvern. The Wyvern EX was priced a little higher than its pro brother, only because it contained the Mabushi 540 and an MSC
-
Mr. ED
- Approved Member
- Posts: 5475
- Joined: Thu Dec 21, 2006 1:30 am
- Location: Back @ home: Belgium
- Has thanked: 58 times
- Been thanked: 56 times
Re: Academy Wyvern, 27 Aug 2012 update: body painted
The rear end: gearbox casing with built in arm mounts with fixed caster.
Another pair of nice arms (yes I know they look like yokomos). Note the spared-out area for the diff cups.
The rear carriers look like yok's too; but they have the axle nicely encapsuled
10x5 bearings and U-J's are optional here and these optional U-J's are way shorter than Yok's: the diffs outdrives are further apart= centering right above the hinge-pins
Getting that butt ready  the "center" gearbox:
and inside:
Far from the prettiest part in the kit, but metal and functional
Ok, I'm tired, we'll continue the story tomorrow.
the "center" gearbox:
and inside:
Far from the prettiest part in the kit, but metal and functional
Ok, I'm tired, we'll continue the story tomorrow.
I hope you're enjoying the ride
I hope you're enjoying the ride
-
JK Racing

- Super Member
- Posts: 4603
- Joined: Thu Jul 19, 2007 2:32 pm
- Location: Placentia, CA
- Has thanked: 103 times
- Been thanked: 200 times
Re: Academy Wyvern, 3 Sept 2012 update: building time!
Truly jealous. I've had a soft spot for Academy cars since I first bought one and became one of the team drivers. I have always loved the yoke's and this puts 2 of my yearnings into one car  But I would be way to temped to drop a 10.5 in there with you owning 90% of the parts on the planet, I wouldnt feel very comfortable.
--Joey --
Vintage A&L and Factory Works
Old School Racer & Vintage RC Car nut
JKRacingRC.com
Vintage A&L and Factory Works
Old School Racer & Vintage RC Car nut
JKRacingRC.com
-
RichieRich
- Approved Member
- Posts: 2351
- Joined: Wed Jun 14, 2006 11:42 pm
- Location: Los Angeles, CA
- Has thanked: 34 times
- Been thanked: 19 times
Re: Academy Wyvern, 3 Sept 2012 update: building time!
I agree, I'd love to have one of these too. I have an SB along with a GV2 so I'm a fan of the Academy kits.
-
Mr. ED
- Approved Member
- Posts: 5475
- Joined: Thu Dec 21, 2006 1:30 am
- Location: Back @ home: Belgium
- Has thanked: 58 times
- Been thanked: 56 times
Re: Academy Wyvern, 3 Sept 2012 update: building time!
Joey, there's worse places to have those stock parts; now at least you know where to ask
Richie, Stormer hobbies has the truck version of the GV2 still on stock and I was eye-balling them for a bit too.
When this build is over I'm gonna categorize parts and see if I can get some basic kits together while keeping some stock of the wear and tear parts.
They'll definitely miss the lower chassis and shocks, but those are 2 items that don't need to be original for a good runner.
I'm going to build a little more tonight, so a little more patience for the story to continue, sorry.
-
Charlie don't surf
- Approved Member
- Posts: 8921
- Joined: Tue Apr 08, 2008 2:44 pm
- Location: USA
- Been thanked: 8 times
-
Mr. ED
- Approved Member
- Posts: 5475
- Joined: Thu Dec 21, 2006 1:30 am
- Location: Back @ home: Belgium
- Has thanked: 58 times
- Been thanked: 56 times
Re: Academy Wyvern, 3 Sept 2012 update: building time!
That's why I chose for the pink dampers; don't want people to get jealousCharlie don't surf wrote:Wow, it gets cooler!!
More on the dampers later though: let's see some other pics first:
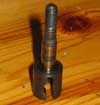
The center shaft: special edition as included and needed with the slipper kit. And the top pulley, and ... uh-oh: I had to dig in other stock to find a fitting E-clipse as that wasn't included
- IMG_8881.JPG (30.16 KiB) Viewed 1375 times
- IMG_8881.JPG (30.16 KiB) Viewed 1375 times
Coming together nicely. Oh, and notice the spur actually sits behind the moter unlike the Yok's. This means the moter sits further forward: a feature copied by many of todays cars
Funny detail: behind the pulley on the lower side is a provision to put an axle and bearing: to put some tension on the belt I guess. But the Optional part was never released: didn't see it anywhere in the catalog with spares and options.
-
Mr. ED
- Approved Member
- Posts: 5475
- Joined: Thu Dec 21, 2006 1:30 am
- Location: Back @ home: Belgium
- Has thanked: 58 times
- Been thanked: 56 times
Re: Academy Wyvern, 3 Sept 2012 update: building time!
Once on the chassis I gave it a couple of turns to see if the transmission felt free. No problem, hooo: see that spur wobble.
As mentioned before I went at the spring ends with the dremel to solve that:
And while it was out I attacked the front arms too:
I don't have spare gears nor diff outdrives for the couple gear diff housings among the spares. So I'm going with the optional balldiffs on this car. A bit worrying as the ones in the griffin pro weren't working for me  Threadlock in the left part and diff rings glued in place with cyano.... I'm pulling everythin out the closet I can come up with
  Allright! It actually feels well AND doesn't slip. What a relief; for the griffin it all failed and I had to chase up geared diffs.
In it goes: on a pair of 15x10 bearings
And that's how far I got with cropping and re-sizing pics.
More to follow, but first a little more building too
- IMG_8902.JPG (24.36 KiB) Viewed 1374 times
- IMG_8902.JPG (24.36 KiB) Viewed 1374 times
In it goes: on a pair of 15x10 bearings
More to follow, but first a little more building too
-
RichieRich
- Approved Member
- Posts: 2351
- Joined: Wed Jun 14, 2006 11:42 pm
- Location: Los Angeles, CA
- Has thanked: 34 times
- Been thanked: 19 times
Re: Academy Wyvern, 3 Sept 2012 update: building time!
Interesting about the diff. For the older Academy ball diffs, we used the TC3 spring, t-nut, bolt and thrust bearing. This made the diff much better. Not sure if that will help you out here.
Excellent progress pictures. You're making everyone want to pick up one of these cars.
Excellent progress pictures. You're making everyone want to pick up one of these cars.
-
Mr. ED
- Approved Member
- Posts: 5475
- Joined: Thu Dec 21, 2006 1:30 am
- Location: Back @ home: Belgium
- Has thanked: 58 times
- Been thanked: 56 times
Re: Academy Wyvern, 3 Sept 2012 update: building time!
Might be worth giving that a try, but for now it feels ok.
I found a nib wyvern in a danish webshop, but it is so expensive. Especially since it is the ex version.
The dealer in germany was pretty active back then , so your best bet would be finding a cheap used one on ebay germany and complete that with some of the option parts I have plenty of.
On with the build story:
I have the black bakelite towers on stock car, so I picked the white epoxy ones for this build. They are around 2.5 , maybe 3mm thick and lots stiffer than the black kyosho ones of the ultima pro etc. Multiple hole locations should make up for the only 1 shock position on the arms (both in back and front). But I have doubts about which are actualy usable. The ride height is big even with the relative short shocks in the rear... you 'll see that soon enough.
Cool thing to note about these spare part bags: all the hardware you see is included in the bags. So if you replave this rear tower , you getnew screws and pillowballs all included.
left-right threaded turnbuckles instead of the black rods to set it further off from the standard EX:
 The pink stuff comes out !
I have several sets of this triplet in pink, some in green too and some yellow duo's only: no rear shock parts.
Pittty 'cause I'd have gone for yellow for sure. And green was my next choice, till I realised it would not go well with any of the potential bodies I have in mind to try on this. Yeah, I could have taken stock black ones, but hey that'd be boring.
Aside from fun I really can't see how Academy considered these shocks as 'hop-ups'. And to top it off you'd have to take your standard shocks apart and re-use parts to build these coloured ones as they don't make full shocks.
The pink turnbuckles give it a bit of a theme look
this is the stuff I had to open extra: everything on the right won't get used
and another bag:
(And this one is a little bit of a problem: I only have the one in the stock kit and 3 spares. But better than the front: for wich I only have the stock kit parts: enough for just 1 front shock pair. And since this is car 2 I need to find some alternative source for shockshafts.)
I found a nib wyvern in a danish webshop, but it is so expensive. Especially since it is the ex version.
The dealer in germany was pretty active back then , so your best bet would be finding a cheap used one on ebay germany and complete that with some of the option parts I have plenty of.
On with the build story:
I have the black bakelite towers on stock car, so I picked the white epoxy ones for this build. They are around 2.5 , maybe 3mm thick and lots stiffer than the black kyosho ones of the ultima pro etc. Multiple hole locations should make up for the only 1 shock position on the arms (both in back and front). But I have doubts about which are actualy usable. The ride height is big even with the relative short shocks in the rear... you 'll see that soon enough.
Cool thing to note about these spare part bags: all the hardware you see is included in the bags. So if you replave this rear tower , you getnew screws and pillowballs all included.
- IMG_8917.JPG (37.58 KiB) Viewed 1361 times
- IMG_8917.JPG (37.58 KiB) Viewed 1361 times
I have several sets of this triplet in pink, some in green too and
Pittty 'cause I'd have gone for yellow for sure. And green was my next choice, till I realised it would not go well with any of the potential bodies I have in mind to try on this. Yeah, I could have taken stock black ones, but hey that'd be boring.
Aside from fun I really can't see how Academy considered these shocks as 'hop-ups'. And to top it off you'd have to take your standard shocks apart and re-use parts to build these coloured ones as they don't make full shocks.
(And this one is a little bit of a problem: I only have the one in the stock kit and 3 spares. But better than the front: for wich I only have the stock kit parts: enough for just 1 front shock pair. And since this is car 2 I need to find some alternative source for shockshafts.)
Create an account or sign in to join the discussion
You need to be a member in order to post a reply
Create an account
Not a member? register to join our community
Members can start their own topics & subscribe to topics
It’s free and only takes a minute
Sign in
-
- Similar Topics
- Replies
- Views
- Last post
-
- 150 Replies
- 18627 Views
-
Last post by Charlie don't surf
-
- 5 Replies
- 730 Views
-
Last post by DerbyDan
-
- 45 Replies
- 6374 Views
-
Last post by Hcp22
-
- 11 Replies
- 1417 Views
-
Last post by FordPSD
-
- 1 Replies
- 488 Views
-
Last post by markt311
-
- 37 Replies
- 3700 Views
-
Last post by tiger1
-
- 4 Replies
- 832 Views
-
Last post by RichieRich
-
- 5 Replies
- 1282 Views
-
Last post by Mr. ED


Who is online
Users browsing this forum: ![]() Facebook [Bot] and 1 guest
Facebook [Bot] and 1 guest