Page 1 of 2
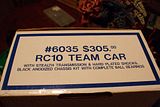
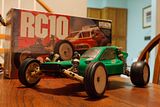
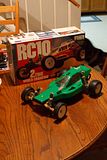
My First rc car!
Posted: Wed Aug 12, 2009 11:38 pm
by Stregone
Re: My First rc car!
Posted: Wed Aug 12, 2009 11:53 pm
by markt311
Looks really good so far, my team car is much the same as yours. I tried to keep mine as much stock as I could and use 2.2 wheels. Try calling Kyosho USA directly, the part # for their wheels are UM414, they are exact copies of B3 wheels. It shows out of stock on their site, but when I called them I got 2 sets sent to me.
Re: My First rc car!
Posted: Thu Aug 13, 2009 7:23 pm
by Stregone
Hopefully I will be able to find something..worst case they are supposed to be back in stock 'mid august' which is any day now.
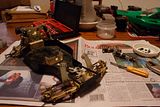
Got the CVDs this morning and assembled them a few minutes ago. This package must have been pretty old, cause the thread lock was almost completely dry.
Got another package coming from tower, should arrive tomorrow. Then I will be able to rebuild the diff and shocks, install new antenna mount, battery cups, and ball cups. Then another package with new bearings. Might not arrive untill after the weekend though.
Re: My First rc car!
Posted: Fri Aug 14, 2009 1:55 pm
by Bent
I bet when you first got that car you never thought it would ever last as long as it did. Good work so far I cant wait to see more.
Re: My First rc car!
Posted: Fri Aug 14, 2009 2:58 pm
by Stregone
Anyone have trouble fitting a side by side nimh or a hardcase lipo in the battery cups? I slid my lipo into the bulkhead, and slipped the new battery cup under the other end. The holes in the battery cup were about a quarter inch from the holes in the chassis. The situation was similar when I tried with a nimh pack. I don't have any stick packs to try it with.
Re: My First rc car!
Posted: Fri Aug 14, 2009 3:08 pm
by Stregone
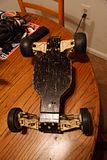
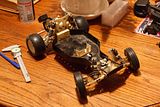
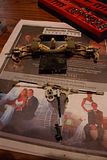
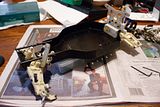
Duh. How about a picture?
The battery is definitely fully seated inside the bulkhead.
Re: My First rc car!
Posted: Fri Aug 14, 2009 3:10 pm
by Asso_man!
yup, today's batteries are slightly bigger. You have two options, either you drill new holes for the battery cup or use some strong double tape to attch it to the chassis in the new position. Good luck with you resto, keep us posted!
Re: My First rc car!
Posted: Fri Aug 14, 2009 4:13 pm
by Stregone
Damn I was hoping I wouldn't have to jury rig anything like that. I'm not able to drill new holes atm, so I guess its tape. Any recommendations for something that will be easy to remove later?
Re: My First rc car!
Posted: Fri Aug 14, 2009 9:35 pm
by Stregone
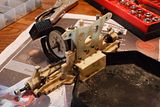
All I can do until my bearings arrive is rebuild the shocks. Except I don't have any shock oil yet cause I have no idea what weight to use. Any tips?
Re: My First rc car!
Posted: Mon Aug 17, 2009 11:37 pm
by Stregone
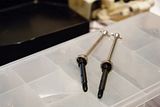
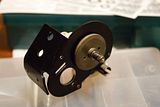
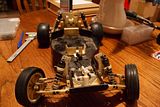
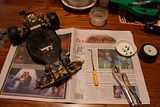
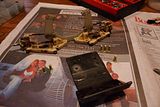
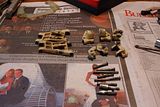
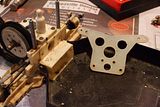
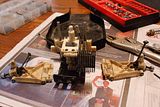
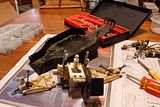
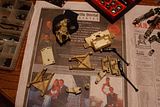
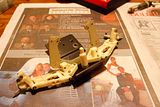
I'm back. Got a nice little shipment from tower.
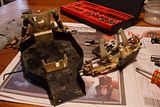
Rebuilt diff...lost one of the two ball bearings inside the diff while tearing it down. Had to raid my rc10t to replace it. Need to remember to order another one when I get around to restoring it...
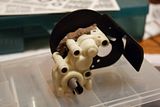
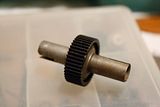
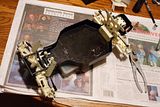
Assembled tranny.
And slipper too.
Tranny and turnbuckles installed.
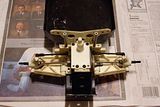
CVDs half installed. Waiting till I rebuild the shocks till I shim them and finish the job. Any tips on finding the proper shimming? (is that a word?)
Next is rebuilding the shocks. I need some input as to what weight oil to use. I plan on running it mostly on asphalt with jumping off of curbs.
Thanks.
Re: My First rc car!
Posted: Mon Aug 17, 2009 11:50 pm
by Group B
There are few things as heartwarming as seeing a nice vintage r/c car spring back to life, to be enjoyed again.
Good work!
I can't wait to see some action shots!
Re: My First rc car!
Posted: Tue Aug 18, 2009 12:01 am
by Group B
Stregone wrote:Damn I was hoping I wouldn't have to jury rig anything like that. I'm not able to drill new holes atm, so I guess its tape. Any recommendations for something that will be easy to remove later?
I was thinking the same thing when the time came to do it on mine.
I just used one of these, and it worked just fine:

One thing to keep in mind: The original holes for the battery cups are usually not even, so once you line it up with your new battery installed, don't feel bad when your new holes don't appear to be perfectly lined-up.
Depending on what size your servo is, you may need to shave some meat off of the adjacent servo mount and the mounting tab on the servo.
I like the RPM servo mounts; they are easy to
hand mill with a dremel!
Trust me, in the end you'll be happier than you would be with
any tape holding the cup or battery down!
Re: My First rc car!
Posted: Tue Aug 18, 2009 12:09 am
by Stregone
Interesting. How much do those go for?
Also how do you go about marking the holes?
Thanks!
Re: My First rc car!
Posted: Tue Aug 18, 2009 12:34 am
by Group B
Stregone wrote:Interesting. How much do those go for?
Also how do you go about marking the holes?
Thanks!
About $20 for the set pictured.
I had a friend hold-down the battery cup, with the battery installed, and I drilled the holes. The battery cup guided the drillbit, so I didn't need to use a punch to start the hole. I then flipped it over and countersunk them.
You could also take the correct size drillbit (3/32" ?), dip the tip in some paint or ink, and use that to mark the holes, or use a drillbit or a score to mark the holes.
Re: My First rc car!
Posted: Wed Aug 19, 2009 8:22 pm
by Stregone
The kit came with 30wt oil. Do you guys think I should go with that or up it a bit to 35 or 40? I plan on running on asphalt 80+% of the time.
The wheels came back in stock on tower and I ordered them. So i need to get up to the hobby shop and get some oil so I can rebuild the shocks. Should have this baby up and running by the weekend!
I also need some advice on gearing. I have a lightly used p2k2 stock motor, a cheap non rebuild able 19 turn, a very well used 17 turn speed gem, and a brand new 15 turn venom. I'm thinking either the stock motor or the venom. The others are pretty well used.
Thanks!

 Tomorrow I am going to call around to some hobby shops in the area. Can't wait to finish this off!


