Page 7 of 13
Re: My Box Art replicas of the RC10
Posted: Thu May 13, 2010 2:35 pm
by Y'ernat Al
Ruffy wrote:.... Anyone know what body this is? Looks like it might be an AYK lexan body of sorts. (I 1st posted this picture in the "If you could ask Gene Husting a question" thread...
Ruffy, if it's the same as mine here...

It's a "Super Champ" model from MRP.
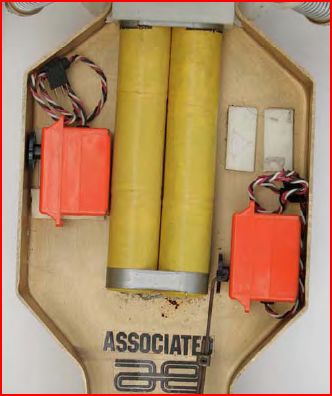
I just noticed a possible reason why the battery cup holes got offset for so long

..
- Capture4.JPG (31.47 KiB) Viewed 1906 times
- Capture4.JPG (31.47 KiB) Viewed 1906 times
Re: My Box Art replicas of the RC10
Posted: Thu May 13, 2010 2:43 pm
by Ruffy
Thank-you for this information Y'ernat Al, I wonder if it is possible to find a clear body like that anymore.
I think you are right regarding the battery offset holes also, they had to make room for the servo.
Re: My Box Art replicas of the RC10
Posted: Thu May 13, 2010 2:51 pm
by murphy3428
Ruffy wrote:Thank-you for this information Y'ernat Al, I wonder if it is possible to find a clear body like that anymore.
I think you are right regarding the battery offset holes also, they had to make room for the servo.
Mr lexan would be a good start, I thought it looked more like a parma body myself well lookinig back at the picks you may have a winner
Re: My Box Art replicas of the RC10
Posted: Thu May 13, 2010 5:23 pm
by RC10resto
I just noticed a possible reason why the battery cup holes got offset for so long ..
Re: If you could ask Gene Hustings...
JPAE07 wrote:
Don't think anyone has asked these yet.
1. Why weren't all the chassis holes underneath the original production RC10 chassis all countersunk? Especially, the battery cup mounting holes that go in line with the rear bulkhead.
2. Why were the battery cup holes (the ones in-line with the bulkhead) drilled off center?
Thanks much,
Jeff
Curtis Husting answers:
#1 Most people ran their batteries down the center of the car. This was the stock set-up. The car worked best on most tracks this way. The battery mount holes were countersunk in this position so most people would run this set-up. The other holes were not countersunk to help keep dirt from packing in the countersinks as well.
#2 The holes were drilled off center because the resister speed control and throttle servo could not fit with the batteries down the middle. We mounted the front battery box slightly off center to fit correctly.
Re: My Box Art replicas of the RC10
Posted: Thu May 13, 2010 9:03 pm
by Y'ernat Al
Ruffy wrote:Thank-you for this information Y'ernat Al, I wonder if it is possible to find a clear body like that anymore...
A few years back it seems there were a few around. Hang around Tamiyaclub forums enough and I'd bet you'd track one down. Mr. Lex would also obviously help, and I wouldn't be surprised to find one with a Parma or other header tag, as incestuous as the industry was back then. Mine I got NIP from a guy on ebay that had like three, and I still have the MRP header. I paid like $35-40 3-4 years ago though I think.
Re: My Box Art replicas of the RC10
Posted: Thu May 13, 2010 10:17 pm
by Ruffy
Thank-you for the information! I will try and find one, otherwise it might just get a clear protech body.
Here are some more pics I took on a piece of steel plate that has been wiped with scotch-brite a little.
I still have to paint the new body, sticker it, make new fog lights, use the original window net in the new body (finally acquired it!), mill the AE in the front nose to show up silver, weather the bottom shock spring retainers so that they aren't so white ( a little red clay maybe ), & figure out the antenna mount.
Completed: cut and polish nose brace tubes.
Completed: round off the back chassis edges.
Completed: cut the front shock lower retention pin.
One day hopefully I can find the Airtronics receiver like the one on the box-art, and maybe get lucky and find the actual Novak ESC as well.
Re: My Box Art replicas of the RC10
Posted: Thu May 13, 2010 11:38 pm
by slotcarrod
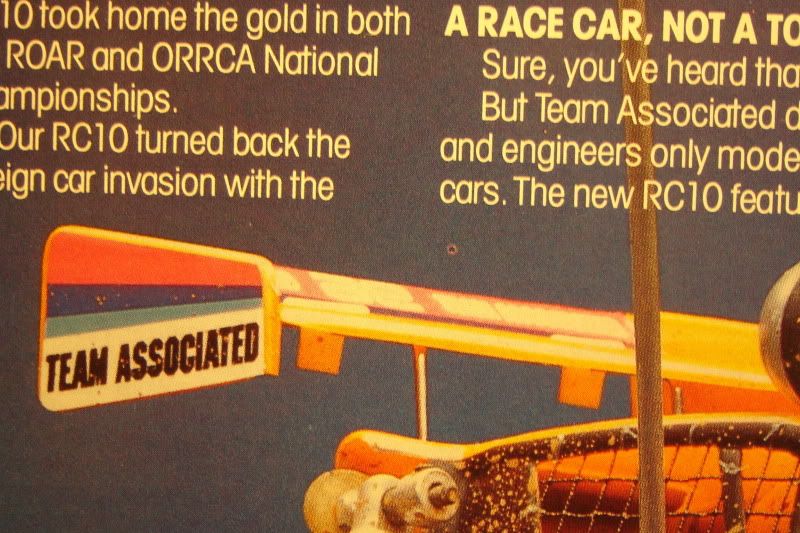
Ok Ruffy, here is the wing shot from an early Import Fighter ad! I was a little right, the last word is Associated! The wing stickers are as follows:
TEAM (medium size) AE (medium) TEAM ASSOCIATED (small)
Re: My Box Art replicas of the RC10
Posted: Fri May 14, 2010 1:33 am
by m_vice
You GO slotcarrod.

Re: My Box Art replicas of the RC10
Posted: Fri May 14, 2010 3:10 am
by kenooze
Ruffy, to be perfect, you have to modify the rear of the chassis.
Take a look to the pictures.
The 3 slot looks shorter and the chassis fit the motor plate at a lower level.
Re: My Box Art replicas of the RC10
Posted: Fri May 14, 2010 6:40 am
by Ruffy
kenooze: Yeah, I know mine will never be perfect as I do not intend to do that modification to mine. We will leave that to the next person that wants to raise the bar.
Awesome Slotcarrod! So the stickers on both of our wings were wrong!

I don't think the first word is "Team" by itself if you look closely. Looks to me like the stickers are (based upon this picture, the Futaba Ad, and the distance from the inside edge of the wing to where the end of this first sticker is located):
TEAM ASSOCIATED (small size)
AE (medium)
TEAM ASSOCIATED (small)
The reason being is that the Futaba Ad shows the start of the "TEAM" word but no more, then also take into account the length of the word from where it starts in the Futaba Ad to the end of what we see in the Import Fighter Ad and in this photo the back edge of the first sticker does not look like an M?! Also the 1st one can't be a medium size as you indicated due to the space or size of that last "D" in the stripe it sits... it is the same size on the right side too. So the left and right stickers on the wing are the full-text small size
"TEAM ASSOCIATED"
But you did get the AE logo in the center appears to be the next size up from the small size.
This is exactly what we needed to see, and why I never like to assume things as I myself have been caught in the past. Thank-you very much for this photo.
Chris Chan still has not replied but now that we at least have the stickers there on the back edge sorted thanks to this picture here. I wonder if there is any other sticker on the topside of the wing. Maybe if Chris comes through with additional images we might be able to see.
I will now change those stickers on this 1st wing and on my v2 wing to the sizes and ones shown in that ad. Are you going to change the ones on yours to the correct size & correct ones?
I tried to recreate the shot quickly here:
This is how it looks to me it is laid out based on that Import Fighter Ad:
My v2 body and wing should be finished soon.
Re: My Box Art replicas of the RC10
Posted: Fri May 14, 2010 9:13 am
by slotcarrod
That makes perfect sense, it's balanced now, I'm going to change mine!
Re: My Box Art replicas of the RC10
Posted: Fri May 14, 2010 9:39 am
by Ruffy
Thanks so much slotcarrod for posting that import fighter picture.
This time I took the image while here at work and using photoshop, I took the right side ""TEAM ASSOCIATED" (from this POV) and moved it to the left side , lining it up with the last "D", to see if it would fit, and it surely does. Fits like a glove!
Re: My Box Art replicas of the RC10
Posted: Fri May 14, 2010 10:45 am
by tamiyadan
.
Re: My Box Art replicas of the RC10
Posted: Fri May 14, 2010 11:02 am
by murphy3428
Hey Ruffy, your items went out today this build is looking awesome
Re: My Box Art replicas of the RC10
Posted: Fri May 14, 2010 11:30 am
by Ruffy
Sweet, thank-you Chris!
