Slotcarrod's Cliff Lett 91 Worlds Team Moo Build

-
slotcarrod

- Approved Member
- Posts: 4415
- Joined: Tue Nov 25, 2008 10:57 pm
- Location: Calgary Alberta Canada
- Has thanked: 1 time
- Been thanked: 45 times
Re: Slotcarrod's Cliff Lett 91 Worlds Team Moo Build
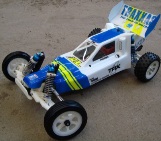
Thanks Jirka, this will help with decal and placement as well. Any one know what decal is under the window but in front of the Lavco?
Rod Littau
Slotcarrod's Rumpus Room: http://www.rc10talk.com/viewtopic.php?f=77&t=16113
25 Years of the RC10: http://www.rc10talk.com/viewtopic.php?f=35&t=13059
Slotcarrod's Rumpus Room: http://www.rc10talk.com/viewtopic.php?f=77&t=16113
25 Years of the RC10: http://www.rc10talk.com/viewtopic.php?f=35&t=13059
-
scr8p

- Administrator
- Posts: 16816
- Joined: Tue Feb 07, 2006 9:46 pm
- Location: Northampton, PA
- Has thanked: 36 times
- Been thanked: 1318 times
-
slotcarrod
- Approved Member
- Posts: 4415
- Joined: Tue Nov 25, 2008 10:57 pm
- Location: Calgary Alberta Canada
- Has thanked: 1 time
- Been thanked: 45 times
Re: Slotcarrod's Cliff Lett 91 Worlds Team Moo Build
Thank you Jason, good eye!scr8p wrote:turbo mirage
Did a bit of work, my front shocks came in, time to get busy!
Rod Littau
Slotcarrod's Rumpus Room: http://www.rc10talk.com/viewtopic.php?f=77&t=16113
25 Years of the RC10: http://www.rc10talk.com/viewtopic.php?f=35&t=13059
Slotcarrod's Rumpus Room: http://www.rc10talk.com/viewtopic.php?f=77&t=16113
25 Years of the RC10: http://www.rc10talk.com/viewtopic.php?f=35&t=13059
-
slotcarrod
- Approved Member
- Posts: 4415
- Joined: Tue Nov 25, 2008 10:57 pm
- Location: Calgary Alberta Canada
- Has thanked: 1 time
- Been thanked: 45 times
Re: Slotcarrod's Cliff Lett 91 Worlds Team Moo Build
The bell cranks are angled in greatly, no need for a longer center link. Niki says to adjust the center link and bump steer will go away. Still testing this.
I used aluminium screws extensively throughout Cliff's car. This was something Cliff did in quite a few of his cars. His RC10ST was covered with them and that was earlier that same year (1991).
A problem that I noticed and possible reason for a different kick up. With only the top deck supports bolted to the chassis and top deck, there is a tiny misalignment in the front bulkhead with the chassis holes. The screws go in, but put a minor amount of stress on the top plate, right about where Masami broke his! 
Rod Littau
Slotcarrod's Rumpus Room: http://www.rc10talk.com/viewtopic.php?f=77&t=16113
25 Years of the RC10: http://www.rc10talk.com/viewtopic.php?f=35&t=13059
Slotcarrod's Rumpus Room: http://www.rc10talk.com/viewtopic.php?f=77&t=16113
25 Years of the RC10: http://www.rc10talk.com/viewtopic.php?f=35&t=13059
-
slotcarrod
- Approved Member
- Posts: 4415
- Joined: Tue Nov 25, 2008 10:57 pm
- Location: Calgary Alberta Canada
- Has thanked: 1 time
- Been thanked: 45 times
Re: Slotcarrod's Cliff Lett 91 Worlds Team Moo Build
One concern that can also put stress on the chassis is the tranny brace. When anchoring the top plate to the tranny there is a gap under the bulkhead. If you don't shim and tighten, it wants to pull the back end up. This was a known problem and was addressed by the AE team with washers later on the Team and Worlds cars but not used on the 91 Stealth. I wont put any on the Moo replica but I will put washers on my runner/racer.
With one screw tight you see how the bulkhead and tranny base are not the same. (Shown is also the Cliff cut bulkhead)
With the 4 washers on my runner now level. (Masami bulkhead)
Rod Littau
Slotcarrod's Rumpus Room: http://www.rc10talk.com/viewtopic.php?f=77&t=16113
25 Years of the RC10: http://www.rc10talk.com/viewtopic.php?f=35&t=13059
Slotcarrod's Rumpus Room: http://www.rc10talk.com/viewtopic.php?f=77&t=16113
25 Years of the RC10: http://www.rc10talk.com/viewtopic.php?f=35&t=13059
-
slotcarrod
- Approved Member
- Posts: 4415
- Joined: Tue Nov 25, 2008 10:57 pm
- Location: Calgary Alberta Canada
- Has thanked: 1 time
- Been thanked: 45 times
Re: Slotcarrod's Cliff Lett 91 Worlds Team Moo Build
I recommend assembly and drilling the rear bulkhead last like shown in picture. You can use the top plate as a guide for perfect alignment. One of my top plates was off a tiny bit and had to angle screws slightly. Jake, you may want to elongate the rear of the top plate 1mm and move the screw holes a mm or so IMO.
Rod Littau
Slotcarrod's Rumpus Room: http://www.rc10talk.com/viewtopic.php?f=77&t=16113
25 Years of the RC10: http://www.rc10talk.com/viewtopic.php?f=35&t=13059
Slotcarrod's Rumpus Room: http://www.rc10talk.com/viewtopic.php?f=77&t=16113
25 Years of the RC10: http://www.rc10talk.com/viewtopic.php?f=35&t=13059
-
TRX-1-3
- Approved Member
- Posts: 2070
- Joined: Sat Mar 29, 2014 12:13 pm
- Location: USAG Humphreys, South Korea
- Has thanked: 2066 times
- Been thanked: 992 times
Re: Slotcarrod's Cliff Lett 91 Worlds Team Moo Build
This is nuts! If Joe Blow off the street told me the '91 Stealth has been replicated to this level of correctness, I wouldn't believe it!
Rod, this thing is looking way bad ([not bad meaning bad but bad meaning good] Run DMC).
These are heady times man, I can't wait to see this thing and all dialed! I LIKE IT! (RoboCop).
I gotta look into a NIX91, gonna start saving..........
Mark
Rod, this thing is looking way bad ([not bad meaning bad but bad meaning good] Run DMC).
These are heady times man, I can't wait to see this thing and all dialed! I LIKE IT! (RoboCop).
I gotta look into a NIX91, gonna start saving..........
Mark
Hope you're doin' something fun.

-
Minisforever

- Approved Member
- Posts: 135
- Joined: Wed Nov 27, 2013 2:12 pm
- Location: Flint mi
Re: Slotcarrod's Cliff Lett 91 Worlds Team Moo Build
I'm loving these stealth builds. Rod have you been in contact with Cliff, maybe has some old photos of his car? He sounds like a pretty good guy and might be willing to help.
-
edwin pibal
- Approved Member
- Posts: 263
- Joined: Mon Jul 14, 2008 5:24 pm
- Location: Wellington, New Zealand
- Has thanked: 1 time
Re: Slotcarrod's Cliff Lett 91 Worlds Team Moo Build
wow Rod! that looks amazing!
im intrigued about the out gearbox brace plate needing spacers under it, on my old rc10 graphite it never required washers
surely the stealth gearbox housing didn't have a running change ?
EDIT: well, bugger me, the plastic brace on my graphite has bent!!, same as the graphite brace on my original worlds car
learn something every day
ed
Hi, my name is Ed, and im a addict.
-
slotcarrod
- Approved Member
- Posts: 4415
- Joined: Tue Nov 25, 2008 10:57 pm
- Location: Calgary Alberta Canada
- Has thanked: 1 time
- Been thanked: 45 times
Re: Slotcarrod's Cliff Lett 91 Worlds Team Moo Build
With a replica I would not use any, but with a racer I would.edwin pibal wrote:wow Rod! that looks amazing!
im intrigued about the out gearbox brace plate needing spacers under it, on my old rc10 graphite it never required washers
surely the stealth gearbox housing didn't have a running change ?
EDIT: well, bugger me, the plastic brace on my graphite has bent!!, same as the graphite brace on my original worlds car
learn something every day
ed
Rod Littau
Slotcarrod's Rumpus Room: http://www.rc10talk.com/viewtopic.php?f=77&t=16113
25 Years of the RC10: http://www.rc10talk.com/viewtopic.php?f=35&t=13059
Slotcarrod's Rumpus Room: http://www.rc10talk.com/viewtopic.php?f=77&t=16113
25 Years of the RC10: http://www.rc10talk.com/viewtopic.php?f=35&t=13059
-
jwscab

- Approved Member
- Posts: 6580
- Joined: Wed Jan 28, 2009 9:42 am
- Location: Chalfont, PA
- Has thanked: 16 times
- Been thanked: 505 times
Re: Slotcarrod's Cliff Lett 91 Worlds Team Moo Build
Hey Rod,
I would loosen all the screws for the top plate, in the standoffs, and then install the rest of the hardware loosely as well, then snug it all up. You might find that it's all you need to get the alignment you are looking for.
I would loosen all the screws for the top plate, in the standoffs, and then install the rest of the hardware loosely as well, then snug it all up. You might find that it's all you need to get the alignment you are looking for.
-
Seabass

- Business Member
- Posts: 1402
- Joined: Mon Jul 27, 2009 8:34 pm
- Location: Mississippi
- Been thanked: 12 times
Re: Slotcarrod's Cliff Lett 91 Worlds Team Moo Build
Rod, the easiest way to relieve that minor stress on the front once everything is buttoned down is to elongate the front bulkhead holes to allow the bulkhead to sit right in position. You don't have to do much just enough to relieve that stress. I even considered enlarging the front bulkhead holes a small bit to make up the .5mm or so needed.slotcarrod wrote:
A problem that I noticed and possible reason for a different kick up. With only the top deck supports bolted to the chassis and top deck, there is a tiny misalignment in the front bulkhead with the chassis holes. The screws go in, but put a minor amount of stress on the top plate, right about where Masami broke his!
Jake
Create an account or sign in to join the discussion
You need to be a member in order to post a reply
Create an account
Not a member? register to join our community
Members can start their own topics & subscribe to topics
It’s free and only takes a minute
Sign in
-
- Similar Topics
- Replies
- Views
- Last post
-
- 139 Replies
- 27473 Views
-
Last post by Ronbo
-
- 2 Replies
- 1454 Views
-
Last post by edwin pibal
-
- 6 Replies
- 2321 Views
-
Last post by Ronbo
-
- 4 Replies
- 2620 Views
-
Last post by slotcarrod
-
- 0 Replies
- 1463 Views
-
Last post by GrePo
-
- 10 Replies
- 2337 Views
-
Last post by 1966blacktubt
-
- 0 Replies
- 619 Views
-
Last post by Dangeruss
-
- 46 Replies
- 6825 Views
-
Last post by GoMachV
Who is online
Users browsing this forum: No registered users and 5 guests