Page 3 of 4
Re: nTC3 electric/brushless rally conversion
Posted: Sun Jun 08, 2014 11:54 am
by mk-Zero
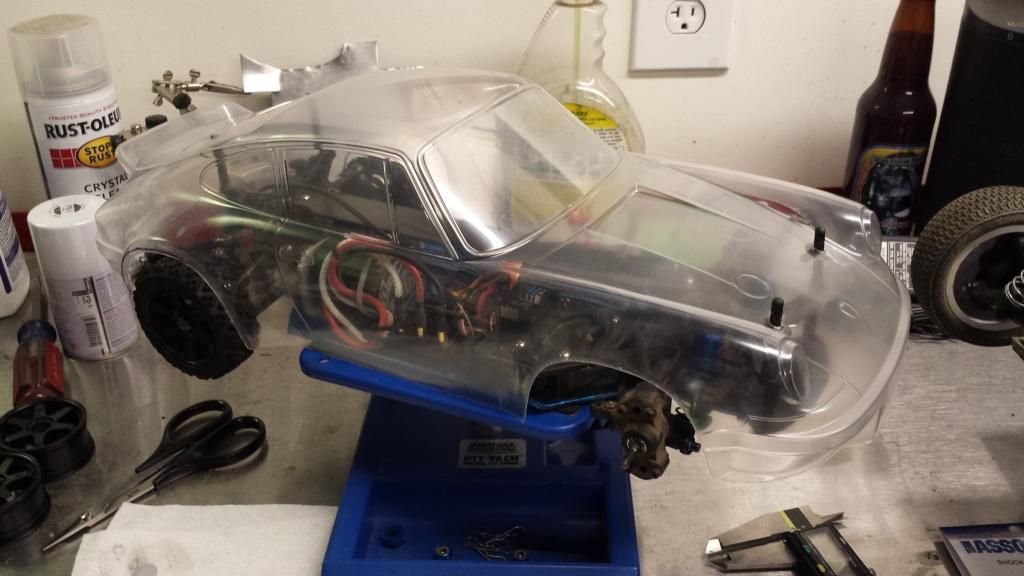
I finally got around to buying a body for this project. Its a Tamiya Porsche RSR. The wheel base of the body is about 3/8" shorter than car's, so I'm extending and raising the arches, which I think will look fine since its a rally car. The rear track width is perfect, but the front was a bit wide. I'm going to switch the front wheels from +3mm offset to zero offset to bring them in, and I dialed an additional few mm's total out of the front by turning in the pivot balls all the way. I think its going to clear perfectly. I'm going to paint it white and use the Martini Racing livery that came with the body. I still need to make a front bumper for it too.
Re: nTC3 electric/brushless rally conversion
Posted: Sun Jun 08, 2014 3:35 pm
by bearrickster
I really like that body
Re: nTC3 electric/brushless rally conversion
Posted: Sun Jun 08, 2014 6:24 pm
by mk-Zero
Thanks, me too. I'm glad it looks like its going to work, I wasn't 100 percent sure when I ordered it. I'll post pics when I get it painted, probably in a few weeks at the rate I get things done

Re: nTC3 electric/brushless rally conversion
Posted: Sun Jun 08, 2014 6:31 pm
by Kyoshojoe
Looks great. I love seeing conversions like this as it is quite inspirational. to lengthen the shocks you could also just screw on longer tie rod ends, same travel but overall longer reach and no bottoming of the piston. I used axial tie rod ends to lengthen my front shocks on my lazer zx-5 in order to use rear arms on the front when I broke one and had no spares. just an Idea.
Re: nTC3 electric/brushless rally conversion
Posted: Sun Jun 08, 2014 6:36 pm
by mk-Zero
Good idea, thanks. Maybe if I start breaking or bending the longer shafts I'll go back to the stock length ones and get the length with the ends
Re: nTC3 electric/brushless rally conversion
Posted: Sun Jun 08, 2014 6:37 pm
by Kyoshojoe
Wanted to chime in on one other thing, the motor mount looks good but you might want to consider using a nut on top of the mounting screws. I assume you used run of the mill hardware store angle which is very soft and due to torque might strip the screw threads. I have experienced this issue personally when building custom parts like shock towers and such.
Re: nTC3 electric/brushless rally conversion
Posted: Sun Jun 08, 2014 6:41 pm
by mk-Zero
That makes sense, and yes, its Home Depot special. There are 4 screws and its 1/8" thick, so I would be surprised if it yanked the threads out, but if it does nuts will be used

Re: nTC3 electric/brushless rally conversion
Posted: Sat Jul 05, 2014 3:44 am
by mk-Zero
Re: nTC3 electric/brushless rally conversion
Posted: Sun Jul 06, 2014 10:20 am
by LoboNYC
Sweet use of the tamiya body.
I got that body for a ds but the body's wheelbase proved to short for the DS.
I ended up getting the HPI version but would love to use the tamiya version.
Will keep watching this thread to see your end results.

I have a couple of bodiless NTC3's on the side that may benefit.
Re: nTC3 electric/brushless rally conversion
Posted: Sun Jul 06, 2014 11:29 am
by mk-Zero
Thanks. The wb was about 3/8" too short for the ntc3 chassis too. But since this is a rally car with lifted suspension and a little bigger tires I was able to stretch and raise the wheel arches and still (I think) look okay. On a low touring car I'm not sure how good the stretched arches would look. It is a sweet body though, might be worth a try.
Got it painted last night and about 2/3 of the decals applied.
Re: nTC3 electric/brushless rally conversion
Posted: Thu Aug 14, 2014 10:01 am
by mk-Zero
Re: nTC3 electric/brushless rally conversion
Posted: Thu Aug 14, 2014 10:17 am
by RC104ever
You've just inspired me to finally do something with my TC3. This looks awesome!
Re: nTC3 electric/brushless rally conversion
Posted: Thu Aug 14, 2014 3:23 pm
by mk-Zero
Thanks! TC3's and nTC3's are cool cars for sure, I think they're a bit under-appreciated
Re: nTC3 electric/brushless rally conversion
Posted: Fri Aug 15, 2014 5:02 pm
by Kyoshojoe
wow that looks awesome. Now ya need to take some glamour shots on a dirt road so it looks like its a full size car on a rally course.
Love the aluminum laminated bumper, now you have the look of alloy yet still get the flexibility of plastic. Wondering if you used an adhesive to bond it in addition to the rivets or just rivets, just curious.
I have to give you props on this build because it is quite pro and turned out beautiful. I can see why you dont want to drive it.
A rear bumper with pseudo-exaust might be cool to add more scale realism as well.
I think it would make a good car for build of the month contest as well.
Re: nTC3 electric/brushless rally conversion
Posted: Fri Aug 15, 2014 5:50 pm
by mk-Zero
Thanks for all your kind words. I have thought about a rear bumper for it, and may still someday make one, but for now I consider it done. I may also add some driving lights to the front of the hood as a lot of rally car use.
On the bumper, the aluminum plate is just held in place with six 2-56 button bead screws.


