Page 11 of 15
Re: RC10 - A Stamp Rebuild - Chipped Idler Gear
Posted: Mon Jun 17, 2024 4:12 pm
by GreenBar0n
Frankentruck wrote: ↑Mon Jun 17, 2024 3:59 pm
Factory Works bellcrank setup would be even better, and it has color options now.
I see:
https://factoryworks.com/shop/ols/products/11180
Want to keep this one a stock example of a mid-late Edinger, on the outside, bearings and 6-gear hopup can't really be seen, but felt.
Re: RC10 - A Stamp Rebuild - Chipped Idler Gear
Posted: Mon Jun 17, 2024 5:05 pm
by Dangeruss
GreenBar0n wrote: ↑Mon Jun 17, 2024 4:12 pm
Want to keep this one a stock example of a mid-late Edinger, on the outside, bearings and 6-gear hopup can't really be seen, but felt.
Natural color is selectable to the right of the photo...
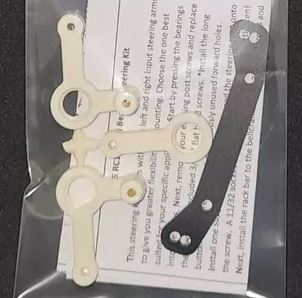
- Natural Color Steering.JPG (19.54 KiB) Viewed 885 times
- Natural Color Steering.JPG (19.54 KiB) Viewed 885 times
...you can also stiffen up the servo saver by cinching both sides together with a zip tie... was a period trick.
Re: RC10 - A Stamp Rebuild - Chipped Idler Gear
Posted: Mon Jun 17, 2024 5:20 pm
by GreenBar0n
This particular RC10 is a really complete and original mid-late Edinger, want it to be frozen in time between 1985-1987, in appearance.

The bottom of this one is really clean too, making it tough to drive just anywhere.

Are there any good clear protectors for the bottom?
Re: RC10 - A Stamp Rebuild - Chipped Idler Gear
Posted: Mon Jun 17, 2024 7:19 pm
by GreenBar0n


Stock diff hub on the left has the correct diameter for the center of the spur gear, the JJH diff hub on the right is too small, the spur gear won't center.

The only problem with the JJH hub.

I looked through the ad and didn't see what else I could be missing.

No instructions were provided.
Apparently there is a bushing that is supposed to go on the diff tube.

If these standard bushings that come with the RC10 didn't have the flange, these would be perfect ID, and OD for the hub and spur gear.

Wonder why they did that.
Re: RC10 - A Stamp Rebuild - Chipped Idler Gear
Posted: Mon Jun 17, 2024 7:27 pm
by GoMachV
Should be a 1/4 x 3/8 bearing
Re: RC10 - A Stamp Rebuild - Chipped Idler Gear
Posted: Mon Jun 17, 2024 7:38 pm
by GreenBar0n
GoMachV wrote: ↑Mon Jun 17, 2024 7:27 pm
Should be a 1/4 x 3/8 bearing
Straight from the horse's mouth, thanks for posting the directions!
Thinking this is the right one - 1/4x3/8x1/8 Rubber Sealed Bearing R168-2RS:
https://www.fasteddybearings.com/1-4x3-8x1-8-rubber-sealed-bearing-r168-2rs/
Re: RC10 - A Stamp Rebuild - Chipped Idler Gear
Posted: Mon Jun 17, 2024 7:40 pm
by GoMachV
Yeah just a standard plain bearing like the 10t rear axles use.
Re: RC10 - A Stamp Rebuild - Chipped Idler Gear
Posted: Mon Jun 17, 2024 7:48 pm
by GreenBar0n
Thanks for the confirmation, ordering that bearing now.
Will get back to this asap. Looking forward to putting this all in order.

FastEddy's bearings is only a few hours from here, as it turns out, should have that bearing soon.
Re: RC10 - A Stamp Rebuild - Chipped Idler Gear
Posted: Fri Jun 21, 2024 10:42 pm
by GreenBar0n
That was the correct bearing, everything went together smoothly after that.

One of the very last steps of the JH Guide.


Will completely finish this tomorrow.
Re: RC10 - A Stamp Rebuild - Chipped Idler Gear
Posted: Tue Jul 02, 2024 1:56 am
by GreenBar0n
Going to take this car in the direction of a Jammin' Jay Halsey tribute, to both the 1985 race car, and the RC10 in the movie The Dead Pool. Not going to mod the chassis or make an exact replica, exterior will be close as I can get it though.


The Andy's body

- and MCI decals, gets me half way there.

Found one of the harder parts to get for this, the Pro-Line 100-F front rims.

Was lucky to have caught an auction for:
Vintage Team CRP Front Stub Axles 1552 Associated RC10 to Tamiya 5x11 Bearings - RC10 front bearings won't work for these wheels.

The Diamond tires it came with will work for the moment, but the correct knobby's are one of the hardest parts to find.
It was recently brought to my attention, that the actual JJH 1985 race winner was using vintage 50153 Tamiya Holiday Buggy rear tires; the RI Holiday Buggy doesn't have those same vintage style tires. These may be one of the hardest to find parts for this.
https://tamiyabase.com/parts/815
Reference pic - not mine:

Instead, going to use vintage Pro-Line 109-R for the rear, I like the sidewall writing.


The 40th wheels came with smaller spacer/donuts.

Instructions say to use the smaller spacer with vintage aftermarket tires.

I would've used the original Edinger rear rims for this, but the PO glued the tires to the rims. Going to leave them stock. The 40th wheels seem really white in comparison.

Re: RC10 - A Stamp Rebuild - Chipped Idler Gear
Posted: Fri Jul 05, 2024 5:04 pm
by GreenBar0n
The RC10 prototype was based on VW and Porsche, according to Gene Husting, on page 5 of his book:
https://www.stevehusting.com/doubtbusters/wp-content/uploads/2009/04/prototype_rc10.pdf
An early Hot VW's bumper sticker.

Really like that the JJH paint job was a tribute to Hot VW's.
Got the JJH towers today, will get those installed.

Turns out the front rims are supposed to be Chrome, not black, will correct that somehow in the future.
Re: RC10 - A Stamp Rebuild - Chipped Idler Gear
Posted: Fri Jul 05, 2024 10:13 pm
by GreenBar0n

If this mid-late Edinger had come with the box, manual, and original body, I would've left it all stock.
Need to work up the courage to cut out the Andy's body.
Re: RC10 - A Stamp Rebuild - Chipped Idler Gear
Posted: Fri Jul 05, 2024 10:25 pm
by GoMachV
If you have a spare body that is cut right or even not cut right you can use it as a template. Made masking tape marks to show where the cut should be less, curves, etc. place the old body over the fresh one and draw the cut lines. I've done this a few times on difficult fits
Re: RC10 - A Stamp Rebuild - Chipped Idler Gear
Posted: Sat Jul 06, 2024 1:19 am
by GreenBar0n
GoMachV wrote: ↑Fri Jul 05, 2024 10:25 pm
If you have a spare body that is cut right or even not cut right you can use it as a template. Made masking tape marks to show where the cut should be less, curves, etc. place the old body over the fresh one and draw the cut lines. I've done this a few times on difficult fits
Appreciate the tip and those sweet JJH towers, thanks!
I do have a Protech body already cut for the 40th. It's the narrow part around the nose that gets tricky with just a #11 x-acto blade, will use the curved scissors in the tight bends and the blade for the rest. It will haunt me forever if I go outside the lines on the Andy's body, I'll probably wait until tomorrow to try it

Here's something odd, the 40th has countersunk holes for using a single battery cup, this Edinger is not countersunk in that spot.
40th on the left Ed. on the right:


Did everyone just use button head screws for the single battery cup location back then?
Re: RC10 - A Stamp Rebuild - Chipped Idler Gear
Posted: Sat Jul 06, 2024 1:24 am
by GoMachV
Nobody really used the single cup on the early cars, people installed the pack sideways. The holes were offset to one side as well, so the pack would have sat at a bit of an angle. It was for servo clearance with the speed control on one side but that never made it to production.