Page 2 of 3
Re: Startin the run what ya brung build of a Team Car
Posted: Wed May 26, 2021 9:49 pm
by JosephS
The replacement fasteners from fastener expires arrived today and as they are just the right fit.
They seem to be ever so slightly larger than my old stock screws but they may be because the original screws are worn from many rebuilds. I am happy to have the front built and the chassis wrap on. This build is starting to take shape.
Re: Startin the run what ya brung build of a Team Car
Posted: Fri Jun 04, 2021 6:42 pm
by JosephS
I got quite a bit farther in my build, the transmission rebuilt and suspension on but I am running into a problem.
When I but the springs and spacers in the dog bones on the car the bones don't fit right. one side fits fine, although it looks like it's nearly going to pop out at full travel. On the other side the spring doesn't seem to compress enough and it seems to bind.
I was running before without springs and spacers and the bones were a bit loose.
I am running the 3/16 b4 rear axles and hubs.
Has anyone else had an issue with the springs and dogbones on that setup?
The solutions seems to be
Cut down the spring. It was hard to source the springs and it seems that they serve a purpose.
Get Slighly longer bones and run with spacers instead of springs
Take it all apart and figure out what I did wrong
Does anyone have an opinion?
Re: Startin the run what ya brung build of a Team Car
Posted: Fri Jun 04, 2021 10:19 pm
by JosephS
I tried option 3 tearing things apart.
I think the problem is actually my diff.
If you look closely you can see a tiny bit of thread sticking out. I swapped out the standard thrust bearing for a captured avid one. It came with grooved washers and I think the exposed thread is causing the shaft to compress the spring just a bit too much.
Looks like I am going to disassemble the gear box and see if I can use the captured thrust bearing with the old style thrust washers.
Re: Startin the run what ya brung build of a Team Car
Posted: Sat Jun 05, 2021 1:02 pm
by JosephS
So the thrust bearing was a problem. I fixed the problem the very old school way. I added extra e-clips the axel until everything fit. I the. Sliced the dog bone springs in half and replaced the nylon spacers with red shock o-rings. As well I switched from the long wheelbase rear arm mount to the manual default.
This fixed up the bind I was having in my suspension travel. The stock nylon spacers were just a bit to thin and the dogbones were getting pushed just a little to far out of the axels. This seems to be just about right.
Re: Startin the run what ya brung build of a Team Car
Posted: Sat Jun 05, 2021 1:04 pm
by JosephS
This fixed up the bind I was having in my suspension travel. The stock nylon spacers were just a bit to thin and the dogbones were getting pushed just a little to far out of the axels. This seems to be just about right.
I noticed that the shock tower wasn't flush to the bulkhead. I went to tighten it down and snapped the head off the bolt. it was a bit if a bummer. I drilled out the remaining bild as best I could from the rear bulkhead but still wound up enlarging the hole. I used a longer bolt and a nut to fasten the bulk head down.
I also drilled the completely new servo mounts to hold the new savox servo. It was satisfying to see the chips fly from the nylon. The new servo horn I purchased is to long for the body I have. I'll use the Savox supplied ones and save this aluminum best for my rc10T build.
Re: Startin the run what ya brung build of a Team Car
Posted: Fri Jun 11, 2021 2:32 pm
by JosephS
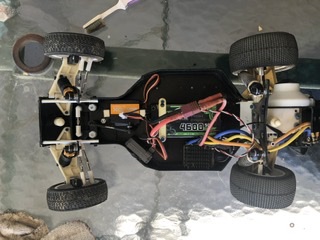
It’s down to details.
Wiring
I am trying to best figure out how I want to set up the electronics and tame this wire mess.
- 7B2AFB74-6752-4B7B-A17D-EDA7B7A70094.jpeg (33.79 KiB) Viewed 778 times
- 7B2AFB74-6752-4B7B-A17D-EDA7B7A70094.jpeg (33.79 KiB) Viewed 778 times
I had the battery transverse at first but that was making it to hard to place the equipment.
I’ll have to look for inspiration around the board but it seems difficult to make a nice layout for the speed controller. The 3 wires don’t route well around the shocks and the sensor cable is just in the way.
Is there a good brushless motor connector? I’d like a fixed connector over bullets, though bullets should route easier.
I was thinking that one way is to change up the body mount to attach to the shock tower and free up the transmission brace to run the wires on top of it.
I cut the brace with a hacksaw and I am not looking forward to making a new one
Has anyone see a really nice wire route with a sensored setup?
For the capacitor is the best solution to extend the leads so it can be strapped to the chassis? Is there a better solution that I am just missing? While I am at it is there an advantage to swapping out a different capacitor? I would be running 13.5 to 17.5 with this setup.
Re: Startin the run what ya brung build of a Team Car
Posted: Fri Jun 11, 2021 2:40 pm
by JosephS
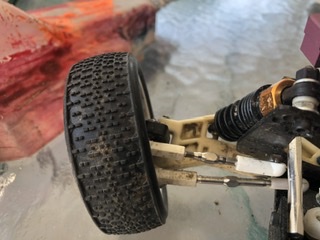
The next detail to attend to are tires.
My first run with the electronics hooked up in mounted my rear tires so this is a great chance to clean them up and remount them.
With the tires off I am noticing some play in the front hubs.
How much wobble should there be with the axle held ?
How is that fixed? Shims,bearing rebuilding, new bearings? The axels are new. Should I be looking at new wheels?
Re: Startin the run what ya brung build of a Team Car
Posted: Fri Jun 11, 2021 3:31 pm
by juicedcoupe
Could be worn bearings, or it could just need shims. Or there could be slack between the bearing and the wheels.
However, I have never seen an axle mounted wheel run as true as a hex mounted one. Because of the design, you just can't remove all the slack without binding the bearings. All of mine have a little wobble to them.
New bearings and maybe shims would be the easiest thing to try.
Re: Startin the run what ya brung build of a Team Car
Posted: Fri Jun 11, 2021 4:24 pm
by jwscab
Loose is fast. No worries.
Re: Startin the run what ya brung build of a Team Car
Posted: Sat Jun 12, 2021 2:13 am
by JosephS
juicedcoupe wrote: ↑Fri Jun 11, 2021 3:31 pm
Could be worn bearings, or it could just need shims. Or there could be slack between the bearing and the wheels.
However, I have never seen an axle mounted wheel run as true as a hex mounted one. Because of the design, you just can't remove all the slack without binding the bearings. All of mine have a little wobble to them.
New bearings and maybe shims would be the easiest thing to try.
I think I will leave this as is for now. I already purchased all the parts for a hex conversion which includes new bearings. I'll see what it's like once the wheels are mounted and balanced.
Re: Startin the run what ya brung build of a Team Car
Posted: Sun Jun 20, 2021 1:37 pm
by JosephS
The car is running which means the posts are less frequent. I picked up some $1 avid bearing to try in the front wheels but the big advancements were tire glue and bands
Once the brushless was installed the tires blew right off the old glue. I saw the new way to do tires and follows with some tire bands and precision glue.
Though on my initial run I would up blowing out a portion of one of the wheel and will need to re glue that areas.
Still The results look a lot cleaner than my last effort.
Re: Startin the run what ya brung build of a Team Car
Posted: Sun Jun 20, 2021 1:47 pm
by JosephS
The next big upgrade was to making the gearing much more proper.
I went from the avid triad stock spur gear of 72 out to a 84 tooth spur. Along with the corresponding pinion gear.
I am having trouble setting the gear mesh with my brushless motor. It seems ever so slightly bigger than the 540 brushes motor and it does not freely move in the motor mount . As I tighten the mounting screws the motor vastly changes position. I basically clamp down the pinion and then tighten the motor in place and it stays.
The car runs and nothing (major) is breaking as I put packs through it.
Re: Startin the run what ya brung build of a Team Car
Posted: Sun Jun 20, 2021 1:54 pm
by scr8p
File the top of the slot in the motor plate a little bit.
Re: Startin the run what ya brung build of a Team Car
Posted: Sun Jun 20, 2021 2:09 pm
by JosephS
So the shake down runs have shaken some things loose.
While the new chassis protect is great it’s not invincible. I have a few dirt to cement transition in my yard and it eating though the nose protector.

- 6B40943F-AAC6-4524-A876-33D9A23DD2EE.jpeg (35.55 KiB) Viewed 712 times
- 6B40943F-AAC6-4524-A876-33D9A23DD2EE.jpeg (35.55 KiB) Viewed 712 times
I sort of expect this given but is there a protector that people have used that will handle that abuse? The rest of the chassis looks fine even though it absolutely has seen abrasion as well.
My initial thought would be a small steel plate attached at the nose tubes and stuck on with double sided tape .
I can’t seem to keep my shorty lipo in place. I am not sure how to best secure it. I had 3D printer a holder from Thingiverse but it didn’t fit the stock screw holes. As well my full side lipo is to long with a standard servo in place. Is there an elegant solution or should I just cut a foam block to fill the space ?
Also thread locker is a must. I was expecting to disassemble and reassemble a number of times so I just tightened the bolts down but I have been loosing screws on runs.

- 37A73893-EDEE-44DA-B644-6E9C66A236AE.jpeg (33.01 KiB) Viewed 712 times
- 37A73893-EDEE-44DA-B644-6E9C66A236AE.jpeg (33.01 KiB) Viewed 712 times
Dirt so so much dirt. Even running on grass I now see this car will never again be clean enough for a build of the month contest.
- 40BAFA93-335D-4E8D-8D37-8F64BB337AD0.jpeg (29.83 KiB) Viewed 712 times
- 40BAFA93-335D-4E8D-8D37-8F64BB337AD0.jpeg (29.83 KiB) Viewed 712 times
I was excited that I found the wing tube I lost in my parts box. I was seriously considering getting a new one .
It looks like the last steps are going to be cleaning up the wiring and painting the body.
I have only painted solid bodies before and this time I want to try a 3 color pattern scheme. My kids helped me do some layouts.... I do love them
but I may try something a little different then the suggestion. Though I did get a second body and wing for their ideas.
Re: Startin the run what ya brung build of a Team Car
Posted: Sun Jun 20, 2021 3:01 pm
by juicedcoupe
Wing and nose tubes are easy, make your own. K&S 83060 tubing works great.
The nose tubes do require drilling and tapping.
To make wiring the motor easier, consider a shock tower that is more open. This one from Factory Works gives you a ton of room for routing wires.
I'd recommend contacting Jeff here instead of using ebay. You will get better pricing and be able to choose color and thickness of the material.
I mention thickness mainly as a precaution for front towers. Using 3/16 front towers with a buggy nose limits clearance near the ball cups around the bellcrank of camber links. It can be done, it just limits parts selection.