How do you glue a track down? Do some Googling and the answers you find all sound so easy. Example: Put a blob on each end of the track. But how do you do a nice, clean job of gluing down the track, and have it securely fastened to the base? What if you don't want to see unsightly blobs of glue squishing out from your track sections? It also sounds like you're advised to glue
each track section individually, gluing and reconnecting each piece, one at a time. What if you have a huge, complex layout like this, where a slight deviation of the exact plan will cause track disconnects and possible breaks in continuity? It took me hours, multiple times, to disassemble and reassemble this layout, and each time I had to spend much time correcting the overall position on the base, and reposition every one of the bridge supports so they make proper contact, and fix any cracks that appeared between track pieces. So, gluing down a track layout
without disassembling any track pieces is not so simple a task as people would suggest on various slot car enthusiast websites.
I did some thinking about this and I think I came up with a pretty clever idea, and it actually works very well. Looking carefully at the bottom of the track sections, you can see which areas make the best contact with the base. Just blobbing glue all over would be a major waste of glue as most of it will end up in the spaces making no contact with the base. Also, the track edges themselves are very thin, so you won't get good adhesion there if that's the only place you apply the glue, too little surface area making contact...plus, it would look like ass when it's done that way. I saw that the plastic channels where the track slots are routed, and the small square sections where the track ends' middle connector tabs are, and the screw posts, all make the best contact with the base. So, how do you apply glue to those areas on the underside of the track sections, without disassembling the track?
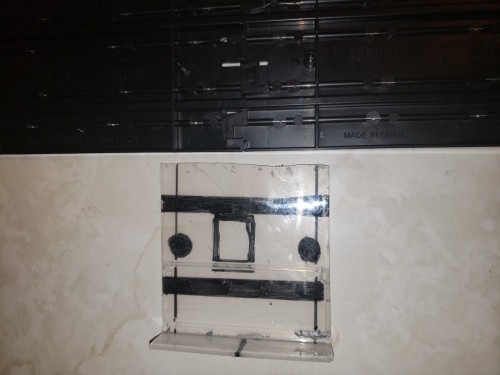
I figured I could raise sections of track carefully by a small amount, maybe a half-inch to an inch, max (or else the track sections might disconnect), and apply glue to the bottom. But doing this with a plastic applicator, trying to reach underneath the track and guess where the best contact surfaces might be, would result in a holy mess and a lot of harsh language as I'd be constantly wiping up glue that got onto the sides of the track. So the idea I came up with was to fabricate a "track glue template". Any piece of thin, sturdy clear plastic with a 90-degree bend at one end should work, but I cut up a piece of a tape drive tape container for this. Hey, I'm in I.T. and I was just looking around the office to see what I could come up with, and I had a bunch of old server backup tapes, so that's what I used.

I connected 2 track sections and put my template underneath, and marked on the bottom of the template (the opposite side of where the glue would be applied) with Sharpie the aforementioned areas: the slot channel bottoms, the screw posts and the middle connector sections. I then marked a line on the 90-degree side, right in the middle, where 2 track pieces mate.

I applied the Liquid Nails Fuze*It glue to the marked areas. With this template being so thin, I could now raise up sections of the track just a bit, slide the template-with-glue underneath, position it exactly between 2 track connections, and press down on the track to let the glue apply to the important areas. Lift the track up again, press down on the template to slide it back out, and press down on the glued track sections and there you have it...a nice, cleanly-glued track with no glue visible on the base. It almost worked too well! I thought this stage of the project might take a few weeks to do, but I was able to do over a dozen connections at once (limited by how many weighted items I had available to press down on the glued track until the glue cured, as well as the glue setting time, which was a bigger concern--the Fuze*It starts to set in only 15 minutes or so, so the more you can lay down quickly, the better).