Page 2 of 2
Re: Arnold Salvageinator in Termination to Salvation HORROR
Posted: Thu Dec 05, 2013 8:59 am
by License2iLL
Chris perfectly rational ocd and the losi manual agrees with you as well as myself. Thanks for catching my late night slip.
Wildbill I gave it to someone who said they were going to indoor flat track race it. But he sometimes doesnt end up building out so let me see what I can manage for you after a few weeks i'll ask about it. Id like to see it get put to use. It was cut properly or so it seems. With a battery mounted it really doesnt seem like it would crack.
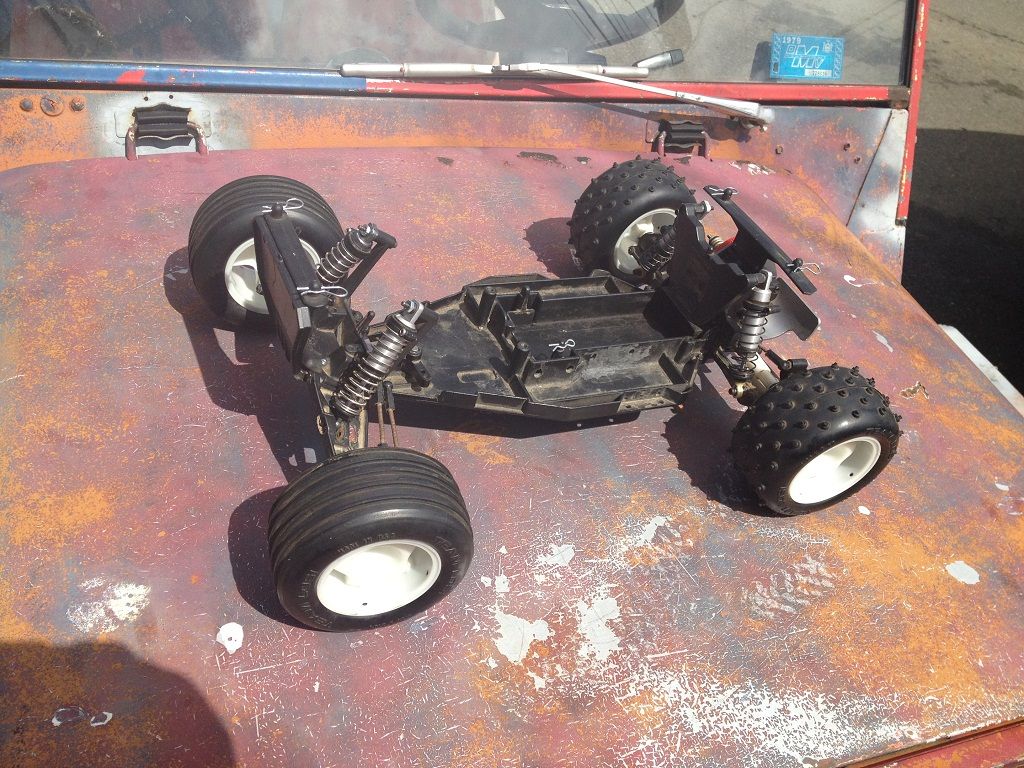
Really is coming out like new...there are absolutely no mechanical slops anywhere. Where ever a shim could slip in it was. And when a shim was too thick i slimmed it down.....shim pack compliments from losi 22.
No slop. Even in my refurbished axle pins.
I didnt take a picture of before and after but the steering rack was not straight anymore. You have to hold it with a wrench up until where the bending is and then bend it back with hand and light force. Eventually your aim is for it to lay perfectly flat on a tabletop with a light behind it. 1000grit wet the little shouldered bolts. Grease, thread lock.
I had to work with what I have 2 shocks had blown carts but luckily I had 2 spares that were just fine and I was able to rebuild. They were all long style unfortunately so ill get some true front shocks later. I could not get proper ride height up front with long springs though...so I took them off and used a set of strange super short ones I had also left over from the oval chassis.
The electrics were a nice score off ebay...yea yea no name. But 10 turns and for the price so far it rocks. Im using a batt from my other runner for now. I had 1 extra receiver.
This steering servo is old school futuba...its on it's last legs...if you got a budget bang for buck suggestions please mention it.
Re: Arnold Salvageinator in Termination to Salvation HORROR
Posted: Thu Dec 05, 2013 10:38 am
by DerbyDan
Well thats a whole less horrible than the title of this thread would suggest

Actually it looks 'bloomin' lovely - I really admire your attention to detail - this will be a supreme runner i'm sure (& yes I have RetroFit XX Trans envy

)
By the way - looking at your rear camber link position, looks like you'll get no camber change or even positive camber under suspension compression?
Re: Arnold Salvageinator in Termination to Salvation HORROR
Posted: Thu Dec 05, 2013 10:54 pm
by License2iLL
Thanks. I did get around to tightening the rear links...but do u mean they maybe should be posted in better spots? Let me know I dont know this car well...its not like 5 link at all....I am really surprised at how much more precise stable this car feels well so far around the house. Let me know your thoughts on the link.
Made some more progress.

Re: Arnold Salvageinator in Termination to Salvation HORROR
Posted: Thu Dec 05, 2013 11:22 pm
by clm
I think his comment was more about your rear upper link being in a non standard location, however the standard location on your rear carriers are unusable due to being cut off. The normal inside link would be inside the rear wing tubes... but your ball ends may be to large to accommodate those....
Chassis looks right at home and better off then it was in it's old life.
Chris
Re: Arnold Salvageinator in Termination to Salvation HORROR
Posted: Fri Dec 06, 2013 12:07 am
by Diamond Dave
I like it! Looks very close to my old truck.
Re: Arnold Salvageinator in Termination to Salvation HORROR
Posted: Fri Dec 06, 2013 12:28 am
by clm
That truck is the 'old life' of his buggy
Chris
Re: Arnold Salvageinator in Termination to Salvation HORROR
Posted: Fri Dec 06, 2013 9:22 am
by DerbyDan
Very neat installation of your electrics

Regarding the rear links - i'd be intriuged to see the camber angle of your rear wheels with the suspension compressed..... I would be guessing that there is very little change through the suspension travel?
Re: Arnold Salvageinator in Termination to Salvation HORROR
Posted: Fri Dec 06, 2013 10:17 am
by License2iLL
Chris,
That's the before I "spruced" her up picture I never took !! lol thanks again my friend.
Dan,
I gave it some thought yesterday too definitely where it is linked right now would seem to be more of a neutral point as your thinking also.
The correct point for some positive camber under compression would be the most top holes on the carriers but like chris said those were blown away by someone in it's past life. So im thinking im going to the top row next over spot or maybe bottom row.
And im also going to go for the inside holes (inside the wing posts which I need to pickup hahahha shes still a work in progress) there are 3 and im thinking the most bottom one. The only thing with all this is I am not sure this turnbuckle will let me go this tight...
Im gonna quick review a losi manual. Let me know what you guys think on those settings. Thanks for another good catch.
Re: Arnold Salvageinator in Termination to Salvation HORROR
Posted: Fri Dec 06, 2013 3:31 pm
by clm
Normally it's middle inner on the bulkhead and middle outer on the carrier... as top and middle are dead on you carrier I would use bottom inner and outer holes for as-close-to-manual-stock as you could go then work from there.
Chris
Re: Arnold Salvageinator in Termination to Salvation HORROR
Posted: Sat Dec 21, 2013 12:09 pm
by License2iLL
I tracked a beater body...and proceeded to remove all cracked paint areas...and then sling some paint
Re: Arnold Salvageinator in Termination to Salvation HORROR
Posted: Sat Dec 21, 2013 12:28 pm
by License2iLL
Quick update I've been running this ebay sensorless brushless setup and it hasnt been very impressive for a 10turn...my other runner 17.5 Trinity(albeit sensored) simply outpaces it. Although I am on an 18 tooth pinion because i feared the 10 turn would be too strong....I am now going to run it full blown 28 tooth. But I dont think its going to make a big difference. I did score it super cheap and it is sensorless...so I can live with it....Im just relaying should anyone be tempted by it what you might expect from it(I will say I have not exploited its timing features or anything yet). On rough surfaces(some sand,dirt,weeds) the car does not seem to be as ample as my 5 link and I thought it would be. I still have to get proper front springs though. I am without wing for now...and may revisit it later...but by then much of the body and paint may be a little beaten.
To be fair I'll post up motor re-tuning results later because now that I recall my trinity didnt come alive until I tweaked its timing too. One thing I did wish I had for it actually would have been the blue lettered old school Team Losi stickers I think toward the bottom close to the front would have made a nice finishing act. But i dont have them and well they do end up peeling off.
This has been fun and was going to be a complete recycling build before I was tempted by fleabay electronics.
It is still somewhat of a scrapyard build. And it is always fun to save a Losi.
Big thanks to Chris/CLM and other commentators/contributors.
Re: Arnold Salvageinator in Termination to Salvation HORROR
Posted: Sat Dec 28, 2013 10:54 pm
by spydur23
License2iLL wrote:I tracked a beater body...and proceeded to remove all cracked paint areas...and then sling some paint
20131205_165133.jpg
20131205_165343.jpg
20131205_165356.jpg
20131205_221001.jpg
20131205_221011.jpg
I know that body!! Nice work I'm glad another member put it to good use!
Re: Arnold Salvageinator in Termination to Salvation HORROR
Posted: Sun Dec 29, 2013 12:44 am
by clm
Re: Arnold Salvageinator in Termination to Salvation HORROR
Posted: Sun Dec 29, 2013 12:50 pm
by alien3t
looking awesome. what did you use to clean up the plastic, I normally use pledge and a toothbrush.
noticed the xx wheels on front, what part numbers and parts did you use to convert, would be nice to use 2.2 on my pro and se build. that doesnt require much modification, (and for rear spacers or anything? and what parts to make b4 slipper work, just the plates pads and gear, or any spacers?
Thanks great build.
Re: Arnold Salvageinator in Termination to Salvation HORROR
Posted: Mon Dec 30, 2013 9:06 am
by License2iLL
Thanks Im glad u guys like...its work and well at least when complete you want to try and make it look as nice as possible for a few pictures pre BEATING!!
spydur im glad it didnt go into the garbage! and we could recycle that bad boy for some duty!
Chris I am definitely tempted my friend!
Alien3t,
The jury is out on the best way to strip paint. Some guys pull off dot3 ok some end up with hazing on the plastic and many report it gets brittle too. Some guys use simple green I think with good results. I've tried dot3 in the past its not fun...and you gotta put in some elbow!
This time around I decided to hit it with a plastic pick with a sharp point on one end and a flat screwdriver type on the other to help loosen areas that had air pockets and chip away old enamel that seemed to be coming off. The plastic on plastic help to prevent scratches. Then hit it with compressed air 110 psi...youll see plenty more paint come off then...which is good because what remains is what could be considered still well bonded paint. Then you can match whats there perfectly or imperfectly...i needed a metallic burgundy maybe tamiya paint...but i couldnt find it and hobby shop was closed so I picked up crimson red non metallic and it matched it pretty good unless u zoom in real close...where u can tell its not metallic. The rest was done on exterior....originally I was just gonna do front and back stripes but felt boring...so I payed a little homage to the cars roots with boxart rendition sides. after you paint it...you can revisit cracked places and glue weld it from behind the paint...or just leave it. I did.
For the xx setup I bought xx front carriers and spindles and used a proper size drill bit to open up it's stock hole just a tad enuff to accept jrx2 pins. The rear i thought would need a 12mm hex..but turned out thats not true...so i took it back off.
For the tranny you can go back a few pics you'll see all u need is the B4 and a losi spacer of the type you see on the rear axles...just 1 to drop into the transhaft. in one of the pics i showed that the lrm tall plate is only 2 thousands of an inch taller...and it comes with just a rear axle spacer. So it becomes preference is you want to run losi slipper or b4....i like this one cuz it has a little more contact surface and easier to find.
Post your build!! and losi blessings to you!
*****Motor/ESC UPDATE******* I kicked up the timing full tilt 26.6 or something and the punch also to second to max setting. TREMENDOUS DIFFERENCE car is definitly competing with my brand name sensrd 17.5 motor. If you can score it for under 40bux consider it a good deal....but dont be afraid of their 8.5turn version.