Page 2 of 4
Re: RC10 Newbitz build thread
Posted: Sun Oct 06, 2013 12:06 pm
by surgetek
They emailed me back saying that they sell the appropriate countersink. They know that it happens as someone mentioned everything is at 100 degree and these are 82 degree.
I don't feel like opening up holes or anything so I'll just buy the few I need. It's cheaper and easier than buying the bit. It's not worth tearing down what I have together to return it all and piece mail the screws I need and wait even longer than I have.
Re: RC10 Newbitz build thread
Posted: Sun Oct 06, 2013 7:16 pm
by Vantard
Not to hijack but do they sell both countersinks? I will be needing kits soon for 2 gold pans and want to make sure I order the right ones too
Re: RC10 Newbitz build thread
Posted: Sun Oct 06, 2013 7:39 pm
by scr8p
surgetek wrote:They emailed me back saying that they sell the appropriate countersink. They know that it happens as someone mentioned everything is at 100 degree and these are 82 degree.
I don't feel like opening up holes or anything so I'll just buy the few I need. It's cheaper and easier than buying the bit. It's not worth tearing down what I have together to return it all and piece mail the screws I need and wait even longer than I have.
you would have some terribly large holes in your chassis if you tried making 100 degree holes 82 degrees.
Re: RC10 Newbitz build thread
Posted: Sun Oct 06, 2013 7:44 pm
by surgetek
They have both.
Yeah I'm not going to start that.
Re: RC10 Newbitz build thread
Posted: Wed Oct 09, 2013 5:05 pm
by THE H.P FREAK
HI!... When whitening plastic parts you need H/P and a REAL ultra violet light bulb. The ultraviolet light is what really does the trick with the H/P. I use a clear glass bowl. Wrap it with aluminum foil, shinny side towards the bowl. Fill up with H/P. Put ultraviolet light in a small desk lamp. Try to get one with a flexible goose neck. Put parts in H/P solution and configure the light about a inch above the solution. Then take more aluminum foil with shinny side inwards and make a funnel around the light and bowl. Let sit for 3-5 days. You will have to stir the parts occasionally and top up the solution due to evaporation. I have found that Kitchen/bath cleaner works the best to clean the parts prior to the whitening process. Get yourself some pipe cleaners from a craft store. They work great for getting in all the holes. Try to get the parts as clean as possible before trying to whiten them.
Re: RC10 Newbitz build thread
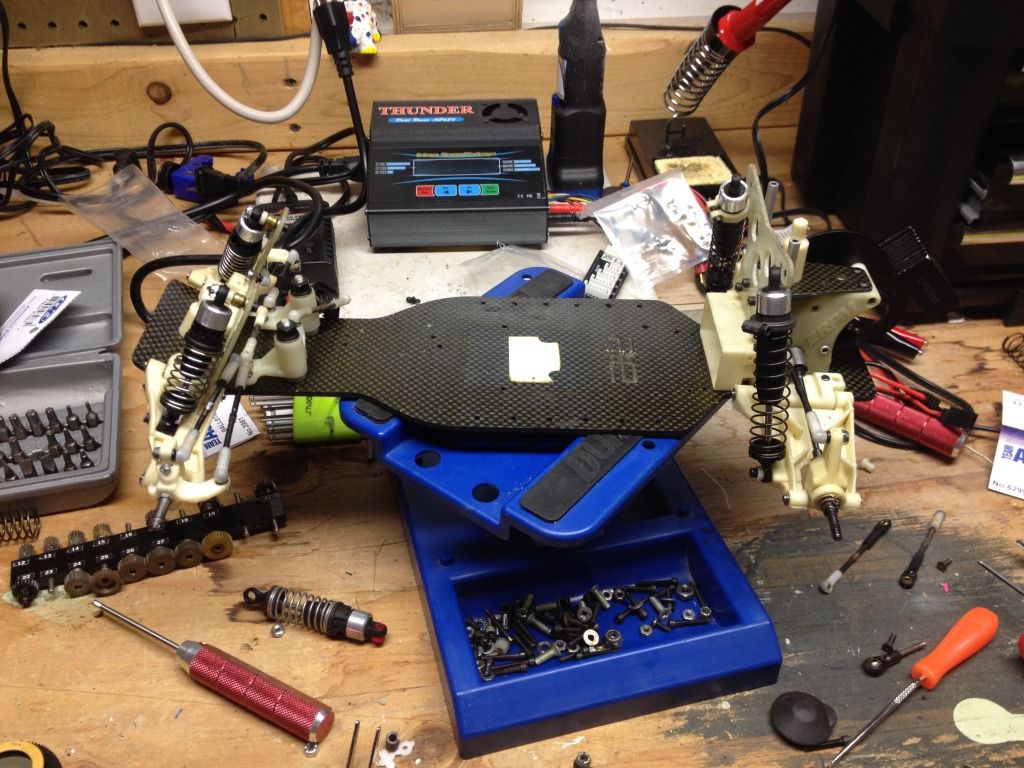
Posted: Thu Oct 10, 2013 8:57 am
by surgetek
Finally got in most of my stuff.
Started putting everything back together. I'm trying to put everything back on the buggy that came with it from my friend. For the most part all is well, except the rear shocks. I can't get them to line up. They are the Kyoshos that came with it but I may go back to the stock ones because I think he had it so rigged I can't figure it out.
I rebuilt the Stealth transmission which was probably the easiest.
I think I may repaint the motor mount to make it look pretty.
I hate turnbuckles and ball studs. My fingers are killing me. I had used ones and I bought new ones. I'm going to attempt to put the new ones together again but I despise them.
I got the battery cup off the suggested method. I think I may have the battery going across the chassis and not the original way. Not sure yet.
I have to start thinking about a power system. I have a radio and I am going to try the Hobby King Spektrum compatible RX. Only $9 so if it sucks oh well, I'll get he real one.
Any suggestions on a motor/ESC combo that's not going to break the bank?
I still need to find compatible batteries (mine do not fit Turnigy Nano-tech hardcase) so I still have some money to dish out.
Here it is so far.
Re: RC10 Newbitz build thread
Posted: Thu Oct 10, 2013 8:42 pm
by knucklebuster
Looks good. Try a Sharpie to hide scratches and replicate anodize

Re: RC10 Newbitz build thread
Posted: Thu Oct 10, 2013 9:44 pm
by surgetek
Yeah I think I'm going hold off on the painting.
I'm going to put the stock shocks on. I am not liking how these are on it.
Re: RC10 Newbitz build thread
Posted: Fri Oct 11, 2013 1:04 am
by REMJ666
Is that still some of the battery cup left ???? It is cleaning up well...
Re: RC10 Newbitz build thread
Posted: Fri Oct 11, 2013 4:21 pm
by surgetek
That was just some left over tape. That came off no problem with no left over residue.
I have to go buy a new grieve gear for the Stealth. The threads are trashed. The nut that was on it when I got it is the only one that would go over the threads, however it's gone.
Re: RC10 Newbitz build thread
Posted: Fri Oct 11, 2013 4:32 pm
by GoMachV
The stealth uses a 5-40 locknut not a 4-40 like the rest of the car (ok besides alum front axles)
Make sure if you buy a new drive gear you buy the locknut as well. You can get it with the spring too, new spring is never a bad idea
Re: RC10 Newbitz build thread
Posted: Fri Oct 11, 2013 5:46 pm
by REMJ666
Just noticed the RPM gearbox...That is a nice piece to have...
Re: RC10 Newbitz build thread
Posted: Fri Oct 11, 2013 6:45 pm
by surgetek
Yeah the 5-40 nuts are on my list. I'll grab a spring too.
Yeah he had a lot of RPM stuff on these.
Re: RC10 Newbitz build thread
Posted: Wed Oct 16, 2013 11:30 pm
by REMJ666
Any more progress ????
Re: RC10 Newbitz build thread
Posted: Thu Oct 17, 2013 9:52 am
by surgetek
Haha yeah there's been some as of last night.
I have been hunting down some small parts (nylon nuts, spacers, new drive gear, screws, etc). As of today I will have everything I need, I think, to get going again.
My friend who I have to go through for everything I do RC

said I should take the Kyosho shocks off and go with the originals. So last night I did that and he was right, they do look better. They're not super pretty but the move so much easier.
I have to decide if I am going to move the battery cup placement or if I am going to buy batteries that fit it where it belongs.
I also got all the wheels off of the rims and cleaned those up. Couple nice sets of beadlocks that will be on the front and I'll get some of the original ones for the rear.
I'll get some picture up tonight after I get it together.