Cougar 2 Team_Rebuild for racing
-
Groomi

- Approved Member
- Posts: 256
- Joined: Thu Aug 23, 2012 6:11 pm
- Location: Kent, UK
- Has thanked: 1 time
- Been thanked: 2 times
-
Groomi
- Approved Member
- Posts: 256
- Joined: Thu Aug 23, 2012 6:11 pm
- Location: Kent, UK
- Has thanked: 1 time
- Been thanked: 2 times
Re: Cougar 2 Team_Rebuild for racing
I made some more progress last night, stripping down and cleaning an old set of varishocks. I chose to use the dark purple bodied ones from a mint Bosscat Sport I bought of ebay a few weeks ago as they would have less wear. My mate kindly dropped by to lend me some alloy shock bottoms so they were rebuilt and will hopefully run sweetly now. I used 30w oil in the rear and 35w in the front, both with 2 holes. We'll see how that fares to start with.

I also fitted the suspension upper links using brand new ball cups. These joints are all really tight like new, so I will have to put some miles on them to get them loosened. I also fitted the driveshafts while I was at it - again, good and tight.

Finally, I managed to squeeze an early morning tea break in today and fit the rear shocks, so the rear suspension is now complete.

One minor issue I have found which needs to be corrected is that I ignored the manuals instruction to fit the horizontal bolts which hold the rear suspension to the chassis in opposite directions. My OCD simply will not allow something like that to be asymetric. Well, I can see now that the nut just fouls the transmission - not enough to cause any misalignment but probably not a good idea to be transmitting virations like that. So this will need to be swapped around with the nut on the outside (on both sides to keep my happy).
Another disaster was running out of shiny new nylocs. More will be ordered and any old ones used swapped over in due course.
Also a new Penguin shell and wing arrived this morning, although I won't rush to get it ready for the first race. I'll fit an old one so it doesn't matter if it gets trashed.
I also fitted the suspension upper links using brand new ball cups. These joints are all really tight like new, so I will have to put some miles on them to get them loosened. I also fitted the driveshafts while I was at it - again, good and tight.
Finally, I managed to squeeze an early morning tea break in today and fit the rear shocks, so the rear suspension is now complete.
One minor issue I have found which needs to be corrected is that I ignored the manuals instruction to fit the horizontal bolts which hold the rear suspension to the chassis in opposite directions. My OCD simply will not allow something like that to be asymetric. Well, I can see now that the nut just fouls the transmission - not enough to cause any misalignment but probably not a good idea to be transmitting virations like that. So this will need to be swapped around with the nut on the outside (on both sides to keep my happy).
Another disaster was running out of shiny new nylocs. More will be ordered and any old ones used swapped over in due course.
Also a new Penguin shell and wing arrived this morning, although I won't rush to get it ready for the first race. I'll fit an old one so it doesn't matter if it gets trashed.
-
Bormac

- Approved Member
- Posts: 3113
- Joined: Wed Sep 05, 2007 3:52 pm
- Location: CENTRAL COAST, NSW AUSTRALIA
- Has thanked: 20 times
- Been thanked: 11 times
Re: Cougar 2 Team_Rebuild for racing
What a great start on what will certainly be a fantastic old Schuey racer. I'm a huge fan of the Cougar2 and have thoroughly enjoyed driving and racing mine over the years.
Be sure to pay close attention to the diff centre bolt/thrust bearing assembly. The manual doesn't show 'conical washers' but rest assured you will need them! I found out the hard way and found the diff would heat up so much it would melt the diff out drives which then gives way and makes the diff too loose and ultimately won't drive.
God knows why my manual had no mention of said conical (spring) washers, but you absolutely do need them.
-
Groomi
- Approved Member
- Posts: 256
- Joined: Thu Aug 23, 2012 6:11 pm
- Location: Kent, UK
- Has thanked: 1 time
- Been thanked: 2 times
Re: Cougar 2 Team_Rebuild for racing
Yep, I paid heed to earlier advice and fitted them. Need some more for other cars though, but don't know where to get them from. Any ideas?
Re: Cougar 2 Team_Rebuild for racing
They're still in stock on Schumachers website. Just search for U857Groomi wrote:Yep, I paid heed to earlier advice and fitted them. Need some more for other cars though, but don't know where to get them from. Any ideas?
Paul.
-
REMJ666
- Approved Member
- Posts: 802
- Joined: Tue Nov 08, 2011 9:43 am
- Location: Mount Airy , Maryland
- Been thanked: 1 time
Re: Cougar 2 Team_Rebuild for racing
Nice car...
Late Edinger Gold Pan # 6010 .....Vintage Blackfoot....Electrix Circuit Stadium Truck ....Kyosho Ultima Pro XL
-
Groomi
- Approved Member
- Posts: 256
- Joined: Thu Aug 23, 2012 6:11 pm
- Location: Kent, UK
- Has thanked: 1 time
- Been thanked: 2 times
Re: Cougar 2 Team_Rebuild for racing
Ah ha - thank you! I was just looking for the washers, didn't think to look for a kit.CAT3K wrote:They're still in stock on Schumachers website. Just search for U857Comes as a kit along with the screw, nut and cover.
Paul.
-
Groomi
- Approved Member
- Posts: 256
- Joined: Thu Aug 23, 2012 6:11 pm
- Location: Kent, UK
- Has thanked: 1 time
- Been thanked: 2 times
Re: Cougar 2 Team_Rebuild for racing
Excellent service from http://www.modelfixings.co.uk once again, my order of nyloc nuts and a few assorted HT allen screws arrived this morning with normal postage.
Just need to finish some work this afternoon and then I can crack on again.
Just need to finish some work this afternoon and then I can crack on again.
-
Groomi
- Approved Member
- Posts: 256
- Joined: Thu Aug 23, 2012 6:11 pm
- Location: Kent, UK
- Has thanked: 1 time
- Been thanked: 2 times
Re: Cougar 2 Team_Rebuild for racing
A question for anyone who has run C1 front arms with a C2 front shock tower: Did you find that you needed to run a long piston rod, rather than the standard medium? It's hard to tell without any wheels on, but I'm not sure I have enough range to swap positions on the shock tower and maintain a suitable ride height.
-
Groomi
- Approved Member
- Posts: 256
- Joined: Thu Aug 23, 2012 6:11 pm
- Location: Kent, UK
- Has thanked: 1 time
- Been thanked: 2 times
Re: Cougar 2 Team_Rebuild for racing
Update time!
Well done to those Cougar experts out there who obviously spotted I had fitted ball sockets to the front shocks even though I was intending to use C1 arms! I realised as soon as I went to fit them, so then commenced an immense amount of faffing around as I tried to find a way to seat the springs when using the narrower diameter rose joints. Unfortunately I don't have the correct spacers, but managed to make some temporary ones up from nylon servo-saver parts. However, these are costing about 7mm of suspension travel so I need to sort this out before the race.

Next job was to fit to the ballraced steering. There's a bit of slack in the mechanism which meant it dragged on the front bulkhead, so I added a washer underneath each side of the mechanism to space it out a bit. I will be making another steering linkage shortly to replace this one.

The Cat SX3 wing mounts were refitted and the bolts holding the rear of the suspension arm to the chassis have been turned around to avoid fouling the transmission assembly as previously mentioned.

All I need now are some wheels and I'll have a rolling chassis!

I hope to have it running on the bench by the end of the weekend - hopefully even a shakedown run in a carpark if I have time. The electrics install won't be straighforward as it is all new equipment to me and a couple of connectors need modifying.
Well done to those Cougar experts out there who obviously spotted I had fitted ball sockets to the front shocks even though I was intending to use C1 arms!
Next job was to fit to the ballraced steering. There's a bit of slack in the mechanism which meant it dragged on the front bulkhead, so I added a washer underneath each side of the mechanism to space it out a bit. I will be making another steering linkage shortly to replace this one.
The Cat SX3 wing mounts were refitted and the bolts holding the rear of the suspension arm to the chassis have been turned around to avoid fouling the transmission assembly as previously mentioned.
All I need now are some wheels and I'll have a rolling chassis!
I hope to have it running on the bench by the end of the weekend - hopefully even a shakedown run in a carpark if I have time. The electrics install won't be straighforward as it is all new equipment to me and a couple of connectors need modifying.
-
Bormac
- Approved Member
- Posts: 3113
- Joined: Wed Sep 05, 2007 3:52 pm
- Location: CENTRAL COAST, NSW AUSTRALIA
- Has thanked: 20 times
- Been thanked: 11 times
Re: Cougar 2 Team_Rebuild for racing
Definately go for 'JC Racing' 5 spoke 2.2" rims. They look as though they were designed specificaly for these cars.
-
Groomi
- Approved Member
- Posts: 256
- Joined: Thu Aug 23, 2012 6:11 pm
- Location: Kent, UK
- Has thanked: 1 time
- Been thanked: 2 times
Re: Cougar 2 Team_Rebuild for racing
Yeah, already have them on order and a set of dishes for my Bosscat. I actually prefer the dishes but they don't do 2wd fronts. 
-
Groomi
- Approved Member
- Posts: 256
- Joined: Thu Aug 23, 2012 6:11 pm
- Location: Kent, UK
- Has thanked: 1 time
- Been thanked: 2 times
-
Bormac
- Approved Member
- Posts: 3113
- Joined: Wed Sep 05, 2007 3:52 pm
- Location: CENTRAL COAST, NSW AUSTRALIA
- Has thanked: 20 times
- Been thanked: 11 times
Re: Cougar 2 Team_Rebuild for racing
The original 2.2 aero discs are a little fragile. Ok, more than a little fragile plus they aren't easy to come by in new or very good condition. The 2WD and 4WD fronts are the same width. This is kinda handy as modern 2WD front tyres are a great fit on this medium width front rim.
The JC's have served me well and while they are not impervious to damage I have done well using them at all the vintage meets I have raced in.
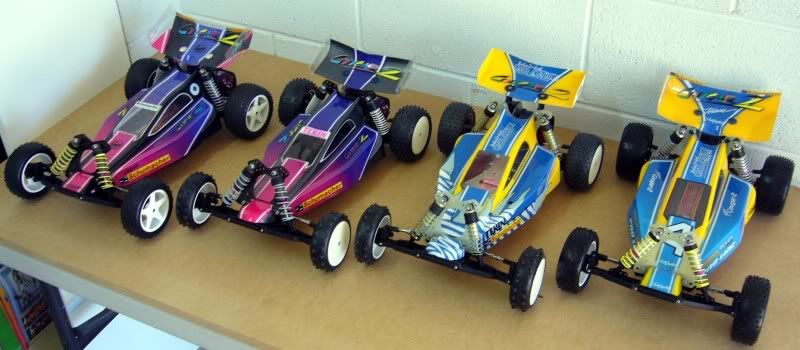
Thanks also for your compliments on my cars. I've owned many Schueys but glad to still have the 4 Cougar2 's I have pictured.
The JC's have served me well and while they are not impervious to damage I have done well using them at all the vintage meets I have raced in.
Thanks also for your compliments on my cars. I've owned many Schueys but glad to still have the 4 Cougar2 's I have pictured.
-
Groomi
- Approved Member
- Posts: 256
- Joined: Thu Aug 23, 2012 6:11 pm
- Location: Kent, UK
- Has thanked: 1 time
- Been thanked: 2 times
Re: Cougar 2 Team_Rebuild for racing
Tonight's update includes a sneak peak into the murky world of my workshop (desk when I should be working)...
I've spent a couple of evenings trying to finalise the electrical installation. Starting with the servo, I wanted to position it as best as I could be in line with the movement of the steering system. The chassis is in pretty good condition and only has two holes drilled into it (unfortunately in completely the wrong place for my preferences) and I didn't want to add any more holes. So I decided to make an upper chassis plate to mount the servo to - this would have the advantage of allowing me future flexibility when other elements of the car are changed (I have future plans for the whole front-end). It would also allow the top of the steering pivot screws to be braced - useful as they naturally measure 3mm closer together at the top than where they pass through the chassis...
So first up I made a template from an old storage crate lid (I think it's polyethene). This material has the advantage of being hard enough to drill accurately, but soft enough to quickly cut with a stanley knife.

After a bit of adjusting and tweaking, I re-measured and drew the final design up in AutoCAD and printed off at 1:1 scale. This was then stuck to the broken lower chassis deck of my old XLS race car. This enabled me to easily drill the holes accurately and cut out the shape with a fret saw.

The servo was then mounted to the upper chassis plate and mounted to the main chassis between the steering pivots and the battery mount. This is rock solid, rigid and a really good brace for the steering.

The shape of the cut-out was carefully measured to clear the steering system movement and to provide neat cable routing away from the servo movement.

A gratuitous close-up shot because I'm really pleased how this turned out - my first attempt at making something from GRP sheet!

So overall, the servo and ESC are both mounted evenly upfront to maintain a good weight distribution.

More info on how I made the upper chassis plate can be found on my Facebook page.
Battery charging tonight, then tomorrow will involve swapping the battery connector to the ESC for a Deans connector and firing her up.
I've spent a couple of evenings trying to finalise the electrical installation. Starting with the servo, I wanted to position it as best as I could be in line with the movement of the steering system. The chassis is in pretty good condition and only has two holes drilled into it (unfortunately in completely the wrong place for my preferences) and I didn't want to add any more holes. So I decided to make an upper chassis plate to mount the servo to - this would have the advantage of allowing me future flexibility when other elements of the car are changed (I have future plans for the whole front-end). It would also allow the top of the steering pivot screws to be braced - useful as they naturally measure 3mm closer together at the top than where they pass through the chassis...
So first up I made a template from an old storage crate lid (I think it's polyethene). This material has the advantage of being hard enough to drill accurately, but soft enough to quickly cut with a stanley knife.
After a bit of adjusting and tweaking, I re-measured and drew the final design up in AutoCAD and printed off at 1:1 scale. This was then stuck to the broken lower chassis deck of my old XLS race car. This enabled me to easily drill the holes accurately and cut out the shape with a fret saw.
The servo was then mounted to the upper chassis plate and mounted to the main chassis between the steering pivots and the battery mount. This is rock solid, rigid and a really good brace for the steering.
The shape of the cut-out was carefully measured to clear the steering system movement and to provide neat cable routing away from the servo movement.
A gratuitous close-up shot because I'm really pleased how this turned out - my first attempt at making something from GRP sheet!
So overall, the servo and ESC are both mounted evenly upfront to maintain a good weight distribution.
More info on how I made the upper chassis plate can be found on my Facebook page.
Battery charging tonight, then tomorrow will involve swapping the battery connector to the ESC for a Deans connector and firing her up.
Create an account or sign in to join the discussion
You need to be a member in order to post a reply
Create an account
Not a member? register to join our community
Members can start their own topics & subscribe to topics
It’s free and only takes a minute
Sign in
-
- Similar Topics
- Replies
- Views
- Last post
-
- 8 Replies
- 4048 Views
-
Last post by naushad
-
- 5 Replies
- 1735 Views
-
Last post by moozo
-
- 87 Replies
- 19638 Views
-
Last post by fredswain
-
- 3 Replies
- 1171 Views
-
Last post by Asso_man!
-
- 37 Replies
- 4480 Views
-
Last post by RichieRich
-
- 1 Replies
- 1010 Views
-
Last post by Bormac
-
- 17 Replies
- 3366 Views
-
Last post by Bormac
-
- 8 Replies
- 1580 Views
-
Last post by Retro rc
Who is online
Users browsing this forum: No registered users and 6 guests