Polished the gloss layer from Coarse, to Fine, and then Finish with the Tamiya polish compounds.
Struggling to come to terms with the problems in the paint job. Need to decide to fix the flaws - which won't be short or easy to do, or leave the 'character'.
The line I putty'd on the nose, chipped and cracked a bit when mounting it to the chassis
Blue bleed over the front passenger fender.
Going to start cutting the decals and think about it for a while more.
Re: Tamiya Sand Scorcher - 2010 Reissue
Posted: Wed Oct 30, 2024 12:45 am
by XLR8
The Scorcher body looks great! The color really pops.
I reckon you've found some tiny blemishes because you've examined every square millimeter while you were polishing it. I bet if you sticker it and finish the build, after time you won't even notice those tiny imperfections.
I'm writing from experience. My Scorcher has lots of flaws in the paint but it's been a couple years now and I've all but forgotten where most of them are.
Re: Tamiya Sand Scorcher - 2010 Reissue
Posted: Wed Oct 30, 2024 2:40 am
by Dangeruss
Wow, yeah... haven't we all been there, being aware of every tiny blemish.
Thought I'd help you out and have a little fun stickering the car for you... the front nose and rear fender decals were hard to get wrapped around the curves.
I also moved your scissors... but I don't remember where I put them... sorry about that.
Re: Tamiya Sand Scorcher - 2010 Reissue
Posted: Wed Oct 30, 2024 4:23 pm
by GreenBar0n
Thanks for the encouragement, guys!
If I try to fix those errors now, I'm likely to ruin an adjacent area in the process, and go in circles like I did with the Tyrrell P-34 model. Going to leave it alone and use that as a reminder of how to mask better in the future.
I'll always use the Tamiya curve tape to seal the edges of a masking line in the future, and then build the yellow masking tape on top of the curve tape, no exceptions for me, it's the only way I can keep the edges from bleeding or overspray.
@Dangeruss you added the www.tamiya.com stickers, the Caution one, no sunroof Auto Haus, and then went and hid my favorite special Tamiya tiny decal scissors, that I had to learn to cut right handed with (quasi-lefty).
Re: Tamiya Sand Scorcher - 2010 Reissue
Posted: Thu Oct 31, 2024 4:25 am
by Dangeruss
Hmm... I'm sensing... you're upset about something.
Good news is I found your scissors. Put them under the Sand Scorcher for you.
Bad news is I rubbed through the paint while trying to get decal adhesive off the rear fender... man, you were right... try to fix a mistake and ruin the area in the process.
Re: Tamiya Sand Scorcher - 2010 Reissue
Posted: Thu Oct 31, 2024 6:20 pm
by GreenBar0n
Sabotage!
Those new Tamiya royalty free decals are the worst, I have to buy the MCI decals in order to not ruin the vintage model theme, or even look at those generics.
Re: Tamiya Sand Scorcher - 2010 Reissue
Posted: Fri Nov 01, 2024 12:09 am
by Dangeruss
Whaaa??... You're disturbed... It wasn't me
Really wanted to put that Forward Automotive Products sticker on door but the body was covering it.
Definitely, reproduction decals would be far better than Tamiya's new versions. Car is looking good though, will be sweet when it's all done.
Re: Tamiya Sand Scorcher - 2010 Reissue
Posted: Sat Nov 02, 2024 10:04 pm
by GreenBar0n
Great cover of a crap song .
I was going to post a song from Gaslight Anthem, seeing how it wasn't you that did that to my workbench.
Got all the box art decals rough cut, there really aren't that many.
Lots of good ones leftover that will find their way on to something.
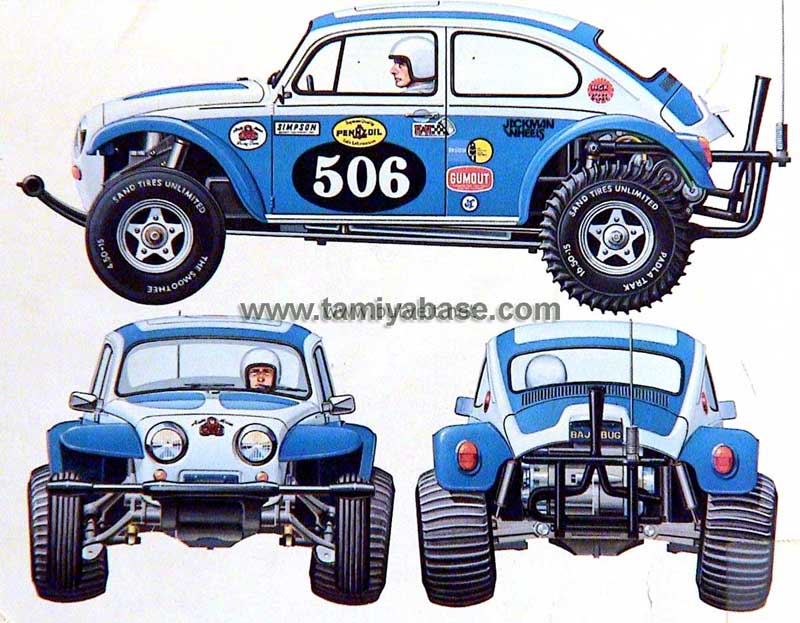
Vintage Sand Scorcher box art, this will be the template.
Re: Tamiya Sand Scorcher - 2010 Reissue
Posted: Tue Nov 05, 2024 6:55 pm
by GreenBar0n
Made it through the decal trimming. Looks like I missed the small round decal under the Gumout, and cut some decals that don't belong on the Sand Scorcher (will put those on the Rough Rider).
Going to try using that angled tip Sharpie, to draw in the window seals around the frames. I've heard that's a convincing and quick way to get it done, without paint problems.
If the marker looks too thin, or fake, I'll run Tamiya Curve tape on every window frame, and then brush paint the seals in flat black.
I want to add the decals now, but I need to take care of the seals first, if I mess those up, and have to paint something over, or again, it would be easier without the decals and glued on body details.
Sharpie is next.
Re: Tamiya Sand Scorcher - 2010 Reissue
Posted: Tue Nov 05, 2024 7:28 pm
by GreenBar0n
The Sharpie looks pretty good, it's not flat black, but it does look like rubber.
Going to finish as much as I can with the pen, and then see if it requires paint.
Re: Tamiya Sand Scorcher - 2010 Reissue
Posted: Tue Nov 05, 2024 8:57 pm
by XLR8
GreenBar0n wrote: ↑Tue Nov 05, 2024 7:28 pm
The Sharpie looks pretty good, it's not flat black, but it does look like rubber.
Going to finish as much as I can with the pen, and then see if it requires paint.
Yes, I agree; the Sharpie looks convincing.
FWIW, I use water-based craft paint for detailing. WHEN I mess up, the paint cleans up with a damp Q-tip.
It's cheap too - like me.
Re: Tamiya Sand Scorcher - 2010 Reissue
Posted: Tue Nov 05, 2024 9:34 pm
by GreenBar0n
XLR8 wrote: ↑Tue Nov 05, 2024 8:57 pm
Yes, I agree; the Sharpie looks convincing.
FWIW, I use water-based craft paint for detailing. WHEN I mess up, the paint cleans up with a damp Q-tip.
It's cheap too - like me.
That's a great idea!
My shelf is really dusty here, I need all my paints to be as permanent as possible, as I have to wash things in the sink to get all the carpet fuzz and dust off.
But I found that the Sharpie ink does come off with 99% IPA, all my Sharpie mistakes wiped away, which is a really good thing, because a couple of times trying to be extra careful, I scribbled way past the boundary
I'm using the Chisel Tip Sharpie, not sure why I called it an angled.
Painted the door handles X-18 Chrome.
What's nice is the Sharpie window seals came out nearly invisible, the seals can be seen, but they don't stand out like the box art seals do.
If I had done this in paint, I'd still be trying to clean up the horrible job on the first window I painted. The Chisel Tip Sharpie just saved me a couple days of chasing mistakes, and ruining other areas trying to fix them. Will wait until tomorrow, and possibly go over the windows again, to make the seals more obvious, but with the same tight and even lines.
Re: Tamiya Sand Scorcher - 2010 Reissue
Posted: Sat Nov 16, 2024 5:48 pm
by GreenBar0n
Got all of the trim pieces glued on today.
The tail lights are difficult to paint correctly, red on top, orange in the middle, and white at the bottom. I've already messed this up a couple times on the Blitzer Beetle, going to go back and do it right, if I can finally get it to work here.
Painted the wipers aluminum, and then used the Sharpie Chisel Tip marker to make the blades, hard to see.
Going to leave the running boards white.
Will finish the tail lights, and get the decals placed.
Re: Tamiya Sand Scorcher - 2010 Reissue
Posted: Mon Nov 25, 2024 5:33 pm
by GreenBar0n
After looking through all the vintage boxart, I can't find any pics of the passenger side.
I've found others interpretations of what the passenger side looked like, but the K&N decal under the door handle is directional, it won't work as well on the passenger side.
Got the driver side and top done, need to figure out the passenger side.
The Gumout decal is pretty large compared to the boxart, makes it tough to fit all that in there.
Re: Tamiya Sand Scorcher - 2010 Reissue
Posted: Mon Nov 25, 2024 7:35 pm
by XLR8
Your post got me curious so I went back and had another peek at my Scorcher.
It looks like I've just mirrored the decal placement from driver side to passenger side.
Not sure where I got those smaller Gumout stickers.
Anyway, lacking any official right side boxart illustrations, we're on our own here. So, you can't do it wrong.