RC10 Graphite rebuild - the doom buggy rides again

General discussion, builds/restorations, etc...

Moderators: scr8p, klavy69

Post Reply
User avatar
Tucsonan
Regular Member
Posts: 9
Joined: Tue Jun 11, 2024 3:26 am
Location: Tucson AZ
Has thanked: 14 times
Been thanked: 18 times

RC10 Graphite rebuild - the doom buggy rides again

Post by Tucsonan »

Since no thread is any good without pictures I'll start this one off with a picture and a story. Along the way I'll do a little RC archaeology as I dig through old track bags and parts boxes.

These are the doom buggies. Well, one doom buggy and the bodies off the other. My RC10 graphite is already in pieces on the bench but the pictures explain the title.
well, one buggy and two additional bodies
Inspired by the Motorhead "Rock 'N' Roll" album cover
I have no idea what made me think of hunting for my old RC cars in my mom's garage, maybe something on youtube triggered a memory. Anyhow I found them, The Graphite, a JRX-Pro and an RC10L road car all neatly packed up in a box along with the original factory boxes, a track bag full of parts and tires, dried CA and leaky oil bottles. I had bought the RC10 new in 1989 or early 1990 when the graphite chassis RC10 was the new hotness from Associated. I ran it regularly at the old RCHR track in Costa Mesa CA, and in any dirt lot, park or cul-de-sac I could find.

A friend of mine free hand painted the motorhead themed body (the second by him, the first was damaged from heavy used and eventually tossed out). I painted the ghoul image on the JRX-Pro.

I added a stealth transmission, long front shock towers and some Andy's rear arms. My initially poor driving and constantly treating it as a dirt lot basher eventually caused minor delamination of the leading edge of the carbon fiber chassis. Nothing near the screw holes, just cosmetic damage at the edge, so I bought a little kydex bumper. That worked well, until it didn't:

thin kydex not so great for bumpers
Eventually I bought a second graphite chassis plate and installed a white Andy's front bumper to protect it. I kept the old plate as a backup but I can't imagine what it would take to do enough damage that I'd need it.

Anyhow, after a bit of fiddling with radio crystals and an old AstroFlight ni-cad charger I got the car running and ran it around in the street on some old slick tires. The car had spent 30+ years in boxes stuffed in hot grages, closets and various torage units. The batteries are probably vintage 1991 or 92 and the tires about the same, but they worked. The car ran. I realize this was not the wisest of moves. The bearings hadn't been serviced in 30 years nor had the shocks, they still had oil in them though.

I packed everything up and took it home and decided to do the right thing and rebuild the shocks and clean and oil the bearings. While I was at it I also dissasembled the Stealth transmission dealt with those bearings then cleaned and greased the diff and both thrust bearings.

Here are a few pics from the initial cleaning:

The buggy itself
How it started
How it started
The 1st gen stealth transmission
a bit dusty
a bit dusty
The front links. I have no idea what brand those are. The factory ball cups were getting worn out. Some were really loose and others were binding so I bought these.
It seemed like a good idea at the time
If anyone recognizes those please let me know what they are.

The transmission was a bit dirty inside. That's not grit in the photo, just dirty black grease. Maybe from the thrust bearing? I don't know. Anyhow it got cleaned and reassembled.
do you know what happens if you lose one of those tiny balls
Here is the slipper clutch assembly:
those disks are hard to find
Anyhow after cleaning bearings, refilling the shocks, which were still pretty full, and reassembling the care I took it out for a few batteries worth of fun in the parking lot. Sadly no pics or video, All I took were bench photos. I will get some in the near future though.
yeah those are tamiya connectors
A bit about those tires. I have no idea what brand they are, but they are very soft and sticky. Age and heat have not hurt them at all. I also have a set of extra wide fronts that are made to overhang the fron rim, but the compound is different and very slick. I took them off because I got vastly better from traction with the skinnies.

Anyhow, turns out I likely never glued those tires up or at least didn't do a good job. on my last run after jumping some speed bumps and doing some power on spins the outer bead of one tire jumped off the rim causing the tire to fold over on the inside of the rim. I couldn't see it from where I was driving and hit the throttle. The car moved but the rim spun in the tire chewing up the inner sidewall
Ouchie!  Glue your tires dude
Ouchie! Glue your tires dude
Since those were my only pair of street tires I can't drive it around the apartment parking lot. While the car is out of commission I decided to try my hand at peroxide bleahing some of the old spare parts in my box. It turns out Arizona sunshine in June is fantastic for quickly lightening nylon parts. Who knew?

I had great success bleaching some old front arms I'd replaced so I decided to do all the suspension pieces. Then I thought, heck do everything and I pulled the transmission out again. At that point the car was in pieces and I decided it needed a total makeover. Lots more details in my next post.

User avatar
Frankentruck
Super Member
Posts: 2696
Joined: Fri Feb 19, 2021 9:59 am
Location: Texas, USA
Has thanked: 1644 times
Been thanked: 1872 times

Re: RC10 Graphite rebuild - the doom buggy rides again

Post by Frankentruck »

Nice buggy! The ball links are Dubro links.
Frankensteined RC10T3 / Franky Jr RC10GT-e (x2) / A+ stamp / Toy Story RC / Graphite replica / B1.5 BFG 5LTi / Clonewald / Hyper Hornet

"I love the effort, but it sure looks like you took the long way around to a tub again"

User avatar
jcwrks
Approved Member
Posts: 551
Joined: Wed Jun 21, 2017 3:40 pm
Location: San Angelo, TX
Has thanked: 127 times
Been thanked: 266 times

Re: RC10 Graphite rebuild - the doom buggy rides again

Post by jcwrks »

The rod ends were offered by Tecnacraft, JG, Parma, and a few others.
The TX SKUNK

User avatar
Tucsonan
Regular Member
Posts: 9
Joined: Tue Jun 11, 2024 3:26 am
Location: Tucson AZ
Has thanked: 14 times
Been thanked: 18 times

Re: RC10 Graphite rebuild - the doom buggy rides again

Post by Tucsonan »

Sunday night, my weekend is done. Time for another update.

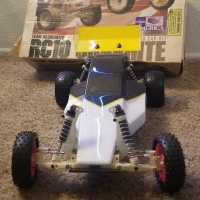
I'll break this up logically into a couple of posts so that it is easier to follow and multiple topics don't get jumbled together. First a follow up to last week's post then maybe that promised digression into some RC Archaeology (What's in the box?)

How it started:
Gee those peroxide bleached spares sure look nifty, maybe I should bleach the whole car.
This is the bleached arm, vs an unbleached arm. The other parts never saw sunlight and were still fresh looking from my parts box (more on that later in archaeology)
Bleached arm, unbleached arm and fresh parts that never saw sunlight
How it's going:
That's a lotta parts
At first I was only going to bleach the suspension bits but gave in and decided to do the stealth and everything else too. The fact that the ball diff comes out as a unit and isn't dissasembled made that decision easy.

As an experiment I split the parts into two sets, one half to be bleached in the sun and the other to be bleached in an immersion circulator (Anova Sous Vide) at 140F. Note: all parts and peroxide were in ziplock baggies. I did NOT fill the circulator with hydrogen peroxide, just water. Peroxide in the circulator would be bad
Is it soup yet?
Is it soup yet?
After maybe 3 hours here is the difference between Arizona sun in early June and the hot bath. AZ sun for the win
Sun for the win
Sun for the win
Side note: Stop bleaching your parts in glass jars. Use flat zipper bags placed on foil shiny side up. Glass blocks the majority of UVB rays allowing only UVA to penetrate. Also jars hold too much peroxide. With the amount of UV available the concentration of decomposing H2O2 in the jar is much lower than in the flat, high surface area low volume bag. It is the decomposition of peroxide into water and oxygen that bleaches your parts. The lower the concetration of oxygen from decomposition the slower the process. I'm bleaching stuff in ~6 hours. If you live in a norther latitude it will take longer so give yourself every advantage. And buy a fresh bottle whenever you're going to bleach parts. It's a $1.49 for a liter. That stuff that's been under the cabinet for 7 years is probably half decomposed already.

After seeing the difference I moved all the sous vide parts out to the sun so everything would finish up quicker. Total time was maybe 6 hours.
freshly bleached
freshly bleached
The 5 parts on the far right are HPI wheels and Andy's arms and bumper. They were bright white to begin with and iddn't seem to change much if at all with the peroxide treatment. They did come out cleaner though.

While the barts were baking I gave the old CF chassis some much needed attention. Most of that damage is old but I'm sure I added some skipping it off of a few speed bumps.
Took a beating
Took a beating
Yes, I did cut holes in the protective sheet to access the screws. For all the abuse my cars took I was actually pretty serious about basic maintenace and tore down the car frequently to do maintenance and cleaning. I also replaced the front arms at some point. I have no idea why as the old arms were in perfect condition. The only thing I can think of is a saw a package that said RC10 LONG front arms and bought them without realizing they were what I already had.


Cleaned off underside. Little marks and lines are residual adheasive from the thick protective sheet.
Great condition for an antique
And the top side
ready for re-assembly
You'll notice this chassis has countersunk holes for the Stealth transmission. As I noted in my previous post this is the second chassis plate for this car. I bought it because the first plate was starting to delaminate at the leading edge from hard use. That plate does not have countersunk holes. I believe it came with no holes at all. The Stealth tranny came with a bolt on drill guide plate so you could drill your own chassis and I think that is what I did, but I never took the extra step of countersinking them.

Anyhow, I decided that those black oxide turnbuckles and old aftermarket ball ends needed to go and that my shocks needed a rebuild. Sadly I only had one rebuild kit in my old box and that'll only rebuild two shocks. I searched in vain for rebuild kits and for the proper o-rings but had no luck. I decided to buy some modern repro hard anodized gray shocks. I'd always intended to replace the goldies with the newer style worlds shocks but retired the car before getting around to it.

I did later find that associated still sells the red o-rings and even carries the black FT springs that fit the RC10 rear shocks, but by that point I'd already pulled the trigger on a new set of FANRC shocks. It turns out that the local stocking dealer for FANRC was only 97 miles away in Chandler AZ (Hobby Action Raceway) so I made the drive last weekend and brought back a haul. In restrospect, I should have just ordered the parts online, shipping is cheaper than gas, especially in a 4x4 F150, but Hobby Action is a bit of an RC Mecca and I wanted to see it for myself.
are we doing a refresh or building a repro here?
[*]Two sets of 1.32" shocks (I run long shocks on truck towers up front)
[*]Titanium turnbuckles because rusty black oxide steel turnbuckles needed to go
[*]Ball cups for the turnbuckles (really nice, the feel crisper and sharper than the orginals but look period correct)
[*]Teardrop wing buttons because I lost the originals. Black because black. You'll see.
[*]Viper body because I like it better than the Any's bodies I was running and wanted to do something new, clean and classic
[*]A battery box so I don't feel guilty about hacking up a vintage box to fit NiMH batteries. I did force a NiMH pack into my old batter box but it really didn't fit and really stresses the box (I had to remove both battery end covers to make it fit at all)
[*]1.5mm Longer CVD axles. This was a bit of a mistake. The worlds style axles take a smaller diameter bearing and require shims and blue spacers. The bearings might not even fit my hub carriers, in which case I'll need to buy the new 0 degree worlds style hub carriers too. The Grphite came with 1.5 degree toe in hub carriers and 1.5 degree rear arm mounts for a totla of 3 degrees per side.

Reassembly was delayed again when I found that I no longer had a complete set of 4-40 ball ends.
maybe one ball short
I ordered some online but they turned out to be M3, not 4-40. This still worked out okay in the end. M3 is ~5 or 6 thousnadths thicker than 4-40 which will work in Nylon, but I don't know that I'd want to do that anywhere I might switch back to 4-40 later. The threads in 4-40 might not bite firmly after gollowing an M3 screw. My solution was to use the M3 ends in the Houge bellcranks. That gave me enough of the correct length 4-40s to do the rest of the chassis and I will just leave the bellcranks M3 forever. Note that FANRC does sell 4-40 ball studs but Hobby Action was out of stock and I orderd the M3 impulsively.

Looks like I'm out of upload space for this post so next time I'll cover reassembly, the minor disasters I had along the way, various things I tried with mixed success and maybe a pic of the finished viper body.
Will post again soon.

User avatar
juicedcoupe
Super Member
Posts: 3015
Joined: Sun Aug 16, 2020 4:05 pm
Location: Pascagoula, MS
Has thanked: 235 times
Been thanked: 1763 times

Re: RC10 Graphite rebuild - the doom buggy rides again

Post by juicedcoupe »

Custom Works ball studs are also 4-40.
Always looking for new and interesting ways to waste money.

User avatar
TRX-1-3
Super Member
Posts: 1769
Joined: Sat Mar 29, 2014 12:13 pm
Location: USAG Humphreys, South Korea
Has thanked: 1428 times
Been thanked: 781 times

Re: RC10 Graphite rebuild - the doom buggy rides again

Post by TRX-1-3 »

That chassis cleanup looks great. Looks like you're having a good time with it all. And don't fret, there are plenty of impulsive shoppers here.
Hope you're doin' something fun.

User avatar
Tucsonan
Regular Member
Posts: 9
Joined: Tue Jun 11, 2024 3:26 am
Location: Tucson AZ
Has thanked: 14 times
Been thanked: 18 times

Re: RC10 Graphite rebuild - the doom buggy rides again

Post by Tucsonan »

I've got a little window of spare time so it's time fo another update.

While I was waiting for the M3 ball studs to come in and perserverating over it I tried to borrow/steal/gank the ball studs from the servo saver in my RC10L onroad car. Like most impromptu auto burglaries this did not go to plan and nobody was better off for it.
Oops!
Oops!
I tried to pry the ball cup off the ball and its grip was stronger than the servo saver.
It was an utter waste. Those were titanium ball ends that really need to stay on the RC10L. At this point I decided to wait for the M3 ball ends and make do.

I distracted myself by soaking some ancient tires and wheels in acetone to dissolve the CA and most of the dry rotted foam inserts. Turns out I still had the old Proline RED tires on HPI rims that I won my first race on. I also had pink Trinity rims and tires for all 4 corners. The Prolines seemed abit worn but otherwise okay, but they spewed nasty black bits of decayed foam from the vent holes. Worse, after dissolving the CA I started to take them off the rims and the bead on one tire tore. I guess that's to be expected from a part over 33 years old. Fortunately I had a vintage pair of Proline REDs still in the OP. The Trinitys were on mch better shape. They got new foam front and rear and were remounted and glued.
30 years on, they still look great
After that I started putting the chassis back together. I had seen notes in the worlds car setup sheet about long vs short wheelbase and realized that, though it isn't mentioned in the manual, the Graphite can also be set up with a long wheelbase instead of the default short simply by selecting the forward set up holes in the read arm mounts. I decided to try it.
fresh links all around

The stretched wheelbase caused me additional issues. The rear arms move back, which moves the lower shock mount position back, but the bulkhead doesn't shift so the upper shock mount is now further forward than the lower shock mount. This puts leverage on the shock and shock tower which gets worse under compression. To resolve this new problem I used longer 1 inch bolts and a pair of nuts as spacers to push the bottom of the shock forward and flipped the
shock bushings and washer around at the top mounting point to bring the upper shock back inline with the bottom. This worked fairly well.
two nuts on a one inch bolt
And for the top position:
just flipped the bushing and washer
One other problem I ran into is that the shock rod ends for the shocks are larger and have a molded ring on them which very slightly interferes with the fron arm in the outer mounting hole. It was not possible to force the bolt through the hole in the pivot ball because it was not aligned with the hole in the arm. I had to slghtly dremel the edge of the shock rod end to get it to fit
might need a little more Bubba
The M3 ball studs did arrive and I was able to install them as noted in my previous post. So at this point we have a roller.
It's a roller
It's a roller
I did the front shock rod dremel Bubba job Saturday night and then got to work on the next stage of the project.
This thing:
not for long
not for long
I spent Saturday night and late into Sunday morning masking, pinstriping and painting this thing. I had never worked with Tamiya masking tape or pinstriping and struggled quite a bit. had a few difficulties along the way and made some mistakes, but managed to get a look that, overall, I'm happy with. Yeah, not monster themed but I had the urge to do something traditional looking. I might still put a monster decal on the nose, but it looks so clean I will probably just leave it as is.
Tada!
Tada!
It's clean, hi-vis and you'll always know which way you are going :lol:

I still need to get the electronics back in it but it is largely complete and I'm really happy with how it turned out. There were a lot of "Oh Crap!" moments during the rebuild but it was worth it.

I'll post a few photos of it's classic race winning livery a little later with trophy and details.

User avatar
Tucsonan
Regular Member
Posts: 9
Joined: Tue Jun 11, 2024 3:26 am
Location: Tucson AZ
Has thanked: 14 times
Been thanked: 18 times

Re: RC10 Graphite rebuild - the doom buggy rides again

Post by Tucsonan »

For nostalgia I dressed the buggy up in its race winning livery, or as close an approximation as I can get.

This is pretty much the identical tire and wheel package that I had on the car during its first race. Trinity front wheels and tires (literally the same 30+ year old trinity tires in front). HPI rear rims and Proline R.E.D. tires. I had matching pink Trinity rears but they were sold as 2.2 inch rims and at the time I thought ROAR approved rear wheels had to be 2.o or 2.15 inch or some such. Anyhow I slapped the HPI/Proline combo on the rear just to be safe. I had a monster body on but can't recall if it was this or a previous shell; both were painted by a friend and roughly copied the Motorhead "Rock N' Roll" album cover. The big difference would have been the gold bottom loader shocks.
Close, but lacking the goldies

My memory is a little fuzzy on this, but I was either running a Trinity Revtech or had swapped out to the Reedy Outlaw Stock motor pictured. I think it was the Reedy, because the old revtech had taken a beating and had a loose endbell.
trophy buggy
trophy buggy
It was my first race so I was entered in the Novice class and managed to qualify 3rd. I got jumped at the tone by at least 3 other cars, all of which managed to get in a pile up at the first corner with the second place buggy. I followed P1 around 3/4ths of the track then he made a mistake and flipped over a pipe. That gave me a clean pass and I took the lead and never relinquished it. The only thing I remember after the first lap is that the announcer kept referring to my car as 'that monster buggy'. Anyhow, I won, leading every lap. It was both my first and last novice race. Once you won the novice A-main you had to move up to stock. I was not the most skilled driver and I did not have the fastest car. What I had was a car that was within my capabilities to drive consistently. I drove as clean as I knew how, avoided the first corner pile up and made very few mistakes.

A close up of the trophy
Radio Controlled Hobbies Raceway 1st Place
Side note, the old RCHR in Costa Mesa was a fantastic track and I was very lucky to live so close to it.

Anynow, enough nostalgia, let's put that shiny new body back on and take some photos
spiffy
spiffy
beauty1.jpg
beauty2.jpg
beauty3.jpg
beauty4.jpg
beauty5.jpg
beauty6.jpg

I have to say again how happy I am with the new body. I had a little bleed through in the pinstripes but overall it came out better than I expected. I like it so much I don't think I can stand to punch mounting holes in it. I need to come up with a velcro solution. there are 4 unused pre-countersunk holes along the side of the chassis for mounting a transverse batter box. That should be plenty to hold some kydex tabs and maybe a bit of foam padding. I could form the kydex or just shave the foam to closely follow the sides of the body and use that as once side for the velcro.

User avatar
MarkyDents
Approved Member
Posts: 1027
Joined: Sun Jan 10, 2021 11:52 am
Location: Staten Island, N.Y.
Has thanked: 1384 times
Been thanked: 514 times

Re: RC10 Graphite rebuild - the doom buggy rides again

Post by MarkyDents »

Great clean up rebuild, great story, great car.
Thank you for taking the time to post it 8)
Who do you race for ?
Me……. I race for me.
That’s impossible, I was told you need a sponsor to race.
Hey Cru ! Go balls out 8)

User avatar
Tucsonan
Regular Member
Posts: 9
Joined: Tue Jun 11, 2024 3:26 am
Location: Tucson AZ
Has thanked: 14 times
Been thanked: 18 times

Re: RC10 Graphite rebuild - the doom buggy rides again

Post by Tucsonan »

Thanks for all the kind and helpful comments. This car has been a bit of an obsession for me over the last month. I still need to get the electronics up and running and will do a "what's in the box / what's in the track bag" post as part of that.

Post Reply

Create an account or sign in to join the discussion

You need to be a member in order to post a reply

Create an account

Not a member? register to join our community
Members can start their own topics & subscribe to topics
It’s free and only takes a minute

Register

Sign in

  • Similar Topics
    Replies
    Views
    Last post
  • LTO Buggy Of Doom
    by LTO_Dave » » in RC10 Buggy Forum
    16 Replies
    2220 Views
    Last post by glastornjet73
  • Building my RC10 Graphite into a modern 13.T buggy
    by Hanibel75 » » in RC10 Buggy Forum
    2 Replies
    776 Views
    Last post by Hanibel75
  • New Member needs some refurb advice for my RC10 Graphite buggy...
    by Millsie23 » » in RC10Talk Welcome Center
    4 Replies
    901 Views
    Last post by Millsie23
  • 'Fun Buggy' RC10 - Graphite, mid mount Stealth, brushless
    by Jeep-Power » » in RC10 Buggy Forum
    91 Replies
    17448 Views
    Last post by Jeep-Power
  • Graphite Rebuild (No Restore)
    by RCCWMAN » » in RC10 Buggy Forum
    6 Replies
    1334 Views
    Last post by RCCWMAN
  • Team Graphite buggy
    by Nacho45acp » » in RC10 Buggy Forum
    2 Replies
    232 Views
    Last post by Nacho45acp
  • New/Old Graphite Buggy Build
    by Zipster » » in RC10 Buggy Forum
    20 Replies
    3747 Views
    Last post by Zipster
  • My Graphite Buggy Resto
    by Smooth » » in RC10 Buggy Forum
    3 Replies
    986 Views
    Last post by Smooth

Return to “RC10 Buggy Forum”

Who is online

Users browsing this forum: No User AvatarDotNetDotCom.org [Bot] and 67 guests