If you prefer something smaller, there are some 3D printed ones on Shapeways that fit closer.
Startin the run what ya brung build of a Team Car
-
juicedcoupe

- Super Member
- Posts: 3018
- Joined: Sun Aug 16, 2020 4:05 pm
- Location: Pascagoula, MS
- Has thanked: 235 times
- Been thanked: 1765 times
Re: Startin the run what ya brung build of a Team Car
I made these nose and wing tubes yesterday, from the K&S tubing.
To protect the nose, I'd recommend a bumper. Andy's bumpers can be found on eBay sometimes.
If you prefer something smaller, there are some 3D printed ones on Shapeways that fit closer.
If you prefer something smaller, there are some 3D printed ones on Shapeways that fit closer.
Always looking for new and interesting ways to waste money.
-
JosephS
- Super Member
- Posts: 1593
- Joined: Thu Mar 23, 2017 5:31 pm
- Has thanked: 1046 times
- Been thanked: 482 times
Re: Startin the run what ya brung build of a Team Car
I'm going to need a file for that. Do you know what size is proper?
-
jwscab

- Super Member
- Posts: 6512
- Joined: Wed Jan 28, 2009 9:42 am
- Location: Chalfont, PA
- Has thanked: 10 times
- Been thanked: 454 times
Re: Startin the run what ya brung build of a Team Car
Yes use a foam block to keep your shorty lipo in place.
As for the file, you can buy a cheapie set of jewelers files, there are about 5 or 6 different shape profiles, and a number of them would work. They usually come in a pack with plasti-dip handles. They are all around 1/8" to 1/4" wide depending on the profile.
https://www.lowes.com/pd/Kobalt-8-in-Smooth-File-Set/999921002?cm_mmc=shp-_-c-_-prd-_-tol-_-google-_-lia-_-216-_-handsaws-_-999921002-_-0&placeholder=null&ds_rl=1286981&gclid=CjwKCAjw8cCGBhB6EiwAgORey71e1Vn1Vydey-GUARPj0Qcw6EBFrRprcLDPd8PS3iSHfySQ5jTB5hoCAzUQAvD_BwE&gclsrc=aw.ds
-
JosephS
- Super Member
- Posts: 1593
- Joined: Thu Mar 23, 2017 5:31 pm
- Has thanked: 1046 times
- Been thanked: 482 times
Re: Startin the run what ya brung build of a Team Car
So the foam block is in place and the body is painted.
I found some computer case screws that work perfectly on the hold down. Electrical tape works great for holding down the wires but any loose edge attracts dirt. I think I am going to cut a foam block to go between the front suspension mounts to see if that cuts down on the dirt and grass entering the chassis.
This was my first attempt at a paint job and I learned a lot. My masking was good, but not good enough so the pattern had to change. The detonator body from J concepts looks great, but there is a corner in the back of the tub area that makes this less friendly to beginners. My masking wicked the paint in this area and it attracts dirt with no way to get it out.
I followed the convention of paint dark colors first and I would not do that again . It makes most sense to do the easiest /cleanest masking first. In this case I would have painted the blue first and the black stripe second with the orange last. This would have let me mask the body from the bottom, which has far fewer curved sections to mask down.
I also learned that if you are careful you can use acetone to remove spot problems. A small dab from a cotton swab right on the paint you want to remove and an immediate follow up with a clean swab to remove it. It’s time consuming this way but if you let the acetone sit it hazes the body and allows the offenseive color to embed in the lexan. So quick and light it is
I used some of the chassis protector on the the underside of the body to protect the paint. It was rubbing off on the chassis. I tried extra coats to protect it but that didn’t help.
Once the wiring is set this project will be done
-
JosephS
- Super Member
- Posts: 1593
- Joined: Thu Mar 23, 2017 5:31 pm
- Has thanked: 1046 times
- Been thanked: 482 times
Re: Startin the run what ya brung build of a Team Car
Making new shock towers to try out a new wiring path.
- AD0933C8-31ED-43A9-96C2-5DB724783AE8.jpeg (29.33 KiB) Viewed 897 times
- AD0933C8-31ED-43A9-96C2-5DB724783AE8.jpeg (29.33 KiB) Viewed 897 times
-
juicedcoupe
- Super Member
- Posts: 3018
- Joined: Sun Aug 16, 2020 4:05 pm
- Location: Pascagoula, MS
- Has thanked: 235 times
- Been thanked: 1765 times
Re: Startin the run what ya brung build of a Team Car
The back of that wing is made to be mostly cut out. There should be some faint lines in the mold for trimming it.
- Attachments
-
Always looking for new and interesting ways to waste money.
-
JosephS
- Super Member
- Posts: 1593
- Joined: Thu Mar 23, 2017 5:31 pm
- Has thanked: 1046 times
- Been thanked: 482 times
Re: Startin the run what ya brung build of a Team Car
Thanks for that. That wing is actually the original kit wing. I should un-string it and work up the detonator wing. Is the wing is painted from underneath?juicedcoupe wrote: ↑Wed Jun 23, 2021 3:24 pm The back of that wing is made to be mostly cut out. There should be some faint lines in the mold for trimming it.
-
juicedcoupe
- Super Member
- Posts: 3018
- Joined: Sun Aug 16, 2020 4:05 pm
- Location: Pascagoula, MS
- Has thanked: 235 times
- Been thanked: 1765 times
Re: Startin the run what ya brung build of a Team Car
Mine is.
I've seen it done both ways.
Always looking for new and interesting ways to waste money.
-
jwscab
- Super Member
- Posts: 6512
- Joined: Wed Jan 28, 2009 9:42 am
- Location: Chalfont, PA
- Has thanked: 10 times
- Been thanked: 454 times
Re: Startin the run what ya brung build of a Team Car
With the foam block you should consider adding a battery strap that looks like a worlds style, that has an extension that hooks under the rear bulkhead box. This will be a better way to prevent the battery from popping up.
-
JosephS
- Super Member
- Posts: 1593
- Joined: Thu Mar 23, 2017 5:31 pm
- Has thanked: 1046 times
- Been thanked: 482 times
Re: Startin the run what ya brung build of a Team Car
I thought about that. It seems like the way to go, but I'll have to a bit before I get one.
-
JosephS
- Super Member
- Posts: 1593
- Joined: Thu Mar 23, 2017 5:31 pm
- Has thanked: 1046 times
- Been thanked: 482 times
Re: Startin the run what ya brung build of a Team Car
-
JosephS
- Super Member
- Posts: 1593
- Joined: Thu Mar 23, 2017 5:31 pm
- Has thanked: 1046 times
- Been thanked: 482 times
Re: Startin the run what ya brung build of a Team Car
A new paint scheme for a new owner.
Still need the paint scheme for the wing and stickers to be put on.
It’s all mechanically and electrically there.
It’s all mechanically and electrically there.
-
juicedcoupe
- Super Member
- Posts: 3018
- Joined: Sun Aug 16, 2020 4:05 pm
- Location: Pascagoula, MS
- Has thanked: 235 times
- Been thanked: 1765 times
Re: Startin the run what ya brung build of a Team Car
As with the JConcepts wing, the AE high downforce wing is also made to be partially cut out at the back.
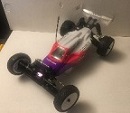
Here is my Team Car. It has a JConcepts Protector body but uses a reproduction AE wing.
You can see how the rear is trimmed. You can also see that I left the trailing edge clear. It looks cloudy in this picture but is barely noticeable in person. I also trimmed the top of the wing to match the angle of the bottom.
Here is my Team Car. It has a JConcepts Protector body but uses a reproduction AE wing.
Always looking for new and interesting ways to waste money.
Create an account or sign in to join the discussion
You need to be a member in order to post a reply
Create an account
Not a member? register to join our community
Members can start their own topics & subscribe to topics
It’s free and only takes a minute
Sign in
-
- Similar Topics
- Replies
- Views
- Last post
-
- 21 Replies
- 2409 Views
-
Last post by slow_jun
-
- 70 Replies
- 4944 Views
-
Last post by SofaKing
-
- 16 Replies
- 3132 Views
-
Last post by NWRacer
-
- 14 Replies
- 3346 Views
-
Last post by iVTEC4LIFE
-
- 4 Replies
- 963 Views
-
Last post by tuna.Rc
-
- 4 Replies
- 661 Views
-
Last post by cas22
-
- 59 Replies
- 6527 Views
-
Last post by lmw94002
-
- 88 Replies
- 7964 Views
-
Last post by janaya


Who is online
Users browsing this forum: ![]() Amazon [Bot],
Amazon [Bot], ![]() Bing [Bot],
Bing [Bot],  GoMachV,
 ![]() Tbot [Bot] and 37 guests
Tbot [Bot] and 37 guests