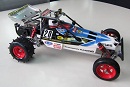
Cox/Kyosho Circuit 1000 Buggy
-
TM Ru22311

- Approved Member
- Posts: 206
- Joined: Thu Mar 06, 2014 3:51 pm
- Location: Michigan, U.S.A.
Re: Cox/Kyosho Circuit 1000 Buggy
Wow, that turned out nice and shiny! I did pretty much what you described...SOS pad and all. However, once I got the car completely disassembled, I noticed quite a few deep scratches on some of the parts. I started with 400 grit wet paper and worked my way up to 1500. I'm pretty happy with the way it turned out but there are a few places that remain a challenge (like down in the crevasses of the heatsink. I was thinking maybe a wire brush Dremel attachment may work there. There was also some small gouges on the side of the bottom plate. For that, I took a very fine file and got them out and then used the wet paper. Is the gearbox made of cast aluminum? I was thinking that couldn't be polished. Also, I wanted to take the gearbox apart and clean everything out, what type of grease/oil would you use to go back in it?
-
KyoshoScorpionKid
- Approved Member
- Posts: 205
- Joined: Thu Sep 27, 2007 1:05 pm
- Location: Canada
- Been thanked: 1 time
Re: Cox/Kyosho Circuit 1000 Buggy
There is nothing you can't use the SOS on, when I have those deep scratches on the bottom plate I can use my sander and sand it out pretty much like you did. As for the gear-box you can take it apart and clean out all the old grease and oil that's in there with some sand or dirt it can be pretty nasty. Use a old toothbrush for those hard to clean areas, you're doing just fine  I can't wait to see it. You have me in the mood to start one which is really nasty and show how nice it can become.
I had a scorpion which was SOOO nasty, dude used a paint brush and covered the rails and tub with green pain, that video is on youtube but it did some clean. Took a while for the simple green to loosen the old pain on the tub. Here is the video, all the video links are on my web site.
https://www.youtube.com/watch?v=s-8gIs4yj2Y
RC
TM Ru22311 wrote:Wow, that turned out nice and shiny! I did pretty much what you described...SOS pad and all. However, once I got the car completely disassembled, I noticed quite a few deep scratches on some of the parts. I started with 400 grit wet paper and worked my way up to 1500. I'm pretty happy with the way it turned out but there are a few places that remain a challenge (like down in the crevasses of the heatsink. I was thinking maybe a wire brush Dremel attachment may work there. There was also some small gouges on the side of the bottom plate. For that, I took a very fine file and got them out and then used the wet paper. Is the gearbox made of cast aluminum? I was thinking that couldn't be polished. Also, I wanted to take the gearbox apart and clean everything out, what type of grease/oil would you use to go back in it?
-
TM Ru22311
- Approved Member
- Posts: 206
- Joined: Thu Mar 06, 2014 3:51 pm
- Location: Michigan, U.S.A.
Re: Cox/Kyosho Circuit 1000 Buggy
Man, what a mess you had on your hands! I am sold on the SimpleGreen though. I am getting that to clean my stove & oven, LoL. Oh, what was it that you put back in the gearbox once it's all clean?
-
TM Ru22311
- Approved Member
- Posts: 206
- Joined: Thu Mar 06, 2014 3:51 pm
- Location: Michigan, U.S.A.
Re: Cox/Kyosho Circuit 1000 Buggy
Got a few part the past few days and found where to buy some when I gets more $$$ So I wanted to update the parts listTM Ru22311 wrote:I am going to post a list of parts I am needing here. Because these parts are just so hard to find, I would welcome any help locating some of them. I do check eBay often, but I never would have found those rear swing shafts without help (Thank you Lars). I will try to keep this updated as much as possible. I have my work cut out refinishing all the aluminum, but I did get the car completely tore down tonight. I plan on printing a manual out for easy reference. I also ordered a set of RCScrewz for a vintage Scorpion (Thank you Coelacanth). I will let you guys know how that goes.
Wheels (rims & tires) (SC-28/29) (SC-26/27)
Front & Rear Dampers (SC-10/SC-11)
Gear Base Cover (SC-36)
Motor Cover (SC-40)
Accessory Set (SC-72)
Rear Body Hook (SC-82)
That list is getting shorter. I am naming the Gear Base Cover and Rear Body Hook my "Golden Unicorn Find" now. Those will be the last 2 parts that will have me scrolling through eBay @ 3a.m. >:(
-
TM Ru22311
- Approved Member
- Posts: 206
- Joined: Thu Mar 06, 2014 3:51 pm
- Location: Michigan, U.S.A.
Re: Cox/Kyosho Circuit 1000 Buggy
Got some polishing done the past few days 


Here is what I used to get those odd shaped parts clean. Also great for the nooks & Crannies! Dremel Rocks!

I was mistaken about the knuckle being bent, it is actually one of the uprights that is bent:


I should be pretty close to reassembly. I have the new screw kit. We just got hammered with about 8" of snow and the kids are home from school...Can't get much done with them around :/
Here is what I used to get those odd shaped parts clean. Also great for the nooks & Crannies! Dremel Rocks!
I was mistaken about the knuckle being bent, it is actually one of the uprights that is bent:
I should be pretty close to reassembly. I have the new screw kit. We just got hammered with about 8" of snow and the kids are home from school...Can't get much done with them around :/
-
Coelacanth

- Approved Member
- Posts: 7375
- Joined: Thu Jul 29, 2010 6:20 pm
- Location: Alberta, Canada
- Has thanked: 16 times
- Been thanked: 293 times
Re: Cox/Kyosho Circuit 1000 Buggy
Nice polishing work there! It's gonna look fantastic when you reassemble it. 
Completed projects: CYANide Onroad Optima | Zebra Gold Optima | Barney Optima | OptiMutt RWD Mid
Gallery - Coel's Stalls: Marui Galaxy & Shogun Resto-Mods | FrankenBuff AYK Buffalo | 1987 Buick GNX RC12L3
Gallery - Coel's Stalls: Marui Galaxy & Shogun Resto-Mods | FrankenBuff AYK Buffalo | 1987 Buick GNX RC12L3
-
KyoshoScorpionKid
- Approved Member
- Posts: 205
- Joined: Thu Sep 27, 2007 1:05 pm
- Location: Canada
- Been thanked: 1 time
Re: Cox/Kyosho Circuit 1000 Buggy
Yes nice work! I see which piece is bent, you can straighten that in a vice slowley if you have one. Here is the trick.
- place the bent piece in the vice
- place it so as you tighten it will become straighter or unbent.
- the trick is not to tighten, put it snug, the next day turn it a bit more and the next and the next and so on.
- the key is to do it slowly.
- place the bent piece in the vice
- place it so as you tighten it will become straighter or unbent.
- the trick is not to tighten, put it snug, the next day turn it a bit more and the next and the next and so on.
- the key is to do it slowly.
Coelacanth wrote:Nice polishing work there! It's gonna look fantastic when you reassemble it.
-
TM Ru22311
- Approved Member
- Posts: 206
- Joined: Thu Mar 06, 2014 3:51 pm
- Location: Michigan, U.S.A.
Re: Cox/Kyosho Circuit 1000 Buggy
Thanks, it has been a lot of work, but it will totally pay off in the end. I need to get some scratches out of the servo plate (which I believe is carbon fiber). Anyone have any ideas for that? As long as I can buff the 1500 grit marks out, I think it would be fine to sand, but I am not sure. Thanks for the tip on the upright. All I have is a hobby vise, but there is a huge steel bench vise @ my grandmothers, I can go over there and try your method. She lives fairly close, so it should work great!
-
Coelacanth
- Approved Member
- Posts: 7375
- Joined: Thu Jul 29, 2010 6:20 pm
- Location: Alberta, Canada
- Has thanked: 16 times
- Been thanked: 293 times
Re: Cox/Kyosho Circuit 1000 Buggy
One thing to mention before you put that in a vise is to wrap it up in tough masking tape or cardboard or piece of thin rubber--anything--so that your vise doesn't embed ugly vise-marks in your part when you tighten the vise.
Completed projects: CYANide Onroad Optima | Zebra Gold Optima | Barney Optima | OptiMutt RWD Mid
Gallery - Coel's Stalls: Marui Galaxy & Shogun Resto-Mods | FrankenBuff AYK Buffalo | 1987 Buick GNX RC12L3
Gallery - Coel's Stalls: Marui Galaxy & Shogun Resto-Mods | FrankenBuff AYK Buffalo | 1987 Buick GNX RC12L3
-
TM Ru22311
- Approved Member
- Posts: 206
- Joined: Thu Mar 06, 2014 3:51 pm
- Location: Michigan, U.S.A.
Re: Cox/Kyosho Circuit 1000 Buggy
Yeah, I don't want to make it worse! Here are 2 parts that I would like to (eventually) replace. I am going to do my best to clean them up for now. The bumper is in pretty rough shape, but $28 seems a bit much for a new one :/


-
TM Ru22311
- Approved Member
- Posts: 206
- Joined: Thu Mar 06, 2014 3:51 pm
- Location: Michigan, U.S.A.


-
TM Ru22311
- Approved Member
- Posts: 206
- Joined: Thu Mar 06, 2014 3:51 pm
- Location: Michigan, U.S.A.
Re: Cox/Kyosho Circuit 1000 Buggy
Something I will need some help with, I have to make a battery connector. I have a male & female but I can't tell which one is mounted to the car by the photo I found. I will have to use new pins and cut my own wire, then crimp some new connectors for hooking it to the speed controller. Could someone tell me if it is male or female and possibly measure each wire length? Is red & white the correct color for these wires?

Here is what I have to make it:

I am going to try RCman's SimpleGreen trick on those connectors!
Here is what I have to make it:
I am going to try RCman's SimpleGreen trick on those connectors!
-
TM Ru22311
- Approved Member
- Posts: 206
- Joined: Thu Mar 06, 2014 3:51 pm
- Location: Michigan, U.S.A.
Re: Cox/Kyosho Circuit 1000 Buggy
I am tearing down the gear box now. I took the set screw out of the pinion inside, but I still can't get that shaft out. I don't want to break anything, so before I do damage, anyone got any ideas? I have a nail punch and a small hammer to tap it out, but I don't know if that would be ideal for this.

-
Hcp22

- Approved Member
- Posts: 1858
- Joined: Sat Jun 19, 2010 6:31 am
- Location: Gothenburg Sweden
- Has thanked: 33 times
- Been thanked: 16 times
Re: Cox/Kyosho Circuit 1000 Buggy
I'm sorry to say that you already done that, the counter gear shouldn't came off. But that wouldn't be a problem sins this will be a shelf queen.
-
TM Ru22311
- Approved Member
- Posts: 206
- Joined: Thu Mar 06, 2014 3:51 pm
- Location: Michigan, U.S.A.
Create an account or sign in to join the discussion
You need to be a member in order to post a reply
Create an account
Not a member? register to join our community
Members can start their own topics & subscribe to topics
It’s free and only takes a minute
Sign in
-
- Similar Topics
- Replies
- Views
- Last post
-
- 2 Replies
- 804 Views
-
Last post by Jirka
-
- 16 Replies
- 2332 Views
-
Last post by AYKBOBCAT
-
- 6 Replies
- 1122 Views
-
Last post by DennisM
-
- 17 Replies
- 3216 Views
-
Last post by DennisM
-
- 1 Replies
- 1095 Views
-
Last post by rhino1
-
- 2 Replies
- 855 Views
-
Last post by RothbauerGmbH
-
- 5 Replies
- 1563 Views
-
Last post by Lonestar
-
- 7 Replies
- 2373 Views
-
Last post by Bimdapogs


Who is online
Users browsing this forum: ![]() DotNetDotCom.org [Bot] and 29 guests
DotNetDotCom.org [Bot] and 29 guests