Hard to believe its been over 2 years since I got this buggy... Here are some pics...
Box ain't pretty, but its what's inside that counts..
Build to follow!
Lucky new owner of a Pro Cat!
-
Bormac
- Approved Member
- Posts: 3113
- Joined: Wed Sep 05, 2007 3:52 pm
- Location: CENTRAL COAST, NSW AUSTRALIA
- Has thanked: 21 times
- Been thanked: 11 times
-
Brandon G
- Approved Member
- Posts: 2106
- Joined: Mon Oct 01, 2007 4:23 pm
- Location: Nashville, TN
- Been thanked: 3 times
Re: Lucky new owner of a Pro Cat!
Here we go...
- Attachments
-
- Step 1. Rear gearbox halves.
-
- Step 2. Rear pulley shaft.
-
- Step 2. Rear gearbox with pulley shaft and case.
-
- Step 3. Rear diff assembly.
-
- Step 3. Rear diff assembly completed.
-
- Step 4. Rear diff assembly with slider shafts installed.
-
Brandon G
- Approved Member
- Posts: 2106
- Joined: Mon Oct 01, 2007 4:23 pm
- Location: Nashville, TN
- Been thanked: 3 times
Re: Lucky new owner of a Pro Cat!
Continued...
Only thing worth mentioning was the fiberglass chassis pieces. They came with some flashing on them from incomplete router passes. My guess is they got really close but not fully done to leave the pieces still attached to the main plate. Break them off like a parts tree when done. Required a bit of filing/sanding to get everything smoothed out.
Only thing worth mentioning was the fiberglass chassis pieces. They came with some flashing on them from incomplete router passes. My guess is they got really close but not fully done to leave the pieces still attached to the main plate. Break them off like a parts tree when done. Required a bit of filing/sanding to get everything smoothed out.
- Attachments
-
- Step 5. Rear gearbox complete.
-
- Step 6. Rear gearbox, drive belt, and upper chassis brace installed on main chassis.
-
- Step 7. Battery straps installed.
-
- Step 8. Front gearbox assembly.
-
- Step 9. Front one way slider shafts installed.
-
- Step 10. Front gearbox assembly and belt tensioner installed in chassis.
-
Brandon G
- Approved Member
- Posts: 2106
- Joined: Mon Oct 01, 2007 4:23 pm
- Location: Nashville, TN
- Been thanked: 3 times
Re: Lucky new owner of a Pro Cat!
Continued...
Not really sure what the purpose of the lexan dust shields in the rear hubs are. I realize they are supposed to shield dust, but they don't look like they would be very effective at it.
Not really sure what the purpose of the lexan dust shields in the rear hubs are. I realize they are supposed to shield dust, but they don't look like they would be very effective at it.
- Attachments
-
- Step 10. Just another view of the rear gearbox on chassis.
-
- Step 11. Wing mounts, shock tower, and camber link mount installed.
-
- Step 12. Lexan shields installed in rear hubs.
-
- Step 13. Rear A-arms installed.
-
- Step 14. Rear hubs installed.
-
- Step 15. Rear camber links installed.
-
DerbyDan
- Approved Member
- Posts: 1837
- Joined: Tue Sep 08, 2009 8:04 am
- Location: Northampton UK
- Has thanked: 2 times
- Been thanked: 19 times
Re: Lucky new owner of a Pro Cat!
Beautifull! - you sure can't beat new-from-packet/box parts!
You could always tell the lazy builder of a Schumacher when the G/FRP parts hadn't had the stop-start 'nipple' filed off
You could always tell the lazy builder of a Schumacher when the G/FRP parts hadn't had the stop-start 'nipple' filed off
My T.C Showroom; http://www.tamiyaclub.com/member.asp?id=28990
-
crusaderlyf
- Approved Member
- Posts: 361
- Joined: Wed Nov 12, 2008 9:03 pm
- Location: China
- Been thanked: 1 time
Re: Lucky new owner of a Pro Cat!
I dream I can find cat nib kit to my collections, SWB cat、cat xl、cat xls、procat & bosscat.but they hard to got now
Re: Lucky new owner of a Pro Cat!
I like it when someone is brave enough to build a NIB 
You're right about those lexan dust shields, they were next to useless and ended up holding in the dust rather than keep it out.
Paul.
You're right about those lexan dust shields, they were next to useless and ended up holding in the dust rather than keep it out.
Paul.
-
Brandon G
- Approved Member
- Posts: 2106
- Joined: Mon Oct 01, 2007 4:23 pm
- Location: Nashville, TN
- Been thanked: 3 times
Re: Lucky new owner of a Pro Cat!
A little more progress made!
Had to do some hand fitting on the chassis where the upper wishbone mounting blocks hinge in. The back screws were binding and I had to relieve the top chassis plate just a bit to allow clearance.
Also the lower wishbone would not snap into the pivot ball unless I took a hair off of the bottom of the front hub dust shield.
Kit was missing one M2X16mm screw for the steering rack. Got one coming...
- Attachments
-
- Step 16a. Front wishbones
-
- Step 16b. Front wishbones attached to chassis.
-
- Step 16b back view.
-
- Step 18. Front hub assemblies and sliders.
-
- Step 19. Front hubs and steering links installed.
-
- Step 17. Steering rack.
-
- Step 20. Front swaybar.
-
Brandon G
- Approved Member
- Posts: 2106
- Joined: Mon Oct 01, 2007 4:23 pm
- Location: Nashville, TN
- Been thanked: 3 times
Re: Lucky new owner of a Pro Cat!
Coninued...
Shocks went together rather well. I wasn't too impressed with the amount of flashing that was on the plastic shock parts. They needed a lot of cleanup. I added some associated upper spring guides. There was nothing included in this kit to locate the springs at the top of the shocks.
Motor is a Race Prep modified.
- Attachments
-
- Step 21a. Shocks are built!
-
- Step 21b. Rear shocks mounted.
-
- Step 21c. Front shocks mounted.
-
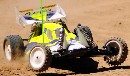
- Getting there!
-
- Shoes are on!
-
- Skipped ahead a little, wanted to get the motor installed.
-
- Motor and spur gear installed.
-
DerbyDan
- Approved Member
- Posts: 1837
- Joined: Tue Sep 08, 2009 8:04 am
- Location: Northampton UK
- Has thanked: 2 times
- Been thanked: 19 times
Re: Lucky new owner of a Pro Cat!
Looking great!
Its interesting to hear about your experiences with needing to make 'adjustments' to parts to get them to fit together properly... something that seemed necessary more than most on Schumacher kits of this era. In some repects its not suprising that I struggled building my TopCat as a young teenager.. these where cars that you really needed an eye for detail when building them to get them to work well on the track. Its funny hearing comments from poeple assembling their 'new' RC10s & moaning about the fit of some of the parts... but that was how it was back then
In some ways things don't change too much - on assembling my brand new TeamC TM2 I had to just clearance out the front wishbones a little to ensure free movement on the front bulkhead/pivot block, also the battery brace needs 'adjustment' to make sure you don't short out the batteries on the carbon! I've heard similar things from my mate who recently built up a Kyosho RB6
My T.C Showroom; http://www.tamiyaclub.com/member.asp?id=28990
-
DerbyDan
- Approved Member
- Posts: 1837
- Joined: Tue Sep 08, 2009 8:04 am
- Location: Northampton UK
- Has thanked: 2 times
- Been thanked: 19 times
Re: Lucky new owner of a Pro Cat!
Oh yes I forgot to mention that there wasn't anything to locate the spring in front of the spacers on these earlier Schueys - it wasn't until the release of the Varishock that I think something was included
It would explain why most shock bodies on used cars are well scuffed?
It would explain why most shock bodies on used cars are well scuffed?
My T.C Showroom; http://www.tamiyaclub.com/member.asp?id=28990
-
stickboy007

- Approved Member
- Posts: 740
- Joined: Sun Sep 16, 2012 6:13 pm
- Location: Mahopac, NY
- Been thanked: 53 times
Re: Lucky new owner of a Pro Cat!
Very nice. Daddy like.
As for the investment aspect, for some kits, they're worth plenty whether you build them or not. Over time, as kits get lost, scrapped, or whatever, they become more rare, so even a good condition built one, like this one, will gain value over time. Regardless, I agree with your sentiment. These are meant to be played with, or at least built. It's only money, right?
As for the investment aspect, for some kits, they're worth plenty whether you build them or not. Over time, as kits get lost, scrapped, or whatever, they become more rare, so even a good condition built one, like this one, will gain value over time. Regardless, I agree with your sentiment. These are meant to be played with, or at least built. It's only money, right?
-
Peakey
- Approved Member
- Posts: 578
- Joined: Tue Feb 25, 2014 3:55 am
- Location: Nottingham, UK
- Been thanked: 3 times
Re: Lucky new owner of a Pro Cat!
Looks like I'm gonna have to finish the semi built bosscat kit I have just picked up.CAT3K wrote:I like it when someone is brave enough to build a NIB
Paul.
Btw it looks very nice and I am a bit jealous. Ok alot
Create an account or sign in to join the discussion
You need to be a member in order to post a reply
Create an account
Not a member? register to join our community
Members can start their own topics & subscribe to topics
It’s free and only takes a minute
Sign in
-
- Similar Topics
- Replies
- Views
- Last post
-
- 5 Replies
- 3909 Views
-
Last post by Mad Racer
-
- 17 Replies
- 3423 Views
-
Last post by isobarik
-
- 4 Replies
- 2888 Views
-
Last post by top cat mike
-
- 7 Replies
- 1056 Views
-
Last post by uzzi
-
- 13 Replies
- 2235 Views
-
Last post by RichieRich
-
- 10 Replies
- 2287 Views
-
Last post by kaszal
-
- 23 Replies
- 5730 Views
-
Last post by isobarik
-
- 0 Replies
- 452 Views
-
Last post by QuackingPlums
Who is online
Users browsing this forum: No registered users and 2 guests