RedScampi wrote:Hey guys, thanks for all the replys and encouragement. I've decided to turn this into a build thread. I agree about the satisfaction of bringing these back from the dead. It's more difficult by far than building new. Each piece has it's own special challenge. The Bulldog tires were toast upon arrival unfortunately. They basically fell apart in my hands. This car is rough but it has good bones. Thankfully I have amassed *ALMOST* enough parts to do a reasonable restoration, I think. I need a backbone (for the car!)
The chassis was hammered but I was lucky to find a really nice one on evilbay. The front magnesium bulkhead was broken too, but I have a replacement. I have several plastic front and rear bulkhead covers in varying condition. None perfect but I think I can make one of each work. One of the cover screws is broken off in the rear bulkhead, pretty much flush. Does anyone have an idea of how to get it out? The diff freed up after a day or too of soaking in acetone. I washed it with soap and water then sprayed it out with WD-40.
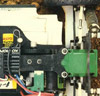
Here are some current state pictures. This probably will not be a box-stock rebuild. I just want it to be a nice example. Let me know your opinions and any suggestions.
I have an original magnesium rear bulkhead in good condition, it just needs a good clean up. You can have if you donate $10 to the site.
Done! I was thinking Christmas was a good time to make a donation anyway. Let me figure out how...got it! I threw in a few extra bucks.
Thanks!
RedScampi wrote:Hey guys, thanks for all the replys and encouragement. I've decided to turn this into a build thread. I agree about the satisfaction of bringing these back from the dead. It's more difficult by far than building new. Each piece has it's own special challenge. The Bulldog tires were toast upon arrival unfortunately. They basically fell apart in my hands. This car is rough but it has good bones. Thankfully I have amassed *ALMOST* enough parts to do a reasonable restoration, I think. I need a backbone (for the car!)
The chassis was hammered but I was lucky to find a really nice one on evilbay. The front magnesium bulkhead was broken too, but I have a replacement. I have several plastic front and rear bulkhead covers in varying condition. None perfect but I think I can make one of each work. One of the cover screws is broken off in the rear bulkhead, pretty much flush. Does anyone have an idea of how to get it out? The diff freed up after a day or too of soaking in acetone. I washed it with soap and water then sprayed it out with WD-40.
Here are some current state pictures. This probably will not be a box-stock rebuild. I just want it to be a nice example. Let me know your opinions and any suggestions.
I have an original magnesium rear bulkhead in good condition, it just needs a good clean up. You can have if you donate $10 to the site.
Done! I was thinking Christmas was a good time to make a donation anyway. Let me figure out how...got it! I threw in a few extra bucks.
Thanks!
No problems, just PM your address and I'll post off when the Post Office opens next week.
Now I'm off to have a few brandy's, Merry Christmas.
Just a quick update on this build. I got the front and rear diffs all rebuilt as well as the drive assembly. I temporarilly installed the rear bulkhead - new one coming (Thanks Alex!) Next hurdle is finding new drive shafts - I only have three and they are all bent on close inspection. Other than that I'm getting parts inspected and cleaned. I think this will turn out to be a pretty decent car after all! Sorry about the blurry pics - bad lighting...better next time.
xxxmain wrote:I think you've got your front and rear diffs swapped... not a big deal but the belt pulley with the single flange usually goes at the rear.
Right you are! Can you tell I've never rebuilt a YZ10 before?
I will rectify that when my new rear bulkhead arrives. Thanks for the heads up!
Just a quick update. While I was waiting for my new unis to arrive I discovered that I need a pair of kingpins for the front carriers. While cleaning the carriers however I discovered that the left side had both of the holes for the kingpins stripped out. Rather than hunt for new ones, delaying the build even further I started scrounging in my parts box and found a pair of Optima carriers that looked like they would work. They do, almost. The main issue is that the Optima part is just a bit deeper between the bearings that the Yok part which causes two problems. 1) The universal doesn't penetrate the carrier quite as much as I'd like which means the flat that the hub set screw is supposed to catch is only about half exposed. It works but could be better. The other issue is of course that the added length of the carrier means the other end of the uni doesn't seat well in the drive cup. I think I can trim the end of the carriers down to the same dimension as the Yok parts and rectify both issues. If it works out, as a bonus I can use the Kyosho kingpins as well. Here is a pic or two of the Kyosho parts mocked up.
Aren't the rear hubs the same ones as the front? Check to see if the threads are ok on the rear...and if they are, just swap them.
Regards,
Roger
Well...yes they are ...that just makes too much sense...I will check that out Roger, thanks! Sure beats having to modify the Optima pieces. I was really hoping to save them for a future build anyway.
Onward!
In the uk the optima hub carriers were often used as they was alot stronger than the yokomo ones for rough off road use and huge jumps.
Looks like you have standard length drive shafts too in which case the hub should be mounted on the inner hole of the arm and thus placing the drive shaft in the diff, as seen here on 63 http://www.oople.com/rc/manuals/yz870c/imagepages/yz870c018.html.
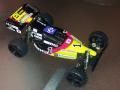
Hi every body, this is my YZ10 resto , i'm sorry I haven't pics before the resto, but the car was in good shape!
Body and undertray are coming soon , when i have the time to make a mould !
PRP.
Last post
Hey mate,
I'll bear it in mind, but I have friend who REALLY wants it and is trying to find me a Pred too.
If he backs out or whatever, I'll drop you a line.
I acquired this via Facebook. Talked with him some, and found he only ran it a few times. From the looks of it, it definitely hadn't been run much. The belts look new....
much as i'm enjoying my new builds, i've got the most satisfaction out of restoring my original gold pan. so heres my next rescue job. quite exciting as you never really know what you're getting till it comes.
Last post
i was pleased with it, just below my max bid. i yearn a family of these beauties :. i just thought this would be a longer project than 24 hours :shock:
So in beginning my plan I am realizing that there are no tires.....lol should have read more threads. So as I understand... The sc10 front turnbuckles fit and just get a hex clamp for rear axles and then I cause modern wheel/tire combo?
this was the first rc10 i bought, i originally bought it for basher purposes but i got caught up restoring it. i know there's still more than plenty to do, but i've been building it again today so i thought i'd get some pictures here so the period...
Last post
things are slowing down a bit for this now (no time and the things i need are proving pretty hard to find). but i found time to paint the body this weekend. it's been nervy as the body is an original and my hands were shaking :) .
it's not turned...
I just test ran my old RC10ce that I've been restoring over the last couple of weeks. I still have to find where I want to mount all of the electrics and tidy that up plus I need to drill the body and get it mounted but I couldn't resist running it...

Thankfully I have amassed *ALMOST* enough parts to do a reasonable restoration, I think. I need a backbone (for the car!)
Let me know your opinions and any suggestions.